How to Use ESP32-CYD-2.8: Examples, Pinouts, and Specs
Introduction
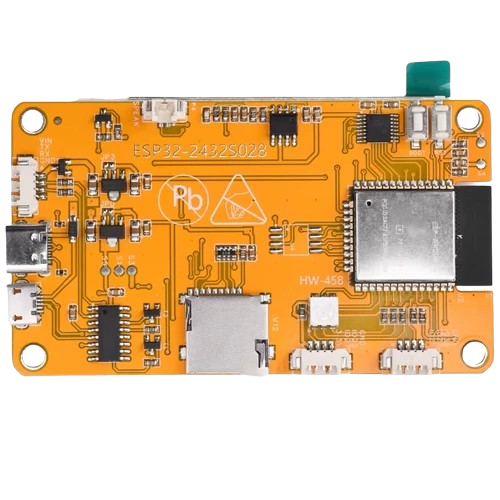
The ESP32-CYD-2.8 is a versatile development board that integrates the powerful ESP32 microcontroller with a 2.8-inch touchscreen display. This combination makes it an excellent choice for Internet of Things (IoT) applications, user interface (UI) projects, and other embedded systems requiring both connectivity and an interactive display. The ESP32-CYD-2.8 supports Wi-Fi and Bluetooth connectivity, making it ideal for smart home devices, industrial automation, and portable monitoring systems.
Explore Projects Built with ESP32-CYD-2.8

Explore Projects Built with ESP32-CYD-2.8
Technical Specifications
Key Technical Details
- Microcontroller: ESP32 dual-core processor
- Display: 2.8-inch TFT touchscreen (320x240 resolution)
- Connectivity: Wi-Fi 802.11 b/g/n, Bluetooth 4.2 (Classic and BLE)
- Operating Voltage: 3.3V
- Input Voltage Range: 5V (via USB) or 3.3V (via external power supply)
- Flash Memory: 4MB
- SRAM: 520KB
- GPIO Pins: 28 (including ADC, DAC, PWM, I2C, SPI, UART)
- Touchscreen Controller: XPT2046 (SPI interface)
- Dimensions: 85mm x 55mm
- Power Consumption: ~240mA (active), ~10mA (deep sleep)
Pin Configuration and Descriptions
The ESP32-CYD-2.8 features a variety of pins for interfacing with external components. Below is the pinout description:
| Pin Name | Type | Description |
|---|---|---|
| VIN | Power Input | Input voltage (5V) for powering the board via USB or external power supply. |
| GND | Ground | Ground connection. |
| 3V3 | Power Output | 3.3V output for powering external components. |
| GPIO0 | Digital I/O | General-purpose I/O pin, also used for boot mode selection. |
| GPIO2 | Digital I/O | General-purpose I/O pin. |
| GPIO4 | Digital I/O | General-purpose I/O pin, supports PWM and ADC. |
| GPIO12-19 | Digital I/O | General-purpose I/O pins, support SPI, I2C, UART, PWM, and ADC. |
| GPIO21 | Digital I/O | General-purpose I/O pin, often used for I2C SDA. |
| GPIO22 | Digital I/O | General-purpose I/O pin, often used for I2C SCL. |
| GPIO25-27 | Digital I/O | General-purpose I/O pins, support DAC and ADC. |
| T_CS | Digital I/O | Chip select pin for the touchscreen controller (XPT2046). |
| T_IRQ | Digital Input | Interrupt pin for the touchscreen controller. |
| T_CLK | Digital Output | Clock pin for the touchscreen controller (SPI interface). |
| T_MOSI | Digital Output | Data input pin for the touchscreen controller (SPI interface). |
| T_MISO | Digital Input | Data output pin for the touchscreen controller (SPI interface). |
Usage Instructions
How to Use the ESP32-CYD-2.8 in a Circuit
Powering the Board:
- Connect the board to a 5V USB power source or provide 3.3V to the VIN pin.
- Ensure the power supply can provide at least 500mA to avoid instability.
Connecting the Touchscreen:
- The touchscreen is pre-wired to the ESP32 via SPI. Use the T_CS, T_CLK, T_MOSI, and T_MISO pins for communication.
- The T_IRQ pin can be used to detect touch events.
Programming the ESP32:
- Use the Arduino IDE or ESP-IDF to program the ESP32.
- Install the necessary libraries for the touchscreen (e.g.,
TFT_eSPIandAdafruit_GFX).
Interfacing with Peripherals:
- Use the GPIO pins to connect sensors, actuators, or other devices.
- Configure the pins in your code according to the peripheral's requirements.
Important Considerations and Best Practices
- Voltage Levels: Ensure all connected peripherals operate at 3.3V logic levels to avoid damaging the ESP32.
- Touchscreen Calibration: Some applications may require touchscreen calibration for accurate input.
- Power Consumption: Use deep sleep mode to reduce power consumption in battery-powered applications.
- Heat Management: Avoid prolonged operation at high loads to prevent overheating.
Example Code for Arduino IDE
Below is an example of initializing the touchscreen and displaying text on the screen:
#include <TFT_eSPI.h>  // Include the TFT library
#include <SPI.h>       // Include the SPI library

TFT_eSPI tft = TFT_eSPI();  // Create TFT object

void setup() {
  tft.init();               // Initialize the display
  tft.setRotation(1);       // Set display orientation
  tft.fillScreen(TFT_BLACK); // Clear the screen with black color

  tft.setTextColor(TFT_WHITE, TFT_BLACK); // Set text color (white on black)
  tft.setTextSize(2);       // Set text size

  tft.setCursor(10, 10);    // Set cursor position
  tft.println("Hello, ESP32!"); // Print text to the screen
}

void loop() {
  // Add your code here for touchscreen interaction or other tasks
}
Troubleshooting and FAQs
Common Issues and Solutions
The touchscreen is not responding:
- Ensure the SPI connections (T_CS, T_CLK, T_MOSI, T_MISO) are properly configured in your code.
- Verify that the touchscreen library is installed and correctly initialized.
The display shows a blank screen:
- Check the power supply to ensure the board is receiving sufficient voltage.
- Verify that the display initialization code is correct.
Wi-Fi or Bluetooth is not working:
- Ensure the ESP32 firmware is up to date.
- Check that the correct Wi-Fi credentials or Bluetooth pairing settings are used.
The board overheats during operation:
- Reduce the workload by optimizing your code.
- Use a heatsink or improve ventilation around the board.
FAQs
Can I use the ESP32-CYD-2.8 with a battery?
Yes, you can power the board using a 3.7V LiPo battery with a suitable voltage regulator.What is the maximum resolution supported by the touchscreen?
The 2.8-inch TFT display supports a resolution of 320x240 pixels.Is the touchscreen multitouch capable?
No, the touchscreen supports single-touch input only.Can I use the ESP32-CYD-2.8 with other development environments?
Yes, the board is compatible with ESP-IDF, PlatformIO, and other ESP32-supported environments.