
How to Use DPS310: Examples, Pinouts, and Specs
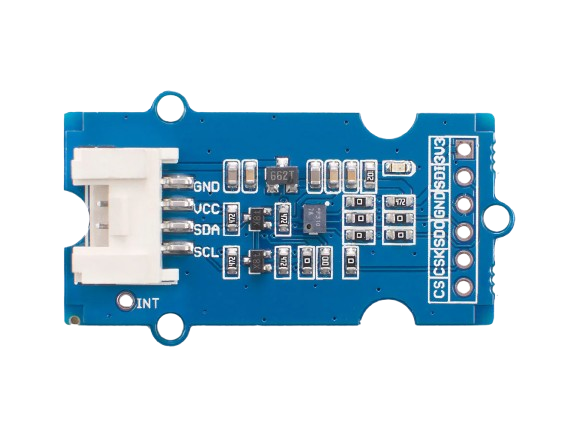
 Design with DPS310 in Cirkit Designer
Introduction
The DPS310 is a digital barometric pressure sensor that provides high-precision measurements of atmospheric pressure and temperature. It is designed to deliver accurate readings in a compact form factor, making it ideal for a wide range of applications. The sensor uses capacitive pressure sensing technology and includes an integrated temperature sensor for compensation, ensuring reliable performance across various environmental conditions.
Explore Projects Built with DPS310
 Open Project in Cirkit Designer
 Open Project in Cirkit Designer
 Open Project in Cirkit Designer
 Open Project in Cirkit Designer
Explore Projects Built with DPS310
Open Project in Cirkit DesignerOpen Project in Cirkit DesignerOpen Project in Cirkit DesignerOpen Project in Cirkit DesignerCommon Applications
- Weather monitoring systems
- Altitude measurement in drones and aviation
- Environmental sensing in IoT devices
- Indoor navigation and HVAC systems
- Wearable devices for fitness and health tracking
Technical Specifications
The DPS310 is a versatile sensor with the following key technical details:
| Parameter | Value |
|---|---|
| Operating Voltage | 1.7V to 3.6V |
| Pressure Measurement Range | 300 hPa to 1200 hPa |
| Pressure Resolution | 0.002 hPa |
| Temperature Measurement Range | -40°C to +85°C |
| Temperature Resolution | 0.01°C |
| Interface | I²C (up to 3.4 MHz) and SPI (up to 10 MHz) |
| Current Consumption | 1.7 µA (standby), 3.6 µA (low-power mode) |
| Package Size | 2.0 mm × 2.5 mm × 1.0 mm |
Pin Configuration and Descriptions
The DPS310 has 8 pins, as described in the table below:
| Pin Number | Pin Name | Description |
|---|---|---|
| 1 | GND | Ground |
| 2 | VDD | Supply voltage (1.7V to 3.6V) |
| 3 | SCL/SPC | I²C clock line / SPI clock input |
| 4 | SDA/SDI | I²C data line / SPI data input |
| 5 | CSB | Chip select for SPI (active low) |
| 6 | SDO | SPI data output |
| 7 | INT1 | Interrupt output 1 |
| 8 | INT2 | Interrupt output 2 |
Usage Instructions
How to Use the DPS310 in a Circuit
- Power Supply: Connect the VDD pin to a 1.7V–3.6V power source and the GND pin to ground.
- Communication Interface: Choose between I²C or SPI for communication:
- For I²C, connect the SCL and SDA pins to the corresponding lines on your microcontroller.
- For SPI, connect the SPC, SDI, SDO, and CSB pins to the appropriate SPI lines.
- Pull-Up Resistors: If using I²C, ensure pull-up resistors (typically 4.7 kΩ) are connected to the SCL and SDA lines.
- Interrupts: Optionally, connect INT1 and INT2 to monitor specific events like data-ready signals.
- Bypass Capacitor: Place a 100 nF capacitor close to the VDD pin for power supply decoupling.
Best Practices
- Use a stable power supply to minimize noise and ensure accurate readings.
- Avoid exposing the sensor to extreme environmental conditions beyond its specified range.
- Calibrate the sensor if precise measurements are required for critical applications.
- Use proper PCB layout techniques to minimize interference and noise.
Example: Connecting DPS310 to Arduino UNO
Below is an example of how to connect the DPS310 to an Arduino UNO using the I²C interface:
Wiring
| DPS310 Pin | Arduino UNO Pin |
|---|---|
| VDD | 3.3V |
| GND | GND |
| SCL | A5 (SCL) |
| SDA | A4 (SDA) |
Arduino Code
#include <Wire.h>
#include <Adafruit_Sensor.h>
#include <Adafruit_DPS310.h>

// Create an instance of the DPS310 sensor
Adafruit_DPS310 dps310;

void setup() {
  Serial.begin(9600);
  while (!Serial); // Wait for Serial Monitor to open

  // Initialize I²C communication
  if (!dps310.begin_I2C()) {
    Serial.println("Failed to find DPS310 sensor!");
    while (1); // Halt execution if sensor is not found
  }

  Serial.println("DPS310 sensor initialized successfully.");
}

void loop() {
  // Read pressure and temperature
  float pressure = dps310.readPressure(); // Pressure in hPa
  float temperature = dps310.readTemperature(); // Temperature in °C

  // Print the readings to the Serial Monitor
  Serial.print("Pressure: ");
  Serial.print(pressure);
  Serial.println(" hPa");

  Serial.print("Temperature: ");
  Serial.print(temperature);
  Serial.println(" °C");

  delay(1000); // Wait 1 second before the next reading
}
Troubleshooting and FAQs
Common Issues
Sensor Not Detected
- Cause: Incorrect wiring or communication interface selection.
- Solution: Double-check the connections and ensure the correct interface (I²C or SPI) is configured in the code.
Inaccurate Readings
- Cause: Environmental noise or improper calibration.
- Solution: Use a stable power supply, minimize noise sources, and perform calibration if necessary.
No Data Output
- Cause: Incorrect pull-up resistor configuration for I²C.
- Solution: Ensure pull-up resistors are connected to the SCL and SDA lines.
FAQs
Can the DPS310 operate at 5V?
- No, the DPS310 operates within a voltage range of 1.7V to 3.6V. Use a level shifter if interfacing with a 5V system.
What is the maximum altitude the DPS310 can measure?
- The sensor can measure up to approximately 9,000 meters above sea level, based on its pressure range.
How do I switch between I²C and SPI modes?
- The DPS310 automatically detects the communication protocol based on the connections. For I²C, leave the CSB pin unconnected or tied to VDD. For SPI, connect the CSB pin to the SPI chip select line.
By following this documentation, you can effectively integrate the DPS310 into your projects and achieve accurate pressure and temperature measurements.