How to Use Adafruit BrainCraft HAT: Examples, Pinouts, and Specs
Introduction
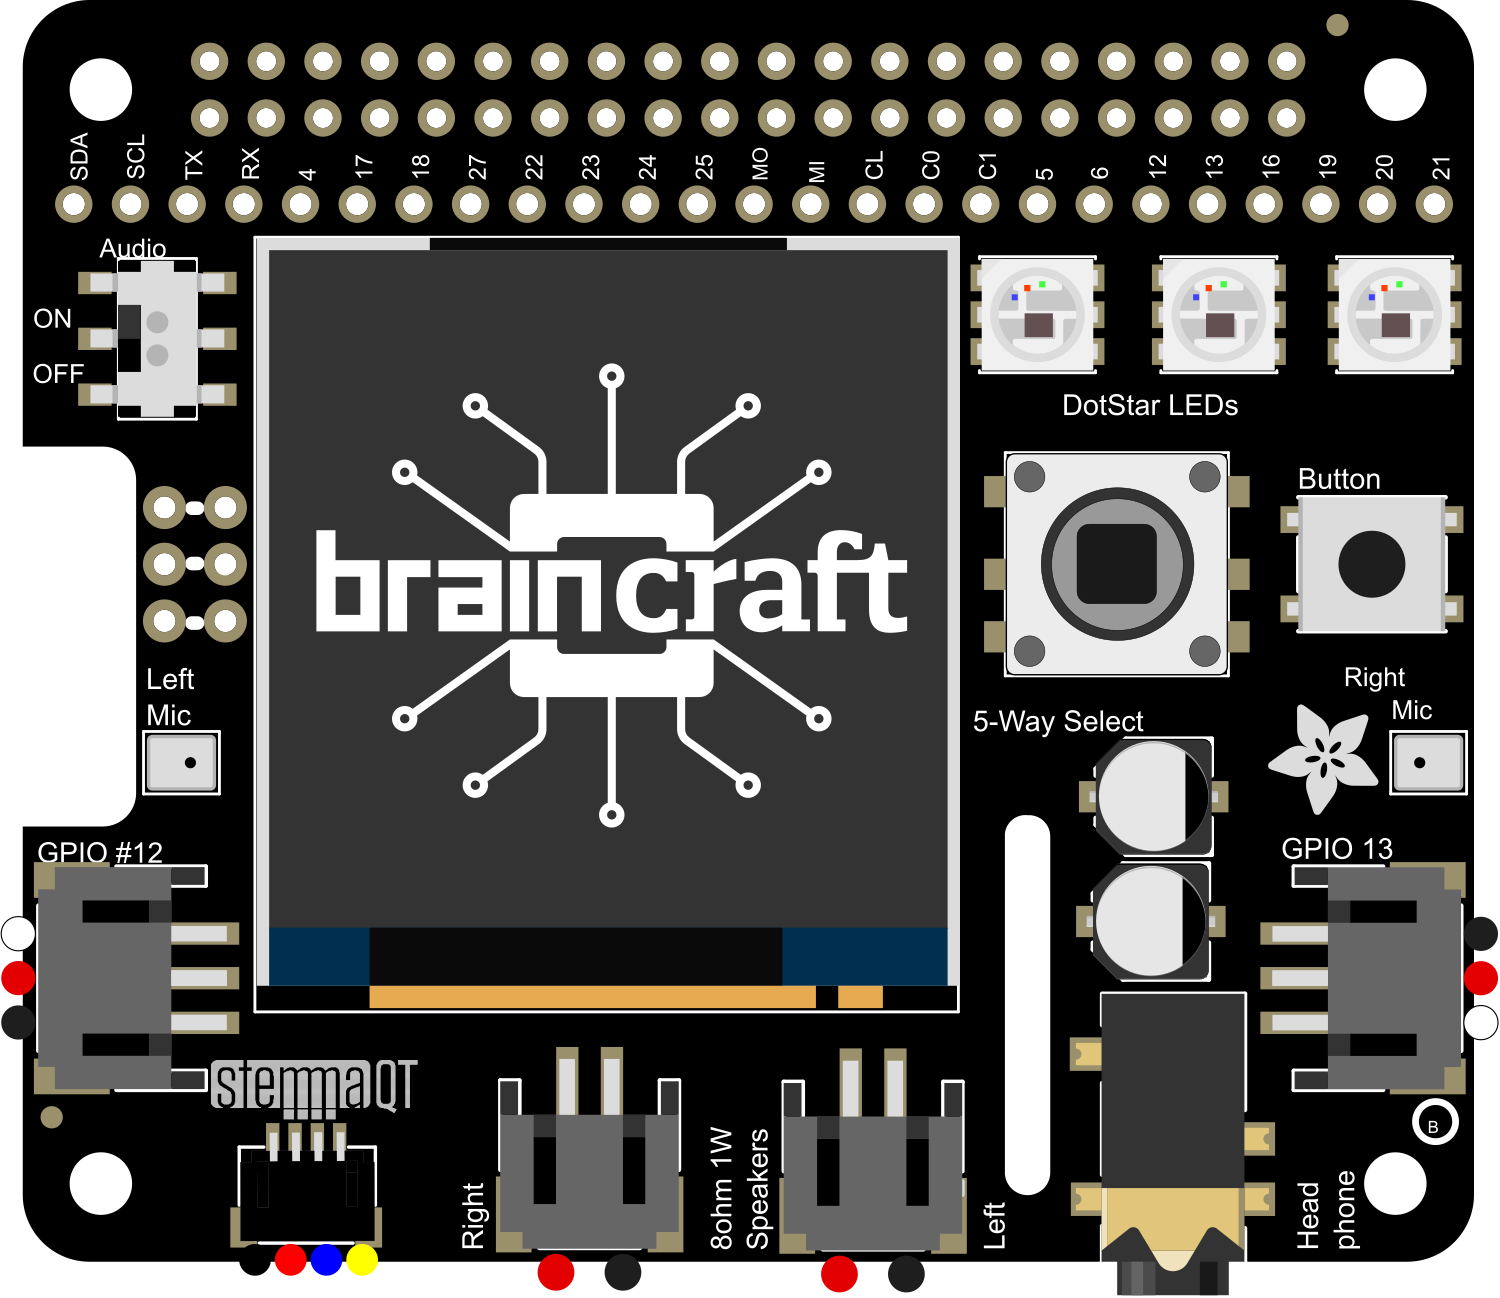
The Adafruit BrainCraft HAT is a powerful accessory designed for the Raspberry Pi, aimed at making machine learning projects easier and more accessible. It is particularly useful for applications involving audio and visual data processing. The HAT (Hardware Attached on Top) includes a range of built-in peripherals such as a microphone, speaker, and a neural network accelerator, which can be leveraged for projects like voice recognition, image classification, and more.
Explore Projects Built with Adafruit BrainCraft HAT


Explore Projects Built with Adafruit BrainCraft HAT
Technical Specifications
Key Features
- Stereo microphones for audio input
- 1.54" 240x240 IPS display for visual feedback
- Built-in speaker for audio output
- Google Edge TPU ML accelerator for efficient machine learning inference
- GPIO breakout for Raspberry Pi
- User-programmable buttons and LEDs
Power Ratings
- 5V via Raspberry Pi GPIO header
- Maximum 4A for Raspberry Pi and peripherals
Pin Configuration and Descriptions
| Pin Number | Function | Description |
|---|---|---|
| 1 | 3V3 | 3.3V power supply |
| 2 | 5V | 5V power supply |
| 3 | SDA1 | I2C SDA for display and sensors |
| 4 | 5V | 5V power supply |
| 5 | SCL1 | I2C SCL for display and sensors |
| 6 | GND | Ground |
| ... | ... | ... |
| 39 | GND | Ground |
| 40 | GPIO21 | GPIO for user interaction (buttons/LEDs) |
Note: This table is not exhaustive and only includes a selection of important pins related to the BrainCraft HAT's functionality.
Usage Instructions
Setting Up the BrainCraft HAT
Attach the HAT to the Raspberry Pi: Carefully align the 40-pin GPIO connector of the BrainCraft HAT with the corresponding pins on the Raspberry Pi and press down to connect.
Install Required Libraries: Run the following commands to install the necessary libraries and dependencies for the BrainCraft HAT:
sudo apt-get update
sudo apt-get install python3-pip
pip3 install adafruit-circuitpython-hat
Test Peripherals: Run example scripts provided by Adafruit to ensure that the display, microphones, and other peripherals are functioning correctly.
Programming for Machine Learning
To utilize the machine learning capabilities of the BrainCraft HAT, you can use TensorFlow Lite models with the Edge TPU accelerator. Here's a basic example of how to run an inference:
import tflite_runtime.interpreter as tflite
Load the TensorFlow Lite model and allocate tensors.
interpreter = tflite.Interpreter(model_path="your_model.tflite", experimental_delegates=[tflite.load_delegate('libedgetpu.so.1')]) interpreter.allocate_tensors()
Get input and output tensors.
input_details = interpreter.get_input_details() output_details = interpreter.get_output_details()
Prepare your input data.
input_data = ... # This should be your preprocessed input image or data
Perform the inference
interpreter.set_tensor(input_details[0]['index'], input_data) interpreter.invoke()
Get the results
output_data = interpreter.get_tensor(output_details[0]['index']) print(output_data)
Best Practices
- Always power off the Raspberry Pi before attaching or detaching the BrainCraft HAT.
- Ensure that the TensorFlow Lite models are compatible with the Edge TPU accelerator.
- Use the provided GPIO breakout to connect additional sensors or peripherals as needed.
Troubleshooting and FAQs
Common Issues
- Display not working: Ensure that the HAT is properly seated on the Raspberry Pi and that the I2C connections are correct.
- Poor audio quality: Check the microphone connections and ensure there is no obstruction near the microphones.
- Machine learning model not running: Verify that the model is Edge TPU compatible and that you have installed all the necessary libraries.
Solutions and Tips
- Double-check all connections and follow the setup instructions carefully.
- Use the
raspi-configtool to enable I2C and other interfaces required by the HAT. - Consult the Adafruit forums and GitHub repositories for community support and example code.
FAQs
Q: Can I use the BrainCraft HAT with other models of Raspberry Pi?
A: The BrainCraft HAT is designed for Raspberry Pi with a 40-pin GPIO header. It should be compatible with most models that have this configuration.
Q: Do I need to use a separate power supply for the HAT?
A: No, the BrainCraft HAT draws power from the Raspberry Pi's GPIO header. However, ensure that your Raspberry Pi power supply can handle the additional load.
Q: How do I update the firmware on the BrainCraft HAT?
A: Firmware updates are typically not required for the HAT. If an update is necessary, Adafruit will provide instructions on how to perform the update.
For further assistance, refer to the Adafruit BrainCraft HAT product page and the Adafruit Learning System for detailed tutorials and guides.