How to Use Grove shiel nano: Examples, Pinouts, and Specs
Introduction
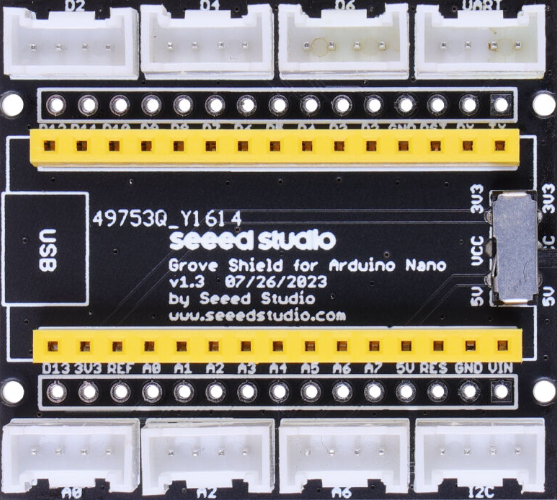
The Grove Shield Nano is an expansion board specifically designed for the Arduino Nano. It provides a standardized interface for connecting Grove modules, which include a wide range of sensors, actuators, and displays. By simplifying the wiring process, the Grove Shield Nano makes prototyping faster and more efficient, especially for beginners and hobbyists. Its compact design ensures compatibility with the Arduino Nano while maintaining ease of use.
Explore Projects Built with Grove shiel nano
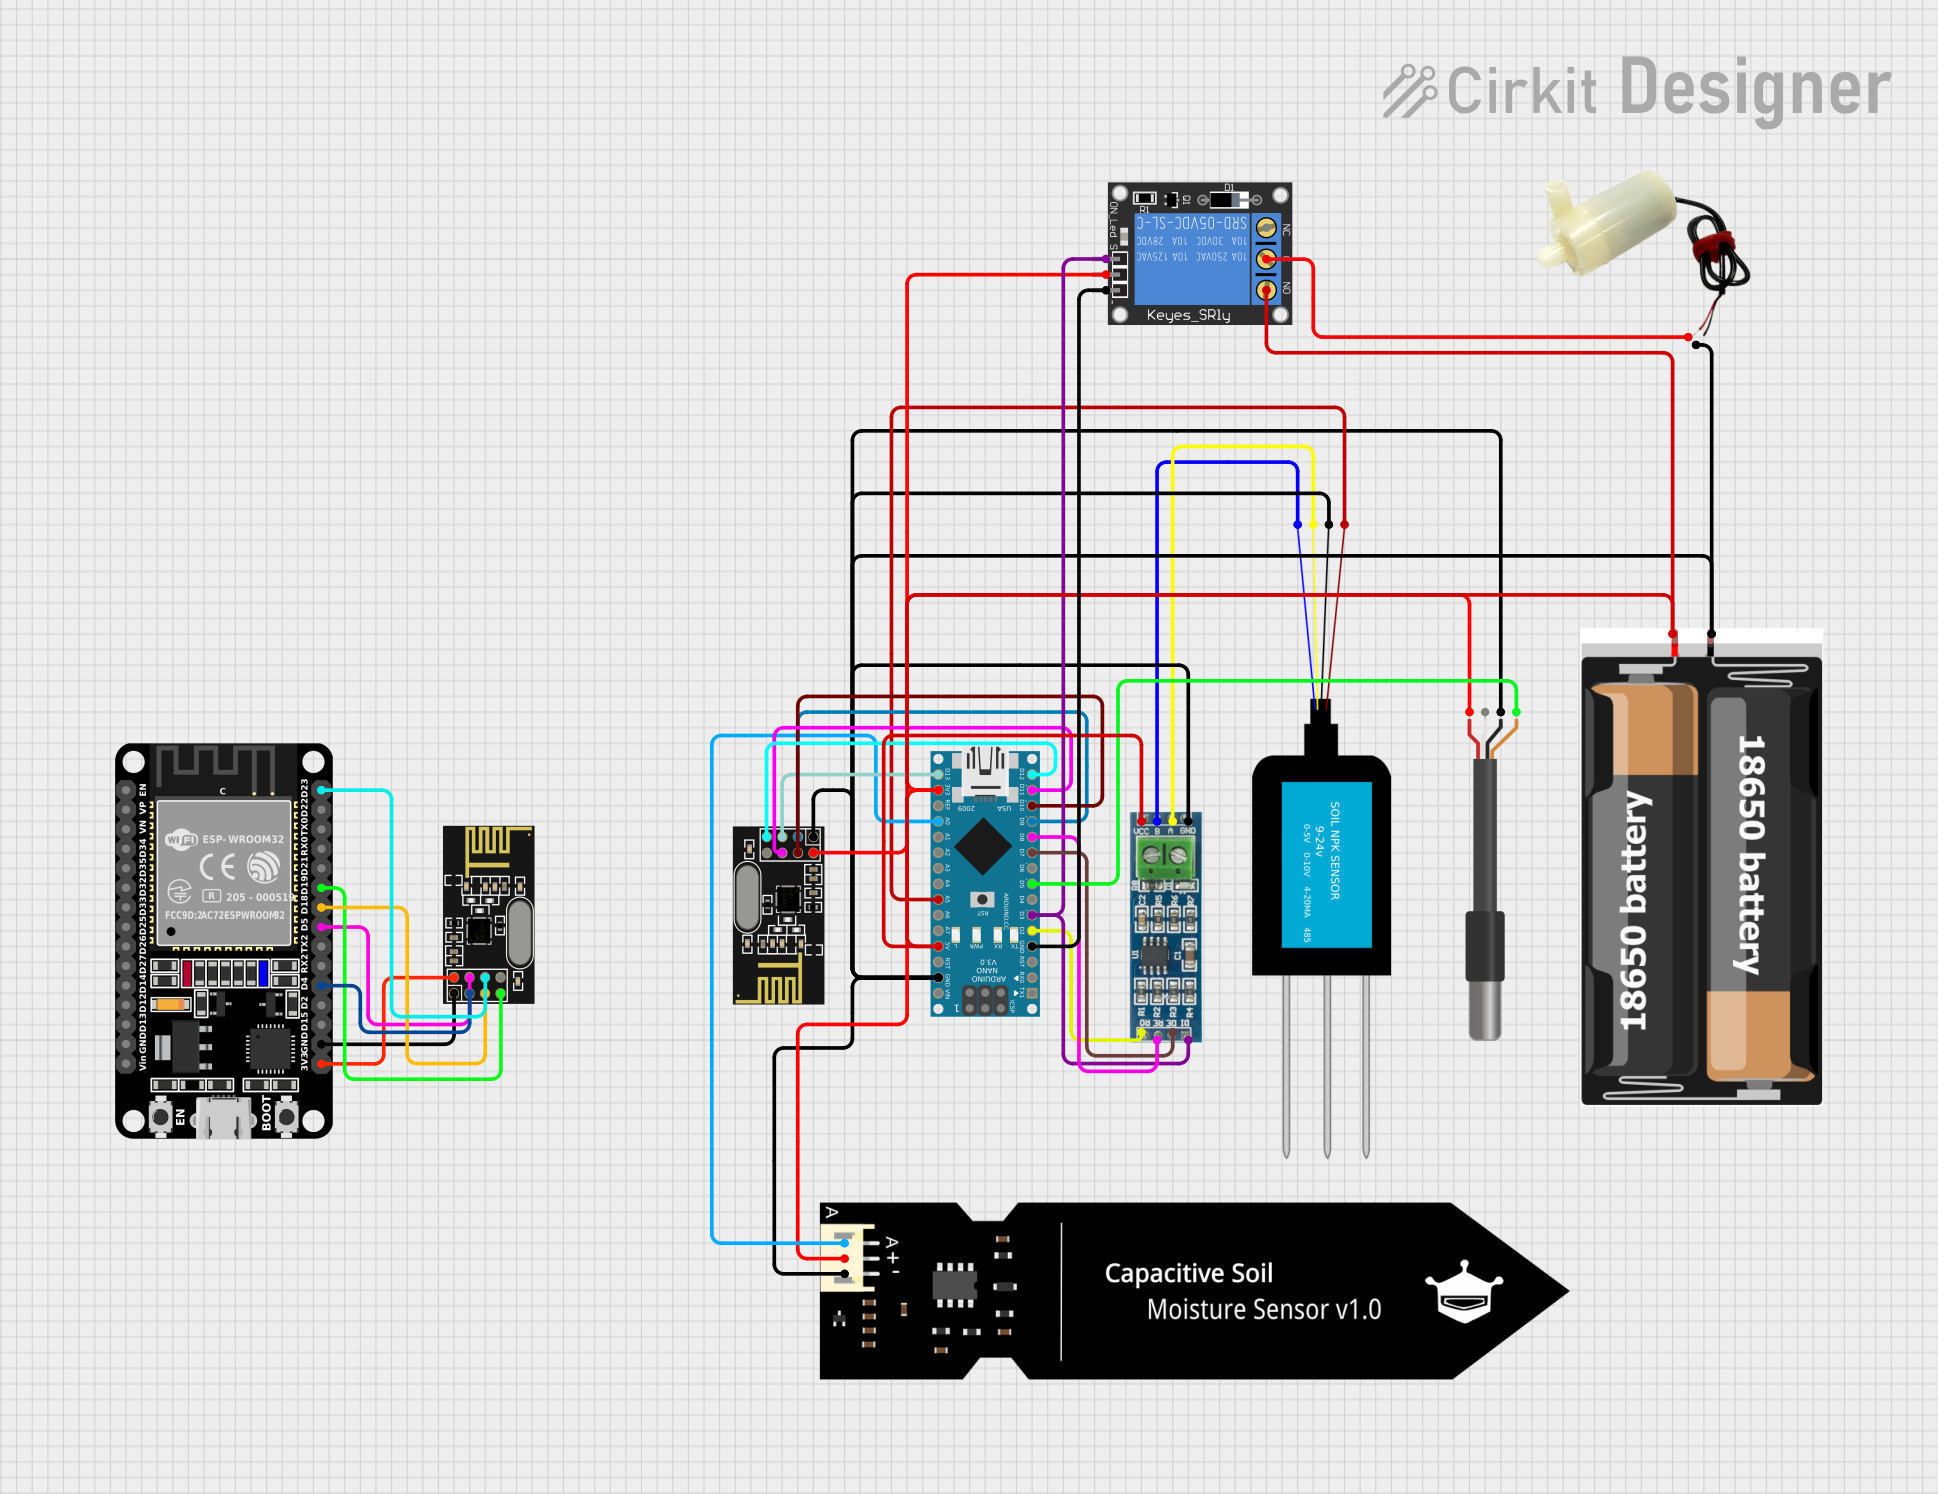
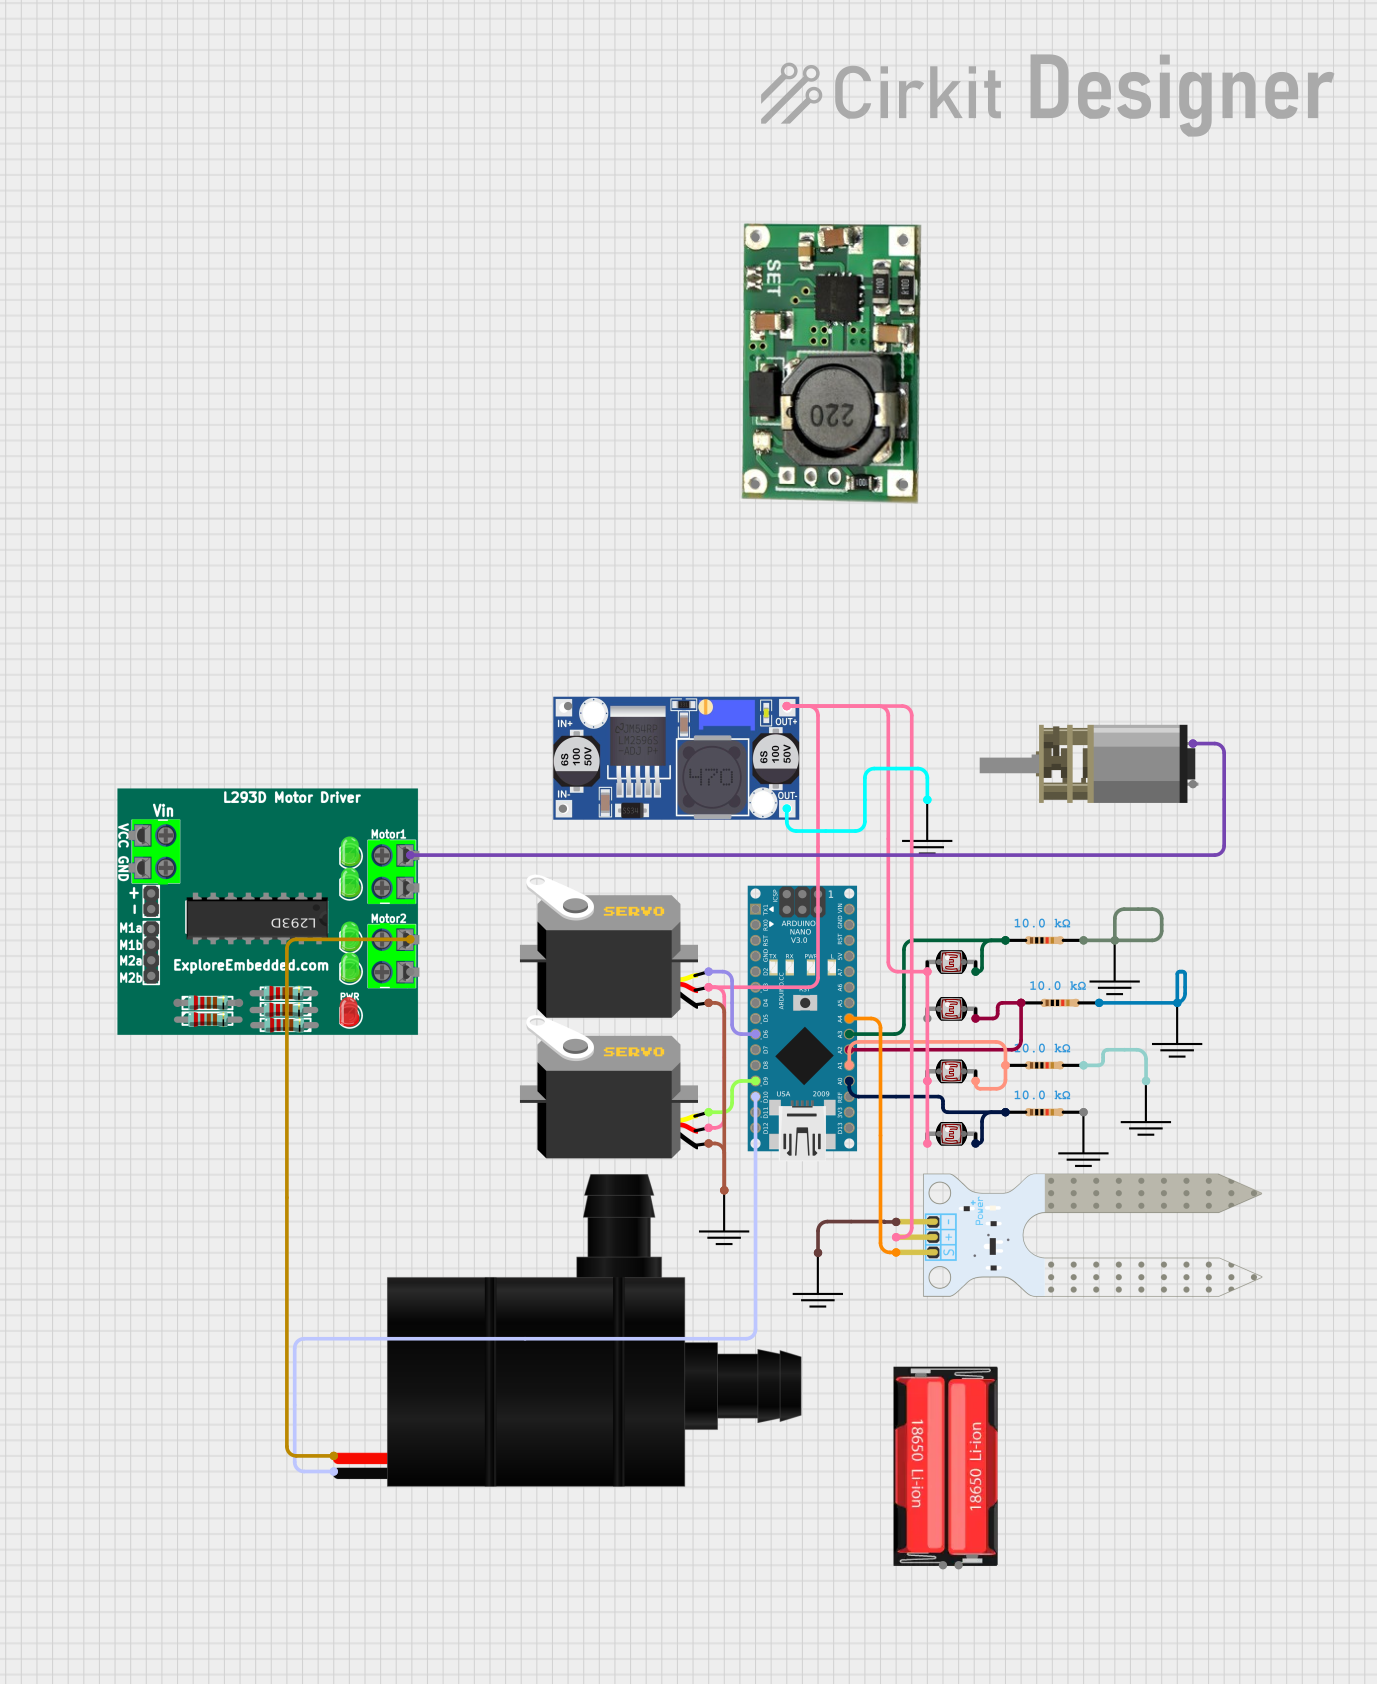
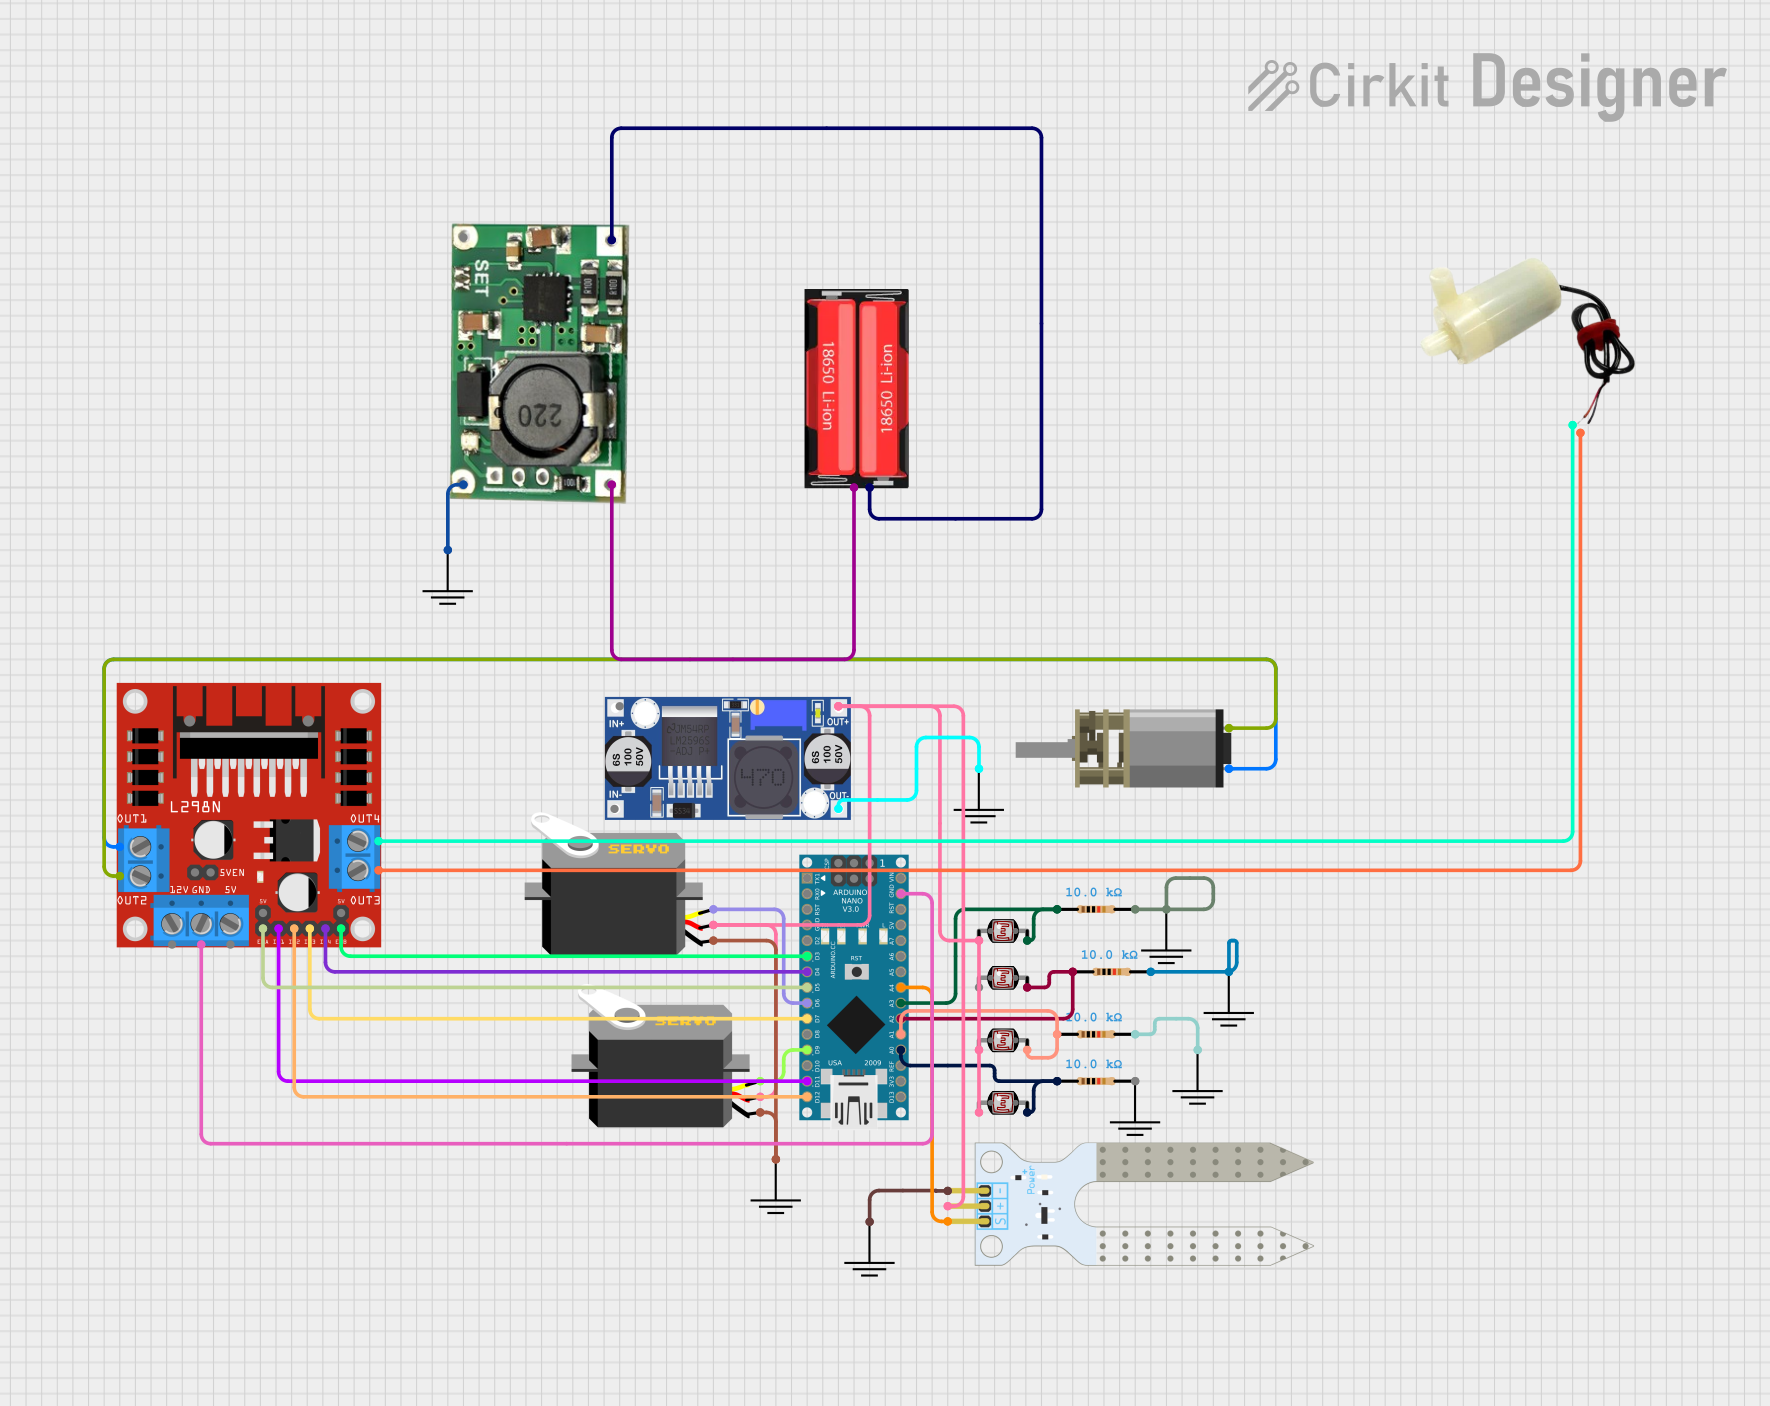
Explore Projects Built with Grove shiel nano
Common Applications and Use Cases
- Rapid prototyping of IoT devices
- Sensor integration for environmental monitoring
- Robotics and automation projects
- Educational projects for learning electronics and programming
- Smart home applications
Technical Specifications
The Grove Shield Nano is designed to work seamlessly with the Arduino Nano and Grove ecosystem. Below are its key technical details:
Key Specifications
| Parameter | Specification |
|---|---|
| Compatible Microcontroller | Arduino Nano (ATmega328P, ATmega168) |
| Operating Voltage | 5V (from Arduino Nano) |
| Grove Ports | 8 (4 Digital, 4 Analog) |
| Communication Interfaces | I2C, UART |
| Dimensions | 43mm x 18mm |
| Weight | ~5g |
Pin Configuration and Descriptions
The Grove Shield Nano provides the following pin configurations for connecting Grove modules:
| Pin Type | Description |
|---|---|
| Digital Ports | D2, D3, D4, D5 - For digital sensors/actuators |
| Analog Ports | A0, A1, A2, A3 - For analog sensors |
| I2C Port | SDA, SCL - For I2C communication modules |
| UART Port | RX, TX - For serial communication modules |
| Power Supply | 5V and GND - Power for connected Grove modules |
Usage Instructions
How to Use the Grove Shield Nano in a Circuit
Attach the Shield to the Arduino Nano:
- Align the pins of the Grove Shield Nano with the Arduino Nano and carefully insert it.
- Ensure the shield is securely connected to avoid loose connections.
Connect Grove Modules:
- Plug Grove modules into the appropriate ports (Digital, Analog, I2C, or UART) based on their functionality.
- Use the provided Grove cables for easy and secure connections.
Power the Arduino Nano:
- Supply power to the Arduino Nano via USB or an external power source. The shield will draw power from the Nano.
Write and Upload Code:
- Write the Arduino sketch to interact with the connected Grove modules.
- Upload the code to the Arduino Nano using the Arduino IDE.
Important Considerations and Best Practices
- Check Module Compatibility: Ensure the Grove module is compatible with the Arduino Nano and the Grove Shield Nano.
- Avoid Overloading: Do not connect modules that exceed the current or voltage limits of the Arduino Nano.
- Secure Connections: Double-check all connections to avoid loose cables or incorrect wiring.
- Use the Grove Library: Install the Grove library in the Arduino IDE for easier integration with Grove modules.
Example Code for Using a Grove Temperature Sensor
Below is an example of how to use a Grove Temperature Sensor connected to the A0 port of the Grove Shield Nano:
// Include the Grove library for sensor support
#include <Grove_Temperature_And_Humidity_Sensor.h>

// Define the analog pin where the temperature sensor is connected
#define TEMP_SENSOR_PIN A0

void setup() {
  // Initialize serial communication for debugging
  Serial.begin(9600);
  Serial.println("Grove Temperature Sensor Example");
}

void loop() {
  // Read the analog value from the temperature sensor
  int sensorValue = analogRead(TEMP_SENSOR_PIN);

  // Convert the analog value to a temperature in Celsius
  float voltage = sensorValue * (5.0 / 1023.0); // Convert to voltage
  float temperatureC = (voltage - 0.5) * 100.0; // Convert to Celsius

  // Print the temperature to the Serial Monitor
  Serial.print("Temperature: ");
  Serial.print(temperatureC);
  Serial.println(" °C");

  // Wait for 1 second before the next reading
  delay(1000);
}
Troubleshooting and FAQs
Common Issues and Solutions
The Grove module is not working:
- Solution: Check the connection to ensure the module is plugged into the correct port. Verify that the module is compatible with the Arduino Nano and the Grove Shield Nano.
No data is being read from the sensor:
- Solution: Ensure the correct pin is defined in the code. Double-check the wiring and confirm that the module is powered.
Arduino Nano is not powering the shield:
- Solution: Verify that the Arduino Nano is receiving power via USB or an external source. Check for loose connections between the Nano and the shield.
Error uploading code to the Arduino Nano:
- Solution: Ensure the correct board and port are selected in the Arduino IDE. Disconnect any modules connected to the RX/TX pins during code upload.
FAQs
Q: Can I use the Grove Shield Nano with other Arduino boards?
A: No, the Grove Shield Nano is specifically designed for the Arduino Nano. For other Arduino boards, consider using a compatible Grove shield.
Q: How many Grove modules can I connect at once?
A: You can connect up to 8 Grove modules simultaneously, depending on the available ports (4 Digital, 4 Analog). Additional modules may require multiplexers or I2C expanders.
Q: Do I need to solder anything to use the Grove Shield Nano?
A: No, the Grove Shield Nano is designed for plug-and-play use. No soldering is required.
Q: Can I use both I2C and UART modules at the same time?
A: Yes, the Grove Shield Nano supports simultaneous use of I2C and UART modules, as they operate on separate communication lines.
By following this documentation, you can effectively use the Grove Shield Nano to simplify your prototyping process and bring your projects to life!