How to Use Touchpad: Examples, Pinouts, and Specs
Introduction
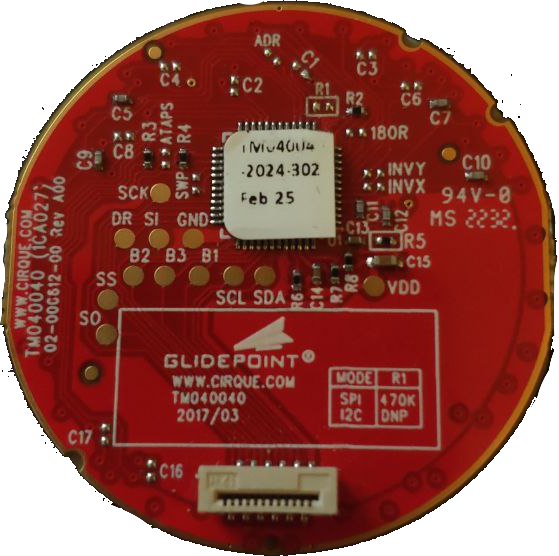
The Cirque Touchpad is a touch-sensitive input device designed to detect the position and movement of a user's finger. It enables precise control of a cursor on a screen, making it an essential component in modern user interfaces. This touchpad is widely used in laptops, embedded systems, and custom electronics projects where intuitive input is required.
Explore Projects Built with Touchpad


Explore Projects Built with Touchpad
Common Applications and Use Cases
- Laptop trackpads for cursor control
- Embedded systems requiring touch input
- Industrial control panels
- Custom human-machine interface (HMI) designs
- Gaming devices and kiosks
Technical Specifications
The Cirque Touchpad is a versatile component with the following key specifications:
| Parameter | Value |
|---|---|
| Operating Voltage | 3.3V or 5V |
| Communication Protocol | I2C, PS/2, or SPI |
| Active Area Size | Varies by model (e.g., 40mm x 30mm) |
| Resolution | Up to 1000 DPI |
| Multi-Touch Support | Yes (depending on the model) |
| Operating Temperature | -20°C to 70°C |
| Power Consumption | Low power (varies by usage) |
Pin Configuration and Descriptions
The Cirque Touchpad typically has the following pin configuration (specific models may vary):
| Pin | Name | Description |
|---|---|---|
| 1 | VCC | Power supply input (3.3V or 5V) |
| 2 | GND | Ground connection |
| 3 | SDA | I2C data line (or MOSI for SPI) |
| 4 | SCL | I2C clock line (or SCK for SPI) |
| 5 | INT | Interrupt output for touch detection |
| 6 | RST | Reset pin (optional, used to reset the touchpad) |
| 7 | PS/2_CLK | Clock line for PS/2 communication (if applicable) |
| 8 | PS/2_DATA | Data line for PS/2 communication (if applicable) |
Usage Instructions
How to Use the Touchpad in a Circuit
- Power Supply: Connect the VCC pin to a 3.3V or 5V power source and the GND pin to ground.
- Communication Protocol: Choose the desired communication protocol (I2C, SPI, or PS/2) and connect the corresponding pins to your microcontroller or host device.
- For I2C: Connect SDA and SCL to the microcontroller's I2C pins.
- For SPI: Connect MOSI, SCK, and optionally MISO (if supported).
- For PS/2: Connect PS/2_CLK and PS/2_DATA to the host device.
- Interrupt Pin: Use the INT pin to detect touch events. This pin can be connected to an interrupt-capable pin on your microcontroller.
- Reset Pin: Optionally, connect the RST pin to a GPIO pin on your microcontroller for manual or software resets.
Important Considerations and Best Practices
- Voltage Compatibility: Ensure the touchpad's operating voltage matches your system's voltage (3.3V or 5V).
- Pull-Up Resistors: For I2C communication, use appropriate pull-up resistors (typically 4.7kΩ) on the SDA and SCL lines.
- Debouncing: Implement software debouncing for the interrupt pin to avoid false triggers.
- ESD Protection: Add ESD protection components (e.g., TVS diodes) to protect the touchpad from electrostatic discharge.
- Mounting: Secure the touchpad in your device to prevent movement or damage during use.
Example Code for Arduino UNO (I2C Communication)
Below is an example of how to interface the Cirque Touchpad with an Arduino UNO using I2C:
#include <Wire.h> // Include the Wire library for I2C communication

#define TOUCHPAD_ADDR 0x2A // Replace with the touchpad's I2C address

void setup() {
  Wire.begin(); // Initialize I2C communication
  Serial.begin(9600); // Start serial communication for debugging

  // Optional: Reset the touchpad
  pinMode(7, OUTPUT); // Assuming RST is connected to pin 7
  digitalWrite(7, LOW);
  delay(10); // Hold reset low for 10ms
  digitalWrite(7, HIGH);

  Serial.println("Touchpad initialized.");
}

void loop() {
  Wire.beginTransmission(TOUCHPAD_ADDR); // Start communication with the touchpad
  Wire.write(0x00); // Request data (register address may vary by model)
  Wire.endTransmission();

  Wire.requestFrom(TOUCHPAD_ADDR, 4); // Request 4 bytes of data
  if (Wire.available() == 4) {
    int x = Wire.read(); // Read X-coordinate (low byte)
    x |= Wire.read() << 8; // Read X-coordinate (high byte)
    int y = Wire.read(); // Read Y-coordinate (low byte)
    y |= Wire.read() << 8; // Read Y-coordinate (high byte)

    Serial.print("X: ");
    Serial.print(x);
    Serial.print(", Y: ");
    Serial.println(y);
  }

  delay(100); // Delay to avoid overwhelming the serial monitor
}
Troubleshooting and FAQs
Common Issues and Solutions
No Response from the Touchpad
- Cause: Incorrect wiring or communication protocol mismatch.
- Solution: Double-check the wiring and ensure the correct protocol is selected.
Touchpad Not Detected on I2C Bus
- Cause: Missing pull-up resistors on SDA and SCL lines.
- Solution: Add 4.7kΩ pull-up resistors to the SDA and SCL lines.
Erratic Cursor Movement
- Cause: Electrical noise or improper grounding.
- Solution: Ensure proper grounding and use shielded cables if necessary.
Interrupt Pin Not Triggering
- Cause: Interrupt pin not connected or configured correctly.
- Solution: Verify the connection and configure the microcontroller's interrupt settings.
FAQs
Q: Can the touchpad detect multiple fingers?
A: Yes, some Cirque Touchpad models support multi-touch functionality. Refer to the specific model's datasheet for details.
Q: What is the maximum cable length for I2C communication?
A: The maximum length depends on the pull-up resistor values and the operating frequency. Typically, it is recommended to keep the cable length under 1 meter for reliable communication.
Q: Can I use the touchpad with a Raspberry Pi?
A: Yes, the touchpad can be interfaced with a Raspberry Pi using I2C, SPI, or PS/2 communication. Ensure the appropriate libraries and drivers are installed.
Q: How do I clean the touchpad surface?
A: Use a soft, lint-free cloth slightly dampened with water or isopropyl alcohol. Avoid using abrasive materials or harsh chemicals.