How to Use K80 Power Supply: Examples, Pinouts, and Specs
Introduction
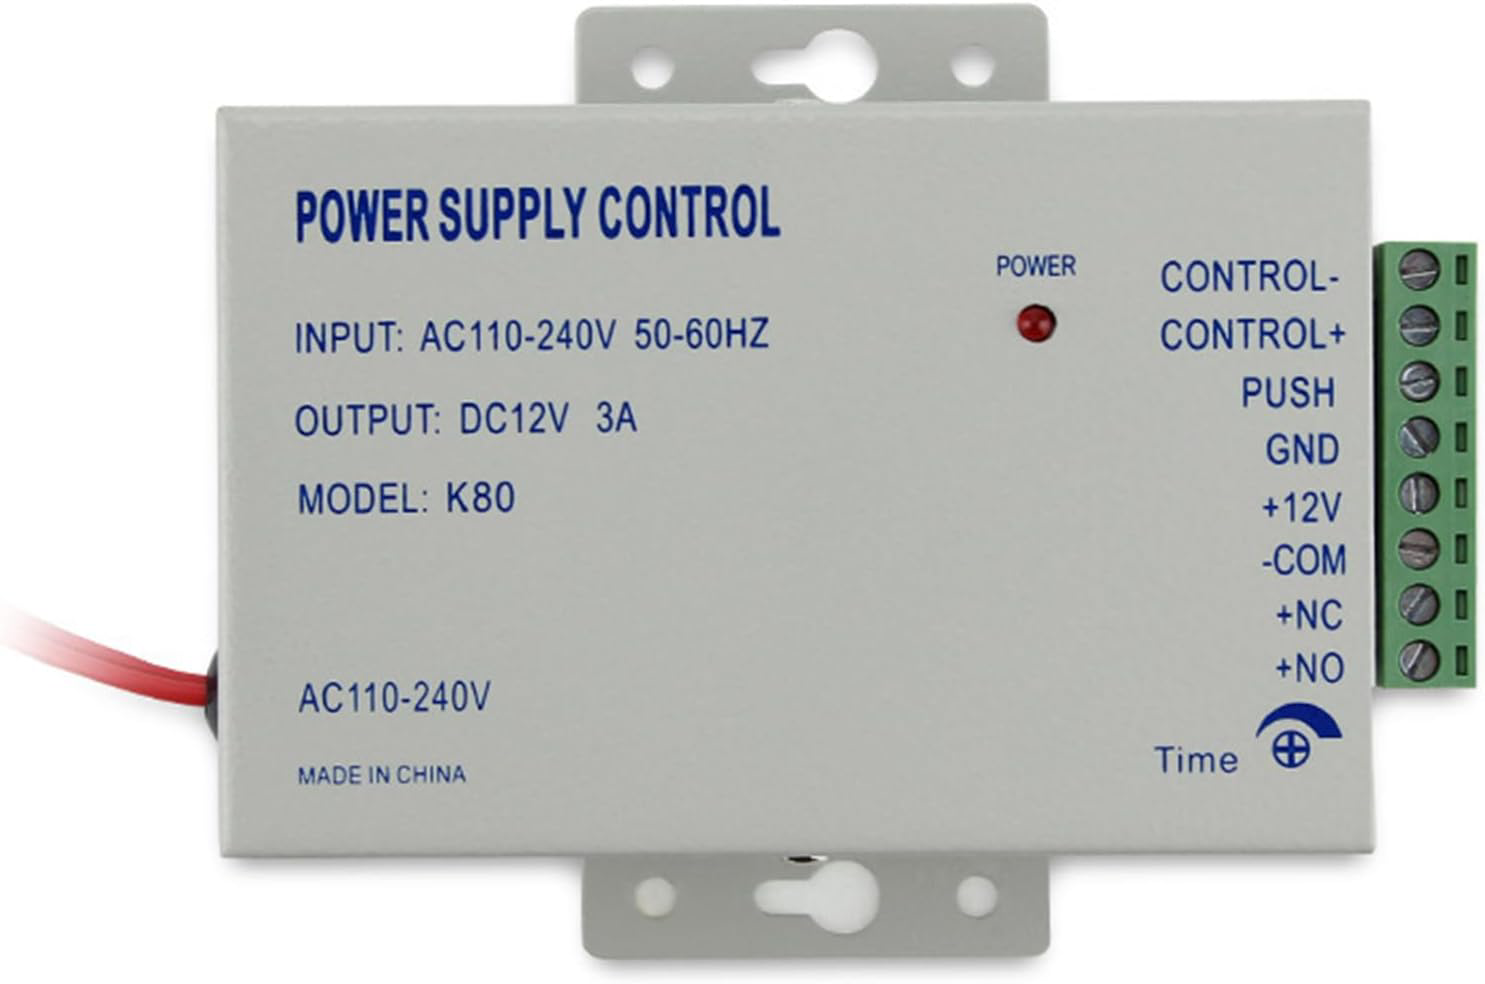
The K80 Power Supply by Navkar Systems (Part ID: BCFDK6) is a reliable and efficient power source designed to deliver stable voltage and current for a wide range of electronic circuits and devices. It is particularly suited for industrial, laboratory, and prototyping applications where precision and reliability are critical. The K80 Power Supply ensures minimal noise and fluctuation, making it ideal for sensitive electronic equipment.
Explore Projects Built with K80 Power Supply


Explore Projects Built with K80 Power Supply
Common Applications and Use Cases
- Powering industrial control systems
- Laboratory testing and prototyping
- Supplying power to microcontrollers and development boards
- Operating sensitive electronic devices requiring stable voltage
- Educational and research purposes in electronics labs
Technical Specifications
The following table outlines the key technical specifications of the K80 Power Supply:
| Parameter | Specification |
|---|---|
| Input Voltage | 100-240V AC, 50/60Hz |
| Output Voltage Range | 0-30V DC (adjustable) |
| Output Current Range | 0-5A DC (adjustable) |
| Ripple and Noise | ≤ 10mV RMS |
| Load Regulation | ≤ 0.01% + 2mV |
| Line Regulation | ≤ 0.01% + 2mV |
| Efficiency | ≥ 85% |
| Operating Temperature | 0°C to 40°C |
| Storage Temperature | -20°C to 70°C |
| Dimensions | 200mm x 150mm x 80mm |
| Weight | 1.5kg |
| Safety Features | Overvoltage, Overcurrent, Overheat Protection |
Pin Configuration and Descriptions
The K80 Power Supply features the following input and output connections:
| Pin/Port | Description |
|---|---|
| AC Input Port | Standard IEC 320 C14 connector for AC power input. |
| Positive Output (+) | Provides the positive DC voltage output. |
| Negative Output (-) | Provides the negative DC voltage output (ground). |
| Ground Terminal (GND) | Earth ground connection for safety. |
| Voltage Adjustment Knob | Adjusts the output voltage within the specified range. |
| Current Adjustment Knob | Adjusts the output current limit. |
| Display Panel | Digital display for voltage and current readings. |
Usage Instructions
How to Use the K80 Power Supply in a Circuit
- Connect the Power Supply to AC Input:
- Plug the AC input cable into the IEC 320 C14 connector and connect it to a standard wall outlet (100-240V AC).
- Set the Desired Voltage and Current:
- Use the voltage adjustment knob to set the required output voltage.
- Use the current adjustment knob to set the maximum allowable current.
- Connect the Load:
- Attach the positive and negative output terminals to the corresponding terminals of your circuit or device.
- Ensure proper polarity to avoid damage to the connected device.
- Power On the Supply:
- Turn on the power supply using the main power switch.
- Monitor the output voltage and current on the digital display to ensure proper operation.
- Adjust as Needed:
- Fine-tune the voltage and current settings as required for your application.
Important Considerations and Best Practices
- Always verify the voltage and current requirements of your load before connecting it to the power supply.
- Avoid short-circuiting the output terminals, as this may trigger the overcurrent protection.
- Ensure proper ventilation around the power supply to prevent overheating.
- Use the ground terminal for safety, especially in industrial or high-power applications.
- When powering sensitive devices like microcontrollers, ensure the ripple and noise levels are within acceptable limits.
Example: Using the K80 Power Supply with an Arduino UNO
To power an Arduino UNO using the K80 Power Supply:
- Set the output voltage to 5V DC.
- Connect the positive output terminal to the Arduino's VIN pin.
- Connect the negative output terminal to the Arduino's GND pin.
- Power on the supply and verify the Arduino is functioning correctly.
Here is an example Arduino code to blink an LED while powered by the K80 Power Supply:
// Blink an LED connected to pin 13
// Ensure the K80 Power Supply is set to 5V before powering the Arduino

void setup() {
  pinMode(13, OUTPUT); // Set pin 13 as an output pin
}

void loop() {
  digitalWrite(13, HIGH); // Turn the LED on
  delay(1000);            // Wait for 1 second
  digitalWrite(13, LOW);  // Turn the LED off
  delay(1000);            // Wait for 1 second
}
Troubleshooting and FAQs
Common Issues and Solutions
| Issue | Possible Cause | Solution |
|---|---|---|
| No output voltage | Power supply not turned on | Ensure the power switch is in the ON position. |
| Output voltage fluctuates | Load exceeds current limit | Increase the current limit or reduce the load. |
| Overheat protection triggered | Insufficient ventilation | Ensure proper airflow around the power supply. |
| Device not powering on | Incorrect voltage or polarity | Verify voltage and polarity settings. |
| Ripple/noise affecting sensitive devices | Poor grounding or interference | Use the ground terminal and shielded cables. |
FAQs
Can the K80 Power Supply be used for battery charging?
- Yes, but ensure the voltage and current settings match the battery's specifications.
What happens if I exceed the current limit?
- The power supply will activate overcurrent protection, limiting the output to prevent damage.
Is the K80 Power Supply suitable for outdoor use?
- No, it is designed for indoor use only. Protect it from moisture and extreme temperatures.
Can I connect multiple K80 Power Supplies in series or parallel?
- Yes, but ensure proper configuration and observe the combined voltage/current limits.
By following this documentation, users can safely and effectively utilize the K80 Power Supply for their electronic projects and applications.