
How to Use Tic T500: Examples, Pinouts, and Specs
 Design with Tic T500 in Cirkit Designer
Introduction
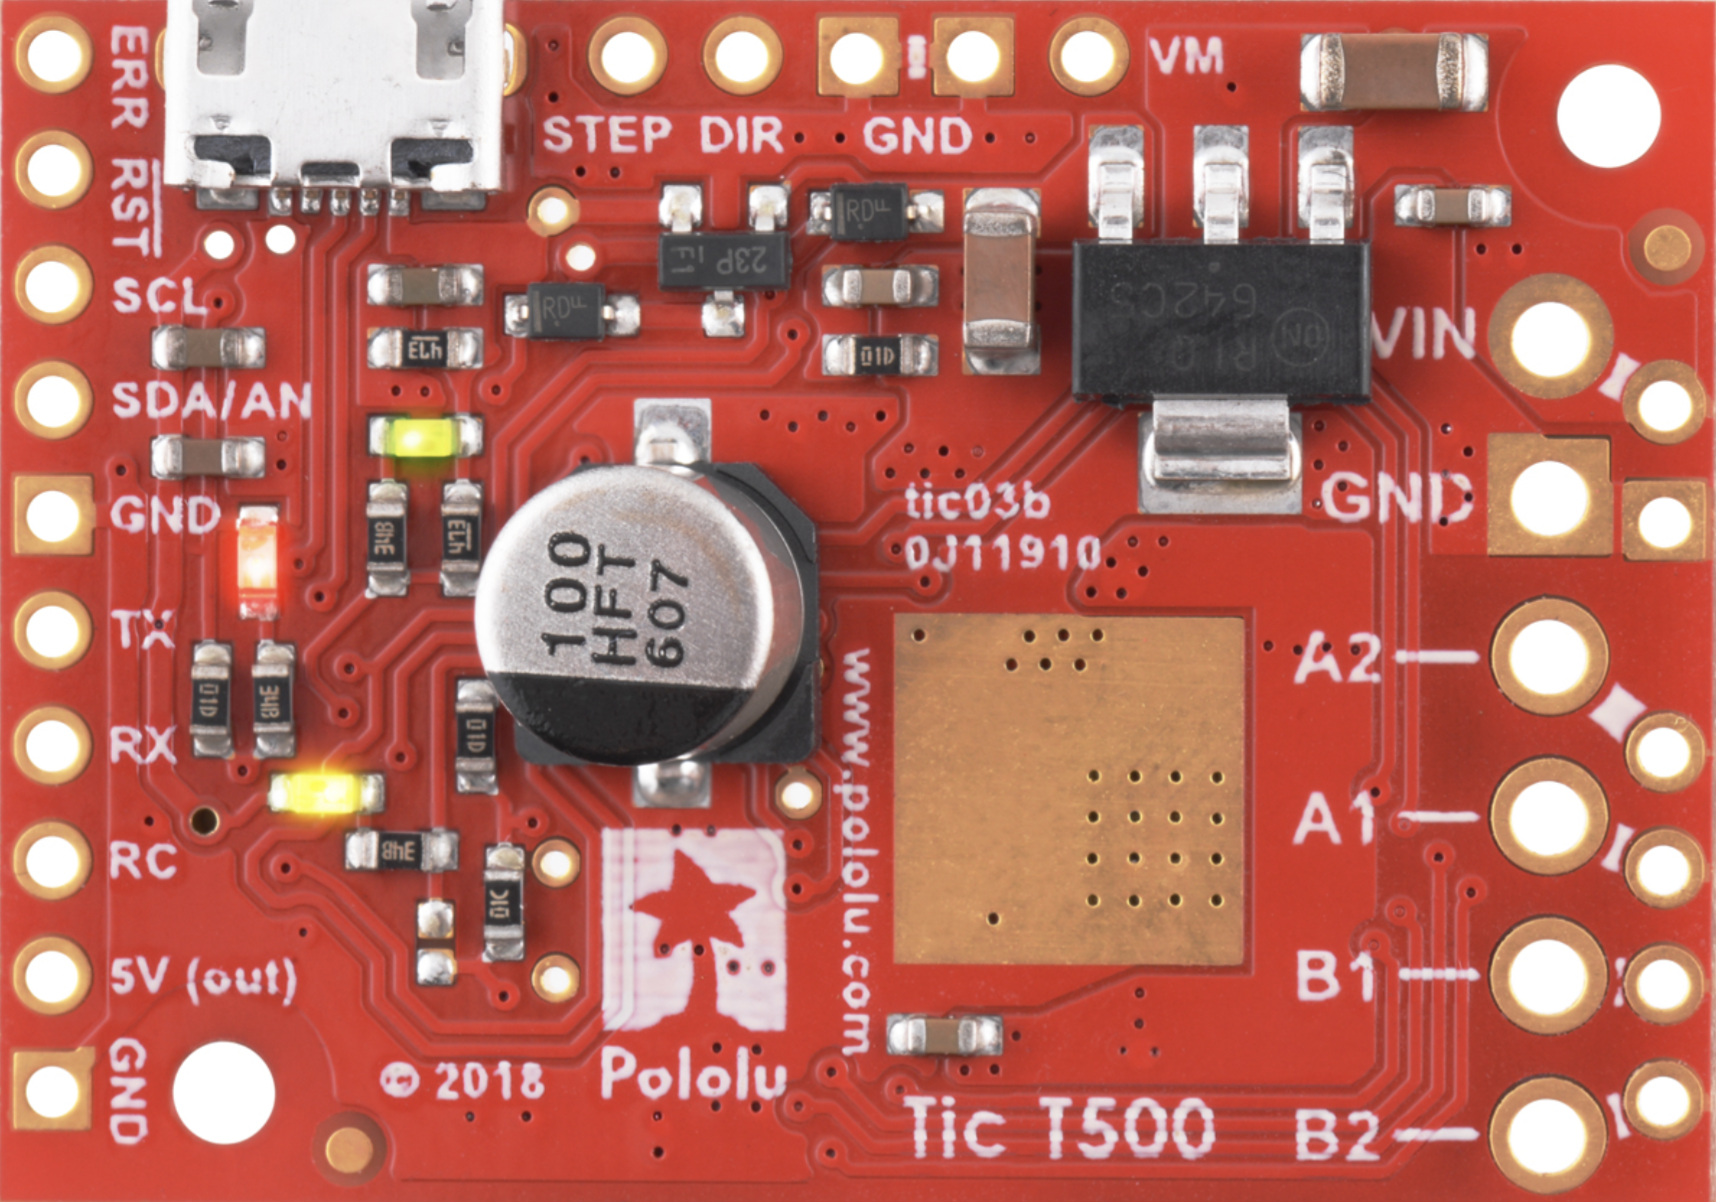
The Tic T500 by Pololu (Manufacturer Part ID: 3134) is a compact and versatile stepper motor controller designed for precise and efficient motor control. It supports a wide range of stepper motors and offers advanced features such as adjustable current limits, microstepping, and multiple control interfaces. The Tic T500 is ideal for robotics, automation, and other motion control applications where precision and reliability are critical.
Explore Projects Built with Tic T500
 Open Project in Cirkit Designer
 Open Project in Cirkit Designer
 Open Project in Cirkit Designer
 Open Project in Cirkit Designer
Explore Projects Built with Tic T500
Open Project in Cirkit DesignerOpen Project in Cirkit DesignerOpen Project in Cirkit DesignerOpen Project in Cirkit DesignerCommon Applications
- Robotics and automation systems
- CNC machines and 3D printers
- Camera sliders and gimbals
- Conveyor belts and industrial equipment
- Educational and hobbyist projects
Technical Specifications
The Tic T500 is designed to provide robust performance while maintaining ease of use. Below are its key technical details:
General Specifications
| Parameter | Value |
|---|---|
| Input Voltage Range | 4.5 V to 35 V |
| Maximum Continuous Current | 1.5 A per phase (without additional cooling) |
| Microstepping Modes | Full step, 1/2, 1/4, 1/8, 1/16, 1/32 |
| Control Interfaces | USB, TTL serial, I²C, RC, analog voltage |
| Operating Temperature | -40°C to +85°C |
| Dimensions | 42 mm × 20 mm × 7 mm |
Pin Configuration and Descriptions
The Tic T500 features a set of pins for power, motor connections, and control interfaces. Below is the pinout:
Power and Motor Connections
| Pin Name | Description |
|---|---|
| VIN | Power input (4.5 V to 35 V) |
| GND | Ground connection |
| A1, A2 | Stepper motor coil A connections |
| B1, B2 | Stepper motor coil B connections |
Control and Communication Pins
| Pin Name | Description |
|---|---|
| TX | TTL serial transmit pin |
| RX | TTL serial receive pin |
| SDA | I²C data line |
| SCL | I²C clock line |
| RC | RC signal input for speed or position control |
| AN | Analog voltage input for speed or position control |
| RST | Reset pin (active low) |
Usage Instructions
The Tic T500 can be used in a variety of configurations depending on the application. Below are the steps to get started and important considerations:
Step 1: Wiring the Tic T500
- Power Supply: Connect a DC power supply (4.5 V to 35 V) to the
VINandGNDpins. - Stepper Motor: Connect the stepper motor coils to the
A1,A2,B1, andB2pins. Ensure the wiring matches the motor's datasheet. - Control Interface: Choose a control method (e.g., USB, TTL serial, I²C) and connect the corresponding pins.
Step 2: Configuring the Tic T500
- Use the Pololu Tic Control Center software to configure the controller via USB. This software allows you to:
- Set the current limit for the motor.
- Select the microstepping mode.
- Configure the control interface and input settings.
Step 3: Controlling the Motor
- Depending on the selected control interface, send commands to the Tic T500 to control the motor's speed, position, or direction.
Example: Using Arduino UNO with TTL Serial
The Tic T500 can be controlled via TTL serial using an Arduino UNO. Below is an example code snippet:
#include <SoftwareSerial.h>

// Define the pins for software serial communication
SoftwareSerial ticSerial(10, 11); // RX, TX

// Define Tic T500 commands
const uint8_t SET_TARGET_POSITION = 0xE0;

void setup() {
  ticSerial.begin(9600); // Initialize serial communication with Tic T500
  delay(100); // Allow time for the Tic T500 to initialize
}

void loop() {
  // Example: Move the motor to position 2000
  sendCommand(SET_TARGET_POSITION, 2000);
  delay(1000); // Wait for 1 second
}

// Function to send a command to the Tic T500
void sendCommand(uint8_t command, int32_t value) {
  ticSerial.write(command); // Send the command byte
  ticSerial.write((uint8_t)(value & 0xFF)); // Send the least significant byte
  ticSerial.write((uint8_t)((value >> 8) & 0xFF)); // Send the next byte
  ticSerial.write((uint8_t)((value >> 16) & 0xFF)); // Send the next byte
  ticSerial.write((uint8_t)((value >> 24) & 0xFF)); // Send the most significant byte
}
Best Practices
- Ensure the power supply voltage matches the motor's requirements.
- Set the current limit to prevent overheating or damage to the motor.
- Use proper decoupling capacitors on the power supply to reduce noise.
- Avoid disconnecting the motor while the Tic T500 is powered.
Troubleshooting and FAQs
Common Issues
Motor Not Moving
- Cause: Incorrect wiring or insufficient power supply.
- Solution: Double-check the motor connections and ensure the power supply meets the voltage and current requirements.
Overheating
- Cause: Current limit set too high or inadequate cooling.
- Solution: Reduce the current limit in the Tic Control Center or add a heatsink.
Communication Failure
- Cause: Incorrect baud rate or wiring for the control interface.
- Solution: Verify the baud rate and ensure proper connections for the selected interface.
FAQs
Q: Can the Tic T500 control a unipolar stepper motor?
A: No, the Tic T500 is designed for bipolar stepper motors. Unipolar motors are not supported.
Q: What is the maximum step rate supported by the Tic T500?
A: The Tic T500 supports step rates up to 50,000 steps per second.
Q: Can I use the Tic T500 with a Raspberry Pi?
A: Yes, the Tic T500 can be controlled via USB or I²C from a Raspberry Pi.
Q: How do I reset the Tic T500 to factory settings?
A: Use the Pololu Tic Control Center software to restore the default settings.
By following this documentation, you can effectively integrate the Tic T500 into your projects and achieve precise stepper motor control.