Cirkit Designer Logo
Cirkit Designer
Your all-in-one circuit design IDE
Home / 
Component Documentation

How to Use ESP32-S3 N16R8: Examples, Pinouts, and Specs

Image of ESP32-S3 N16R8
Cirkit Designer LogoDesign with ESP32-S3 N16R8 in Cirkit Designer

Introduction

The ESP32-S3 N16R8 is a powerful microcontroller designed for advanced IoT applications and complex processing tasks. It features integrated Wi-Fi and Bluetooth connectivity, making it ideal for wireless communication in smart devices. With 16MB of flash memory and 8MB of RAM, the ESP32-S3 N16R8 is well-suited for applications requiring high processing power, such as AI, machine learning, and multimedia processing.

Explore Projects Built with ESP32-S3 N16R8

Use Cirkit Designer to design, explore, and prototype these projects online. Some projects support real-time simulation. Click "Open Project" to start designing instantly!
ESP32-S3 GPS and Wind Speed Logger with Dual OLED Displays and CAN Bus
Image of esp32-s3-ellipse: A project utilizing ESP32-S3 N16R8 in a practical application
This circuit features an ESP32-S3 microcontroller interfaced with an SD card module, two OLED displays, a GPS module, and a CAN bus module. The ESP32-S3 records GPS data to the SD card, displays speed on one OLED, and shows wind speed from the CAN bus on the other OLED, providing a comprehensive data logging and display system.
Cirkit Designer LogoOpen Project in Cirkit Designer
ESP32-S3 GPS Logger and Wind Speed Display with Dual OLED and CAN Bus
Image of Copy of esp32-s3-ellipse: A project utilizing ESP32-S3 N16R8 in a practical application
This circuit features an ESP32-S3 microcontroller interfaced with an SD card, two OLED displays, a GPS module, and a CAN bus module. It records GPS data to the SD card every second, displays speed in knots on one OLED display, and shows wind speed from the CAN bus in NMEA 2000 format on the other OLED display.
Cirkit Designer LogoOpen Project in Cirkit Designer
ESP32-S3 Based Environmental Monitoring and Control System with Data Logging
Image of ESP32: A project utilizing ESP32-S3 N16R8 in a practical application
This circuit features an ESP32-S3 microcontroller interfaced with various sensors and modules, including a DHT22 temperature and humidity sensor, an HC-SR04 ultrasonic sensor, an SGP41 VOC and NOx sensor, and an Adafruit INA260 current and power sensor. The ESP32-S3 also controls a DC motor via a relay and communicates with an SD card and an OLED display. An Arduino UNO is used to read inputs from a rotary encoder, and a step-down buck converter is used to regulate voltage from a 12V battery to power the components.
Cirkit Designer LogoOpen Project in Cirkit Designer
ESP32-Based GPS Tracker with SD Card Logging and Barometric Sensor
Image of gps projekt circuit: A project utilizing ESP32-S3 N16R8 in a practical application
This circuit features an ESP32 Wroom Dev Kit as the main microcontroller, interfaced with an MPL3115A2 sensor for pressure and temperature readings, and a Neo 6M GPS module for location tracking. The ESP32 is also connected to an SD card reader for data logging purposes. A voltage regulator is used to step down the USB power supply to 3.3V, which powers the ESP32, the sensor, and the SD card reader.
Cirkit Designer LogoOpen Project in Cirkit Designer

Explore Projects Built with ESP32-S3 N16R8

Use Cirkit Designer to design, explore, and prototype these projects online. Some projects support real-time simulation. Click "Open Project" to start designing instantly!
Image of esp32-s3-ellipse: A project utilizing ESP32-S3 N16R8 in a practical application
ESP32-S3 GPS and Wind Speed Logger with Dual OLED Displays and CAN Bus
This circuit features an ESP32-S3 microcontroller interfaced with an SD card module, two OLED displays, a GPS module, and a CAN bus module. The ESP32-S3 records GPS data to the SD card, displays speed on one OLED, and shows wind speed from the CAN bus on the other OLED, providing a comprehensive data logging and display system.
Cirkit Designer LogoOpen Project in Cirkit Designer
Image of Copy of esp32-s3-ellipse: A project utilizing ESP32-S3 N16R8 in a practical application
ESP32-S3 GPS Logger and Wind Speed Display with Dual OLED and CAN Bus
This circuit features an ESP32-S3 microcontroller interfaced with an SD card, two OLED displays, a GPS module, and a CAN bus module. It records GPS data to the SD card every second, displays speed in knots on one OLED display, and shows wind speed from the CAN bus in NMEA 2000 format on the other OLED display.
Cirkit Designer LogoOpen Project in Cirkit Designer
Image of ESP32: A project utilizing ESP32-S3 N16R8 in a practical application
ESP32-S3 Based Environmental Monitoring and Control System with Data Logging
This circuit features an ESP32-S3 microcontroller interfaced with various sensors and modules, including a DHT22 temperature and humidity sensor, an HC-SR04 ultrasonic sensor, an SGP41 VOC and NOx sensor, and an Adafruit INA260 current and power sensor. The ESP32-S3 also controls a DC motor via a relay and communicates with an SD card and an OLED display. An Arduino UNO is used to read inputs from a rotary encoder, and a step-down buck converter is used to regulate voltage from a 12V battery to power the components.
Cirkit Designer LogoOpen Project in Cirkit Designer
Image of gps projekt circuit: A project utilizing ESP32-S3 N16R8 in a practical application
ESP32-Based GPS Tracker with SD Card Logging and Barometric Sensor
This circuit features an ESP32 Wroom Dev Kit as the main microcontroller, interfaced with an MPL3115A2 sensor for pressure and temperature readings, and a Neo 6M GPS module for location tracking. The ESP32 is also connected to an SD card reader for data logging purposes. A voltage regulator is used to step down the USB power supply to 3.3V, which powers the ESP32, the sensor, and the SD card reader.
Cirkit Designer LogoOpen Project in Cirkit Designer

Common Applications and Use Cases

  • IoT devices and smart home automation
  • Wearable technology
  • AI and machine learning applications
  • Multimedia streaming and processing
  • Industrial automation and control systems
  • Wireless communication hubs

Technical Specifications

The ESP32-S3 N16R8 is packed with advanced features and capabilities. Below are its key technical specifications:

General Specifications

Feature Specification
Processor Dual-core Xtensa LX7 @ 240 MHz
Flash Memory 16MB
RAM 8MB
Wireless Connectivity Wi-Fi 802.11 b/g/n, Bluetooth 5.0
Operating Voltage 3.0V to 3.6V
GPIO Pins 45
ADC Channels 20
Communication Interfaces UART, SPI, I2C, I2S, CAN, Ethernet
Power Consumption Ultra-low power in deep sleep mode

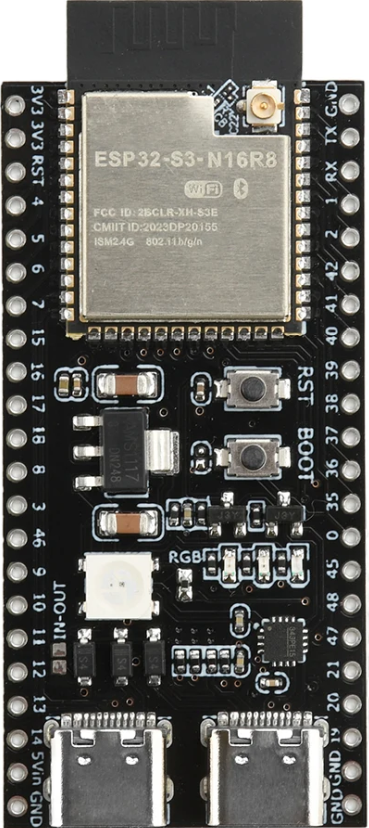
Pin Configuration and Descriptions

The ESP32-S3 N16R8 has a versatile pinout. Below is a summary of its key pins:

Pin Name Type Description
GPIO0 Input/Output General-purpose I/O, can be used for boot mode selection
GPIO1 Input/Output General-purpose I/O, UART TXD (default)
GPIO2 Input/Output General-purpose I/O, ADC2 channel
GPIO3 Input/Output General-purpose I/O, UART RXD (default)
GPIO4 Input/Output General-purpose I/O, ADC2 channel
GPIO21 Input/Output General-purpose I/O, I2C SDA (default)
GPIO22 Input/Output General-purpose I/O, I2C SCL (default)
EN Power Enable pin, active high to enable the chip
3V3 Power 3.3V power supply input
GND Power Ground connection

For a complete pinout, refer to the official ESP32-S3 datasheet.

Usage Instructions

The ESP32-S3 N16R8 is highly versatile and can be used in a variety of applications. Below are the steps to get started with this microcontroller:

Basic Setup

  1. Power the ESP32-S3 N16R8: Connect the 3.3V and GND pins to a stable power source.
  2. Connect to a Computer: Use a USB-to-serial adapter to connect the ESP32-S3 to your computer for programming.
  3. Install Development Tools:
    • Download and install the Arduino IDE or ESP-IDF (Espressif IoT Development Framework).
    • Add the ESP32 board package to the Arduino IDE via the Board Manager.

Example: Blinking an LED

The following example demonstrates how to blink an LED connected to GPIO2 using the Arduino IDE:

// Define the GPIO pin where the LED is connected
#define LED_PIN 2

void setup() {
  // Initialize the LED pin as an output
  pinMode(LED_PIN, OUTPUT);
}

void loop() {
  // Turn the LED on
  digitalWrite(LED_PIN, HIGH);
  delay(1000); // Wait for 1 second

  // Turn the LED off
  digitalWrite(LED_PIN, LOW);
  delay(1000); // Wait for 1 second
}

Important Considerations

  • Power Supply: Ensure a stable 3.3V power supply to avoid damaging the chip.
  • Boot Mode: To enter bootloader mode, hold the BOOT button while pressing the EN button.
  • GPIO Voltage Levels: GPIO pins are not 5V tolerant. Use level shifters if interfacing with 5V devices.
  • Antenna Placement: For optimal wireless performance, ensure the onboard antenna is not obstructed by metal objects.

Troubleshooting and FAQs

Common Issues

  1. ESP32-S3 Not Detected by Computer:

    • Ensure the USB-to-serial adapter drivers are installed.
    • Check the USB cable for data transfer capability (some cables are power-only).
  2. Program Upload Fails:

    • Verify the correct COM port is selected in the Arduino IDE.
    • Ensure the ESP32-S3 is in bootloader mode by holding the BOOT button during upload.
  3. Wi-Fi Connection Issues:

    • Double-check the SSID and password in your code.
    • Ensure the ESP32-S3 is within range of the Wi-Fi router.
  4. Overheating:

    • Check for excessive current draw from peripherals.
    • Ensure proper ventilation around the ESP32-S3.

FAQs

Q: Can the ESP32-S3 N16R8 run AI models?
A: Yes, the ESP32-S3 supports AI and machine learning applications, thanks to its powerful dual-core processor and ample RAM.

Q: How do I reset the ESP32-S3?
A: Press the EN button to reset the microcontroller.

Q: Is the ESP32-S3 compatible with Arduino libraries?
A: Yes, the ESP32-S3 is compatible with most Arduino libraries, but some may require modifications for optimal performance.

Q: Can I use the ESP32-S3 with a 5V power supply?
A: No, the ESP32-S3 operates at 3.3V. Use a voltage regulator if your power source is 5V.

By following this documentation, you can effectively utilize the ESP32-S3 N16R8 for your projects. For more advanced features, refer to the official Espressif documentation.