
How to Use BT 136: Examples, Pinouts, and Specs
 Design with BT 136 in Cirkit Designer
Introduction
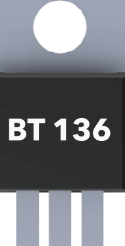
The BT 136 is a bidirectional thyristor, commonly referred to as a TRIAC (Triode for Alternating Current). It is designed for controlling power in AC circuits by switching on and off. This component is widely used in applications such as light dimmers, motor speed controllers, and AC power control systems. Its ability to handle high voltages and currents makes it a versatile choice for various industrial and consumer electronics.
Explore Projects Built with BT 136
 Open Project in Cirkit Designer
 Open Project in Cirkit Designer
 Open Project in Cirkit Designer
 Open Project in Cirkit Designer
Explore Projects Built with BT 136

 Open Project in Cirkit Designer
 Open Project in Cirkit Designer
 Open Project in Cirkit Designer
 Open Project in Cirkit Designer
Technical Specifications
The BT 136 is a robust and reliable TRIAC with the following key specifications:
| Parameter | Value |
|---|---|
| Maximum Repetitive Voltage (VDRM) | 600V |
| Maximum RMS On-State Current (IT(RMS)) | 4A |
| Peak Non-Repetitive Surge Current (ITSM) | 25A (for 20ms half-sine wave) |
| Gate Trigger Voltage (VGT) | 1.5V (typical) |
| Gate Trigger Current (IGT) | 5mA (typical) |
| Holding Current (IH) | 2mA (typical) |
| Operating Temperature Range | -40°C to +125°C |
| Package Type | TO-220 |
Pin Configuration and Descriptions
The BT 136 has three pins, as described below:
| Pin Number | Pin Name | Description |
|---|---|---|
| 1 | MT1 (Main Terminal 1) | Connected to one side of the AC load. |
| 2 | MT2 (Main Terminal 2) | Connected to the other side of the AC load. |
| 3 | Gate (G) | Trigger input to control the TRIAC's operation. |
Usage Instructions
The BT 136 is typically used in AC circuits for power control. Below are the steps and considerations for using this component effectively:
How to Use the BT 136 in a Circuit
Circuit Design:
- Connect the AC load between MT2 and the AC supply.
- Connect MT1 to the neutral or the other side of the AC supply.
- Use a resistor to limit the current to the Gate pin. A typical value is 330Ω to 1kΩ, depending on the control circuit.
- Trigger the Gate pin using a control signal (e.g., from a microcontroller or a manual switch).
Gate Triggering:
- Apply a small current to the Gate pin to turn the TRIAC on.
- Once triggered, the TRIAC remains on until the AC current crosses zero (zero-crossing point).
Snubber Circuit:
- For inductive loads (e.g., motors), include a snubber circuit (a resistor and capacitor in series) across MT1 and MT2 to prevent false triggering due to voltage spikes.
Example: Controlling a Lamp with an Arduino UNO
Below is an example of how to use the BT 136 to control an AC lamp with an Arduino UNO:
Circuit Diagram
- Connect the AC lamp in series with MT2 and the AC supply.
- Connect MT1 to the neutral line.
- Use a 330Ω resistor between the Arduino digital pin and the Gate pin of the BT 136.
Arduino Code
// Example code to control a lamp using BT 136 and Arduino UNO
// Ensure proper isolation between the AC circuit and Arduino using an optocoupler.

const int gatePin = 9; // Pin connected to the Gate of BT 136

void setup() {
  pinMode(gatePin, OUTPUT); // Set the gate pin as an output
}

void loop() {
  digitalWrite(gatePin, HIGH); // Trigger the TRIAC to turn on the lamp
  delay(1000);                 // Keep the lamp on for 1 second
  digitalWrite(gatePin, LOW);  // Turn off the TRIAC (lamp will turn off at zero-crossing)
  delay(1000);                 // Wait for 1 second before turning it on again
}
Important Considerations and Best Practices
- Isolation: Always use an optocoupler or similar isolation device when interfacing the BT 136 with a microcontroller to protect against high voltages.
- Heat Dissipation: Use a heatsink with the BT 136 if it operates at high currents to prevent overheating.
- Load Type: For inductive loads, always include a snubber circuit to avoid damage or erratic behavior.
- Gate Current: Ensure the Gate current is sufficient to trigger the TRIAC reliably, especially for low-sensitivity variants.
Troubleshooting and FAQs
Common Issues and Solutions
TRIAC Does Not Turn On:
- Check the Gate resistor value. It might be too high, preventing sufficient current from reaching the Gate.
- Verify the control signal voltage and current. Ensure it meets the Gate trigger requirements.
TRIAC Turns On Erratically:
- For inductive loads, ensure a snubber circuit is present to suppress voltage spikes.
- Check for noise in the control signal. Use proper filtering or shielding.
TRIAC Overheats:
- Ensure the load current does not exceed the maximum RMS current rating (4A).
- Use a heatsink to dissipate heat effectively.
TRIAC Does Not Turn Off:
- Verify that the load current drops below the holding current (2mA) at the zero-crossing point.
- Check for any short circuits or incorrect wiring.
FAQs
Q1: Can the BT 136 be used for DC circuits?
A1: No, the BT 136 is designed for AC circuits. It relies on the zero-crossing point of the AC waveform to turn off.
Q2: What is the maximum load power the BT 136 can handle?
A2: The maximum power depends on the load voltage and current. For example, at 230V AC and 4A, it can handle up to 920W. Ensure proper heat dissipation.
Q3: Can I control the BT 136 directly with an Arduino?
A3: Yes, but use a current-limiting resistor and an optocoupler for isolation to protect the Arduino from high voltages.
Q4: Do I need a heatsink for low-power applications?
A4: For low-power loads (e.g., below 1A), a heatsink may not be necessary. However, monitor the temperature to ensure safe operation.