Cirkit Designer Logo
Cirkit Designer
Your all-in-one circuit design IDE
Home / 
Component Documentation

How to Use Spark: Examples, Pinouts, and Specs

Image of Spark
Cirkit Designer LogoDesign with Spark in Cirkit Designer

Introduction

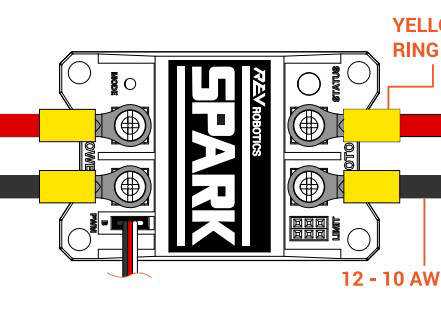
The Spark Gap module, manufactured by Rev Robotics, is an essential safety device used in various electronic circuits. It is designed to protect sensitive components from voltage spikes by providing a controlled path for excess voltage to discharge, preventing damage to the circuit. Common applications include surge protection in power supply units, as part of ignition systems in internal combustion engines, and in high-voltage circuits where voltage regulation is crucial.

Explore Projects Built with Spark

Use Cirkit Designer to design, explore, and prototype these projects online. Some projects support real-time simulation. Click "Open Project" to start designing instantly!
Remote-Controlled Drone with Motion Sensing Capabilities
Image of melty: A project utilizing Spark in a practical application
This circuit is designed for motion control and telemetry in a small vehicle or drone. It includes an Adafruit ADXL345 accelerometer interfaced with a SparkFun Pro Micro microcontroller for motion sensing. The circuit also features two Electronic Speed Controllers (ESCs) to drive motors, a step-up voltage regulator to stabilize power supply from a Lipo battery, and a flysky mini receiver to receive control signals from a remote transmitter.
Cirkit Designer LogoOpen Project in Cirkit Designer
Arduino Nano-Based Wireless Ignition System with LCD Display and nRF24L01
Image of Transmitter System: A project utilizing Spark in a practical application
This circuit is an ignition control system using an Arduino Nano, which interfaces with an nRF24L01 wireless module, a 20x4 I2C LCD, a piezo buzzer, and LEDs. The system initiates an ignition sequence when a pushbutton is pressed, providing feedback via the buzzer and LEDs, and displays status messages on the LCD while sending a wireless ignition signal.
Cirkit Designer LogoOpen Project in Cirkit Designer
Arduino UNO Controlled Brushless Motor with SD Data Logging and Buzzer Alert System
Image of Circuit: A project utilizing Spark in a practical application
This circuit features an Arduino UNO controlling a brushless motor via a speed controller, with a piezo buzzer for audible alerts and a pushbutton to initiate the sequence. The Arduino reads current data from an ACS712 sensor and logs it to an SD card using an SD module. The system is designed to ramp up the motor's throttle, maintain it, and record the current consumption, with the buzzer providing status feedback.
Cirkit Designer LogoOpen Project in Cirkit Designer
Arduino Nano Controlled Rocket Thruster with Load Cell Feedback and SD Data Logging
Image of HIP circuit v1: A project utilizing Spark in a practical application
This circuit is designed to control a rocket thruster using an Arduino Nano, which interfaces with a load cell through an HX711 amplifier to measure thrust force, and logs data to an SD card. It uses a pushbutton to initiate the ignition sequence, activating an e-match via a MOSFET to ignite the thruster and then opening a solenoid valve to release fuel. The circuit includes protection diodes for the solenoids and pull-up resistors for the MOSFET gates.
Cirkit Designer LogoOpen Project in Cirkit Designer

Explore Projects Built with Spark

Use Cirkit Designer to design, explore, and prototype these projects online. Some projects support real-time simulation. Click "Open Project" to start designing instantly!
Image of melty: A project utilizing Spark in a practical application
Remote-Controlled Drone with Motion Sensing Capabilities
This circuit is designed for motion control and telemetry in a small vehicle or drone. It includes an Adafruit ADXL345 accelerometer interfaced with a SparkFun Pro Micro microcontroller for motion sensing. The circuit also features two Electronic Speed Controllers (ESCs) to drive motors, a step-up voltage regulator to stabilize power supply from a Lipo battery, and a flysky mini receiver to receive control signals from a remote transmitter.
Cirkit Designer LogoOpen Project in Cirkit Designer
Image of Transmitter System: A project utilizing Spark in a practical application
Arduino Nano-Based Wireless Ignition System with LCD Display and nRF24L01
This circuit is an ignition control system using an Arduino Nano, which interfaces with an nRF24L01 wireless module, a 20x4 I2C LCD, a piezo buzzer, and LEDs. The system initiates an ignition sequence when a pushbutton is pressed, providing feedback via the buzzer and LEDs, and displays status messages on the LCD while sending a wireless ignition signal.
Cirkit Designer LogoOpen Project in Cirkit Designer
Image of Circuit: A project utilizing Spark in a practical application
Arduino UNO Controlled Brushless Motor with SD Data Logging and Buzzer Alert System
This circuit features an Arduino UNO controlling a brushless motor via a speed controller, with a piezo buzzer for audible alerts and a pushbutton to initiate the sequence. The Arduino reads current data from an ACS712 sensor and logs it to an SD card using an SD module. The system is designed to ramp up the motor's throttle, maintain it, and record the current consumption, with the buzzer providing status feedback.
Cirkit Designer LogoOpen Project in Cirkit Designer
Image of HIP circuit v1: A project utilizing Spark in a practical application
Arduino Nano Controlled Rocket Thruster with Load Cell Feedback and SD Data Logging
This circuit is designed to control a rocket thruster using an Arduino Nano, which interfaces with a load cell through an HX711 amplifier to measure thrust force, and logs data to an SD card. It uses a pushbutton to initiate the ignition sequence, activating an e-match via a MOSFET to ignite the thruster and then opening a solenoid valve to release fuel. The circuit includes protection diodes for the solenoids and pull-up resistors for the MOSFET gates.
Cirkit Designer LogoOpen Project in Cirkit Designer

Technical Specifications

General Specifications

Parameter Value Description
Operating Voltage 5V - 24V The range of voltages the spark gap can handle
Discharge Voltage Typically 500V - 1kV Voltage at which the spark will jump the gap
Peak Current Up to 10A Maximum current the spark gap can handle
Gap Distance Adjustable Distance between electrodes can be set
Electrode Material Tungsten or similar Material used for the electrodes

Pin Configuration

Pin Number Name Description
1 GND Ground connection for the spark gap module
2 HV High voltage input for the spark gap module
3 NC No connection; reserved for future use

Usage Instructions

Integration into a Circuit

  1. Power Supply Connection: Connect the HV pin to the high voltage line that requires protection. Ensure that the voltage does not exceed the module's maximum operating voltage.
  2. Grounding: Connect the GND pin to the common ground in your circuit to provide a discharge path for the excess voltage.
  3. Adjusting the Gap: Carefully adjust the gap distance between the electrodes based on the desired discharge voltage. A smaller gap will discharge at lower voltages, while a larger gap requires higher voltages.

Best Practices

  • Mounting: Secure the Spark Gap module away from sensitive components to prevent electromagnetic interference when a discharge occurs.
  • Inspection: Regularly inspect the gap distance and condition of the electrodes, as arcing can cause wear over time.
  • Safety Precautions: Always power down the circuit before making adjustments to the spark gap to avoid electric shock.

Troubleshooting and FAQs

Common Issues

  • No Discharge: If the spark gap is not discharging when expected, check the gap distance and ensure it is set correctly for the desired voltage. Also, inspect the electrodes for wear or contamination.
  • Unexpected Discharge: If the spark gap is discharging at lower voltages than expected, verify that the gap distance has not changed and that there are no conductive contaminants bridging the gap.

FAQs

Q: Can the Spark Gap module be used for AC applications? A: Yes, the Spark Gap module can be used in AC circuits, but ensure that the specifications match the requirements of the application.

Q: How often should the gap distance be adjusted? A: The gap distance should be set during the initial installation and checked periodically, especially if the module is subject to mechanical vibrations or thermal expansion.

Q: Is there a risk of fire with the Spark Gap module? A: While the spark gap can generate a small arc, it is contained and should not pose a fire risk if used within its specifications and with proper mounting.

Example Code for Arduino UNO

Below is an example code snippet for monitoring the operation of the Spark Gap module with an Arduino UNO. This example assumes the use of an additional sensor to detect when the spark gap has discharged.

// Define the pin connected to the discharge sensor
const int dischargeSensorPin = 2;

void setup() {
  // Initialize the discharge sensor pin as an input
  pinMode(dischargeSensorPin, INPUT);
  // Begin serial communication at 9600 baud rate
  Serial.begin(9600);
}

void loop() {
  // Read the state of the discharge sensor pin
  int sensorState = digitalRead(dischargeSensorPin);

  // Check if a discharge has been detected
  if (sensorState == HIGH) {
    // Print a message to the serial monitor
    Serial.println("Discharge detected!");
  }

  // Small delay to debounce the sensor and prevent multiple detections
  delay(50);
}

Please note that this code is for illustrative purposes and assumes the use of a hypothetical discharge sensor. In practice, the Spark Gap module does not require any active control or monitoring and functions passively within the circuit.