Cirkit Designer Logo
Cirkit Designer
Your all-in-one circuit design IDE
Home / 
Component Documentation

How to Use 28BYJ-48 Stepper Motor: Examples, Pinouts, and Specs

Image of 28BYJ-48 Stepper Motor
Cirkit Designer LogoDesign with 28BYJ-48 Stepper Motor in Cirkit Designer

Introduction

The 28BYJ-48 is a small, low-cost stepper motor widely used in robotics, automation, and DIY electronics projects. It features a 5-phase design and is capable of precise control of rotation and position. This motor is ideal for applications requiring accurate angular movement, such as robotic arms, camera sliders, and automated mechanisms. Its compact size and affordability make it a popular choice for hobbyists and professionals alike.

Explore Projects Built with 28BYJ-48 Stepper Motor

Use Cirkit Designer to design, explore, and prototype these projects online. Some projects support real-time simulation. Click "Open Project" to start designing instantly!
Arduino Mega 2560-Controlled Stepper Motors with RFID Access and Traffic Light Indication
Image of Copy of test: A project utilizing 28BYJ-48 Stepper Motor in a practical application
This circuit controls two 28BYJ-48 stepper motors using A4988 stepper motor driver carriers, interfaced with an Arduino Mega 2560 microcontroller. It features an RFID-RC522 module for RFID reading, a 16x4 LCD display with I2C interface for user interaction, and a piezo speaker for audio feedback. Additionally, there is a traffic light module controlled by the Arduino, and a 48V to 5V converter to step down voltage for the logic levels. The power supply provides 12V to the motor drivers and is connected to a standard power outlet.
Cirkit Designer LogoOpen Project in Cirkit Designer
RFID-Activated Traffic Light Controller with Auditory Feedback Using Arduino Mega
Image of test: A project utilizing 28BYJ-48 Stepper Motor in a practical application
This circuit is designed to control two 28BYJ-48 stepper motors using A4988 stepper motor driver carriers, with an Arduino Mega 2560 as the central microcontroller. It includes an RFID-RC522 module for RFID reading, an LCD display for user interface, and a traffic light and piezo speaker for visual and audio signaling. The circuit is powered by a 12V 5A power supply, which is stepped down to 5V for logic level components, and it interfaces with a power outlet for AC to DC conversion.
Cirkit Designer LogoOpen Project in Cirkit Designer
Arduino-Controlled 28BYJ-48 Stepper Motor with ULN2003 Driver
Image of Act: A project utilizing 28BYJ-48 Stepper Motor in a practical application
This circuit controls a 28BYJ-48 stepper motor using an Arduino UNO and a ULN2003A breakout board. The Arduino is programmed to drive the stepper motor with a specific number of steps received via its serial interface, allowing for precise rotational movement control. The ULN2003A interfaces between the low-current Arduino output pins and the higher-current requirements of the stepper motor coils.
Cirkit Designer LogoOpen Project in Cirkit Designer
Arduino UNO Controlled Stepper Motor with ULN2003A Driver
Image of Arduino-Controlled 28BYJ-48 Stepper Motor with ULN2003 Driver: A project utilizing 28BYJ-48 Stepper Motor in a practical application
This circuit controls a 28BYJ-48 stepper motor using an Arduino UNO and a ULN2003A driver board. The Arduino sends control signals to the ULN2003A, which then drives the stepper motor based on commands received via the serial interface.
Cirkit Designer LogoOpen Project in Cirkit Designer

Explore Projects Built with 28BYJ-48 Stepper Motor

Use Cirkit Designer to design, explore, and prototype these projects online. Some projects support real-time simulation. Click "Open Project" to start designing instantly!
Image of Copy of test: A project utilizing 28BYJ-48 Stepper Motor in a practical application
Arduino Mega 2560-Controlled Stepper Motors with RFID Access and Traffic Light Indication
This circuit controls two 28BYJ-48 stepper motors using A4988 stepper motor driver carriers, interfaced with an Arduino Mega 2560 microcontroller. It features an RFID-RC522 module for RFID reading, a 16x4 LCD display with I2C interface for user interaction, and a piezo speaker for audio feedback. Additionally, there is a traffic light module controlled by the Arduino, and a 48V to 5V converter to step down voltage for the logic levels. The power supply provides 12V to the motor drivers and is connected to a standard power outlet.
Cirkit Designer LogoOpen Project in Cirkit Designer
Image of test: A project utilizing 28BYJ-48 Stepper Motor in a practical application
RFID-Activated Traffic Light Controller with Auditory Feedback Using Arduino Mega
This circuit is designed to control two 28BYJ-48 stepper motors using A4988 stepper motor driver carriers, with an Arduino Mega 2560 as the central microcontroller. It includes an RFID-RC522 module for RFID reading, an LCD display for user interface, and a traffic light and piezo speaker for visual and audio signaling. The circuit is powered by a 12V 5A power supply, which is stepped down to 5V for logic level components, and it interfaces with a power outlet for AC to DC conversion.
Cirkit Designer LogoOpen Project in Cirkit Designer
Image of Act: A project utilizing 28BYJ-48 Stepper Motor in a practical application
Arduino-Controlled 28BYJ-48 Stepper Motor with ULN2003 Driver
This circuit controls a 28BYJ-48 stepper motor using an Arduino UNO and a ULN2003A breakout board. The Arduino is programmed to drive the stepper motor with a specific number of steps received via its serial interface, allowing for precise rotational movement control. The ULN2003A interfaces between the low-current Arduino output pins and the higher-current requirements of the stepper motor coils.
Cirkit Designer LogoOpen Project in Cirkit Designer
Image of Arduino-Controlled 28BYJ-48 Stepper Motor with ULN2003 Driver: A project utilizing 28BYJ-48 Stepper Motor in a practical application
Arduino UNO Controlled Stepper Motor with ULN2003A Driver
This circuit controls a 28BYJ-48 stepper motor using an Arduino UNO and a ULN2003A driver board. The Arduino sends control signals to the ULN2003A, which then drives the stepper motor based on commands received via the serial interface.
Cirkit Designer LogoOpen Project in Cirkit Designer

Technical Specifications

The 28BYJ-48 stepper motor is designed for low-power applications and offers reliable performance. Below are its key technical details:

General Specifications

  • Type: Unipolar Stepper Motor
  • Operating Voltage: 5V DC
  • Step Angle: 5.625°/step (64 steps per revolution in full-step mode)
  • Gear Ratio: 1:64 (final resolution: 4096 steps per revolution)
  • Coil Resistance: ~50Ω per coil
  • Max Current: ~240mA
  • Holding Torque: ~300 gf.cm
  • Weight: ~30g

Pin Configuration

The 28BYJ-48 stepper motor is typically used with a ULN2003 driver board, which provides an easy interface for controlling the motor. Below is the pin configuration for the motor and the driver board:
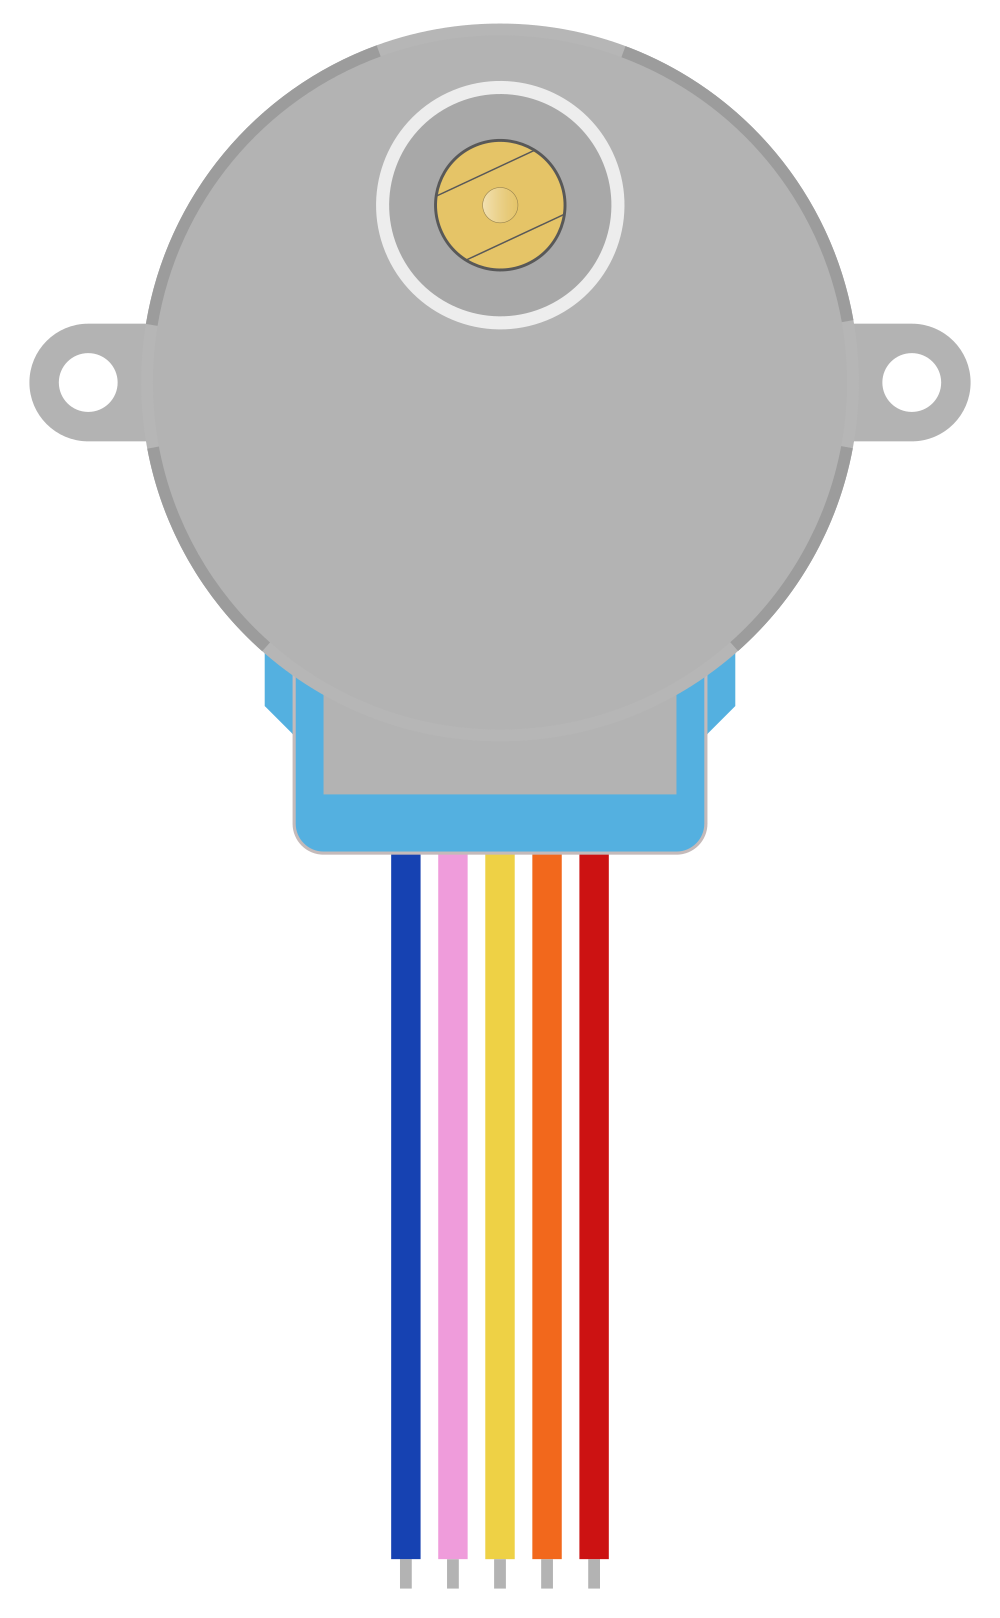
Motor Pinout

Pin Number Wire Color Description
1 Orange Coil A
2 Yellow Coil B
3 Pink Coil C
4 Blue Coil D
5 Red VCC (5V Power Input)

ULN2003 Driver Board Pinout

Pin Label Description
IN1 Input for Coil A
IN2 Input for Coil B
IN3 Input for Coil C
IN4 Input for Coil D
VCC Power Input (5V)
GND Ground
OUT1-OUT4 Outputs to Motor Coils (A-D)

Usage Instructions

The 28BYJ-48 stepper motor is typically controlled using a driver board like the ULN2003 and a microcontroller such as an Arduino UNO. Below are the steps to use the motor in a circuit:
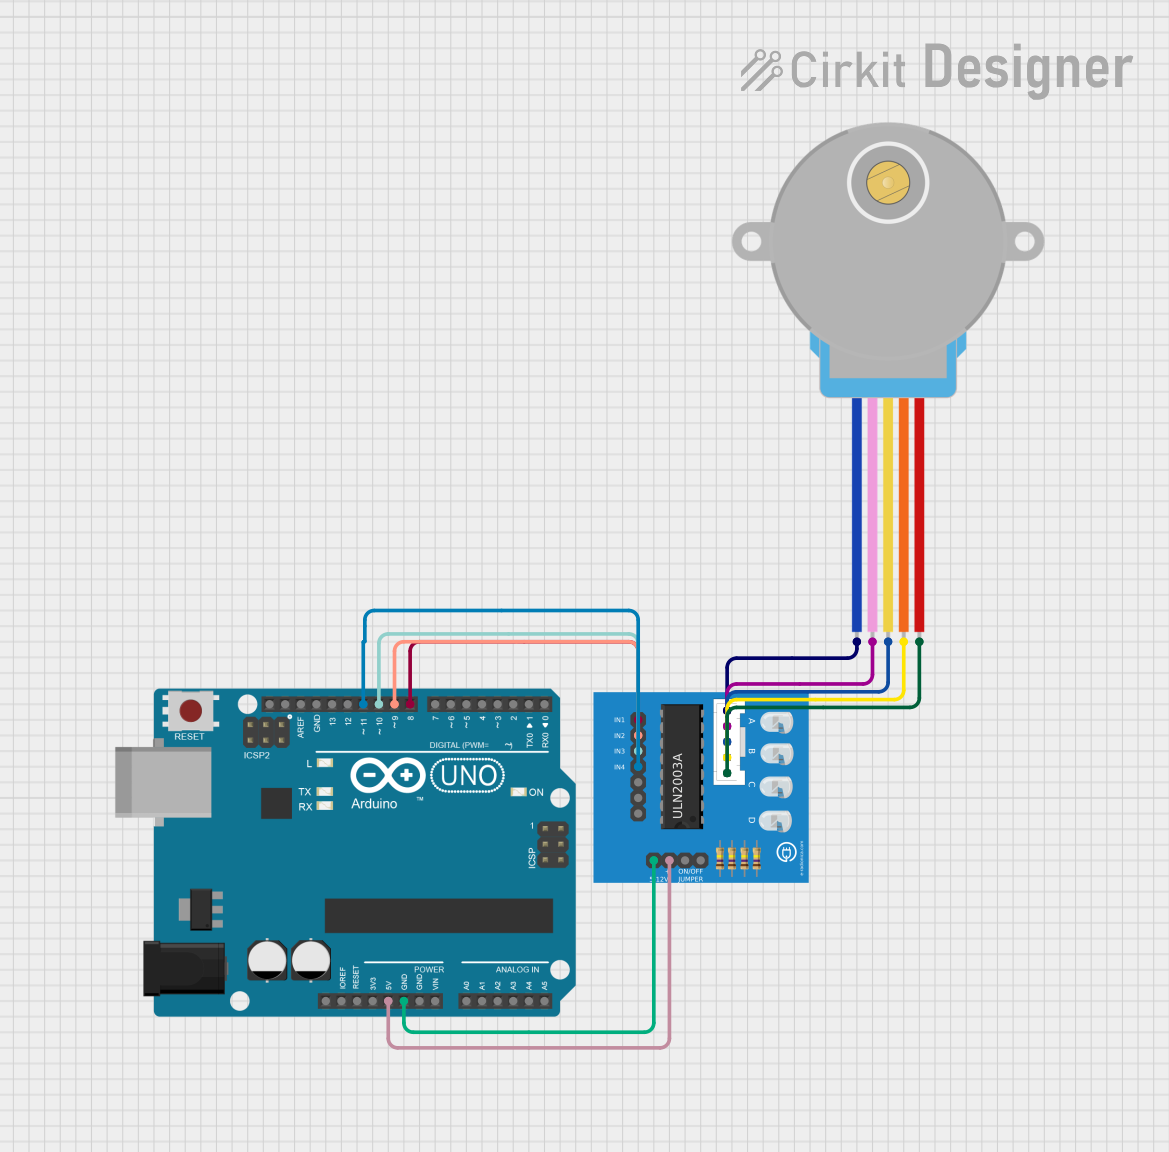
Circuit Connection

  1. Connect the 28BYJ-48 motor to the ULN2003 driver board:
    • Match the motor's 5-pin connector to the driver board's socket.
  2. Connect the ULN2003 driver board to the Arduino UNO:
    • IN1 → Arduino Digital Pin 8
    • IN2 → Arduino Digital Pin 9
    • IN3 → Arduino Digital Pin 10
    • IN4 → Arduino Digital Pin 11
    • VCC → Arduino 5V
    • GND → Arduino GND
  3. Power the Arduino UNO using a USB cable or an external power source.

Arduino Code Example

Below is an example Arduino sketch to control the 28BYJ-48 stepper motor using the ULN2003 driver board:

#include <Stepper.h>

// Define the number of steps per revolution for the motor
#define STEPS_PER_REV 2048  // 4096 steps per revolution (half-step mode)

// Initialize the Stepper library with the motor's pin connections
Stepper stepper(STEPS_PER_REV, 8, 10, 9, 11);

void setup() {
  // Set the motor speed (in RPM)
  stepper.setSpeed(10);  // Adjust speed as needed
  Serial.begin(9600);
  Serial.println("28BYJ-48 Stepper Motor Test");
}

void loop() {
  // Rotate the motor 1 full revolution clockwise
  Serial.println("Rotating clockwise...");
  stepper.step(STEPS_PER_REV);
  delay(1000);  // Wait for 1 second

  // Rotate the motor 1 full revolution counterclockwise
  Serial.println("Rotating counterclockwise...");
  stepper.step(-STEPS_PER_REV);
  delay(1000);  // Wait for 1 second
}

Important Considerations

  • Power Supply: Ensure the motor is powered with a stable 5V DC supply. Using higher voltages may damage the motor.
  • Current Limitation: Avoid exceeding the motor's maximum current rating (~240mA) to prevent overheating.
  • Speed and Torque: Higher speeds may reduce torque. Adjust the speed in the code to balance performance.
  • Gearbox: The motor's internal gearbox provides high torque but limits speed. Avoid applying excessive force to the motor shaft to prevent damage.

Troubleshooting and FAQs

Common Issues

  1. Motor Not Rotating:

    • Check all connections between the motor, driver board, and microcontroller.
    • Ensure the power supply is providing 5V DC.
    • Verify the Arduino code is correctly uploaded and running.
  2. Motor Vibrates but Doesn't Rotate:

    • Ensure the step sequence in the code matches the motor's wiring.
    • Check for loose or incorrect connections.
  3. Motor Overheating:

    • Reduce the operating speed or duty cycle.
    • Verify the current does not exceed the motor's rating.
  4. Inconsistent Movement:

    • Ensure the power supply is stable and not fluctuating.
    • Check for mechanical obstructions in the motor or connected load.

FAQs

Q: Can I power the motor directly from the Arduino?
A: While the motor can be powered from the Arduino's 5V pin, it is recommended to use an external 5V power supply for better performance and to avoid overloading the Arduino.

Q: How do I increase the motor's speed?
A: Increase the speed in the stepper.setSpeed() function in the Arduino code. Note that higher speeds may reduce torque.

Q: Can I use the motor without a driver board?
A: It is possible but not recommended. The ULN2003 driver board simplifies control and protects the microcontroller from high currents.

Q: What is the maximum load the motor can handle?
A: The motor's holding torque is approximately 300 gf.cm. Ensure the load does not exceed this value to avoid stalling or damage.

By following this documentation, you can effectively use the 28BYJ-48 stepper motor in your projects.