Cirkit Designer
Your all-in-one circuit design IDE
Home /
Component Documentation
How to Use 2/2 solenoid valve: Examples, Pinouts, and Specs

Introduction
The 2/2 Solenoid Valve is an electromechanical device designed to control the flow of fluids in various systems. It features two ports and two positions, enabling it to either allow or block fluid flow based on its energized or de-energized state. This versatility makes it ideal for applications in automation, irrigation, HVAC systems, and fluid control in industrial processes.
Explore Projects Built with 2/2 solenoid valve
Raspberry Pi 4B Automated Irrigation System with IR Sensor and Solenoid Valve
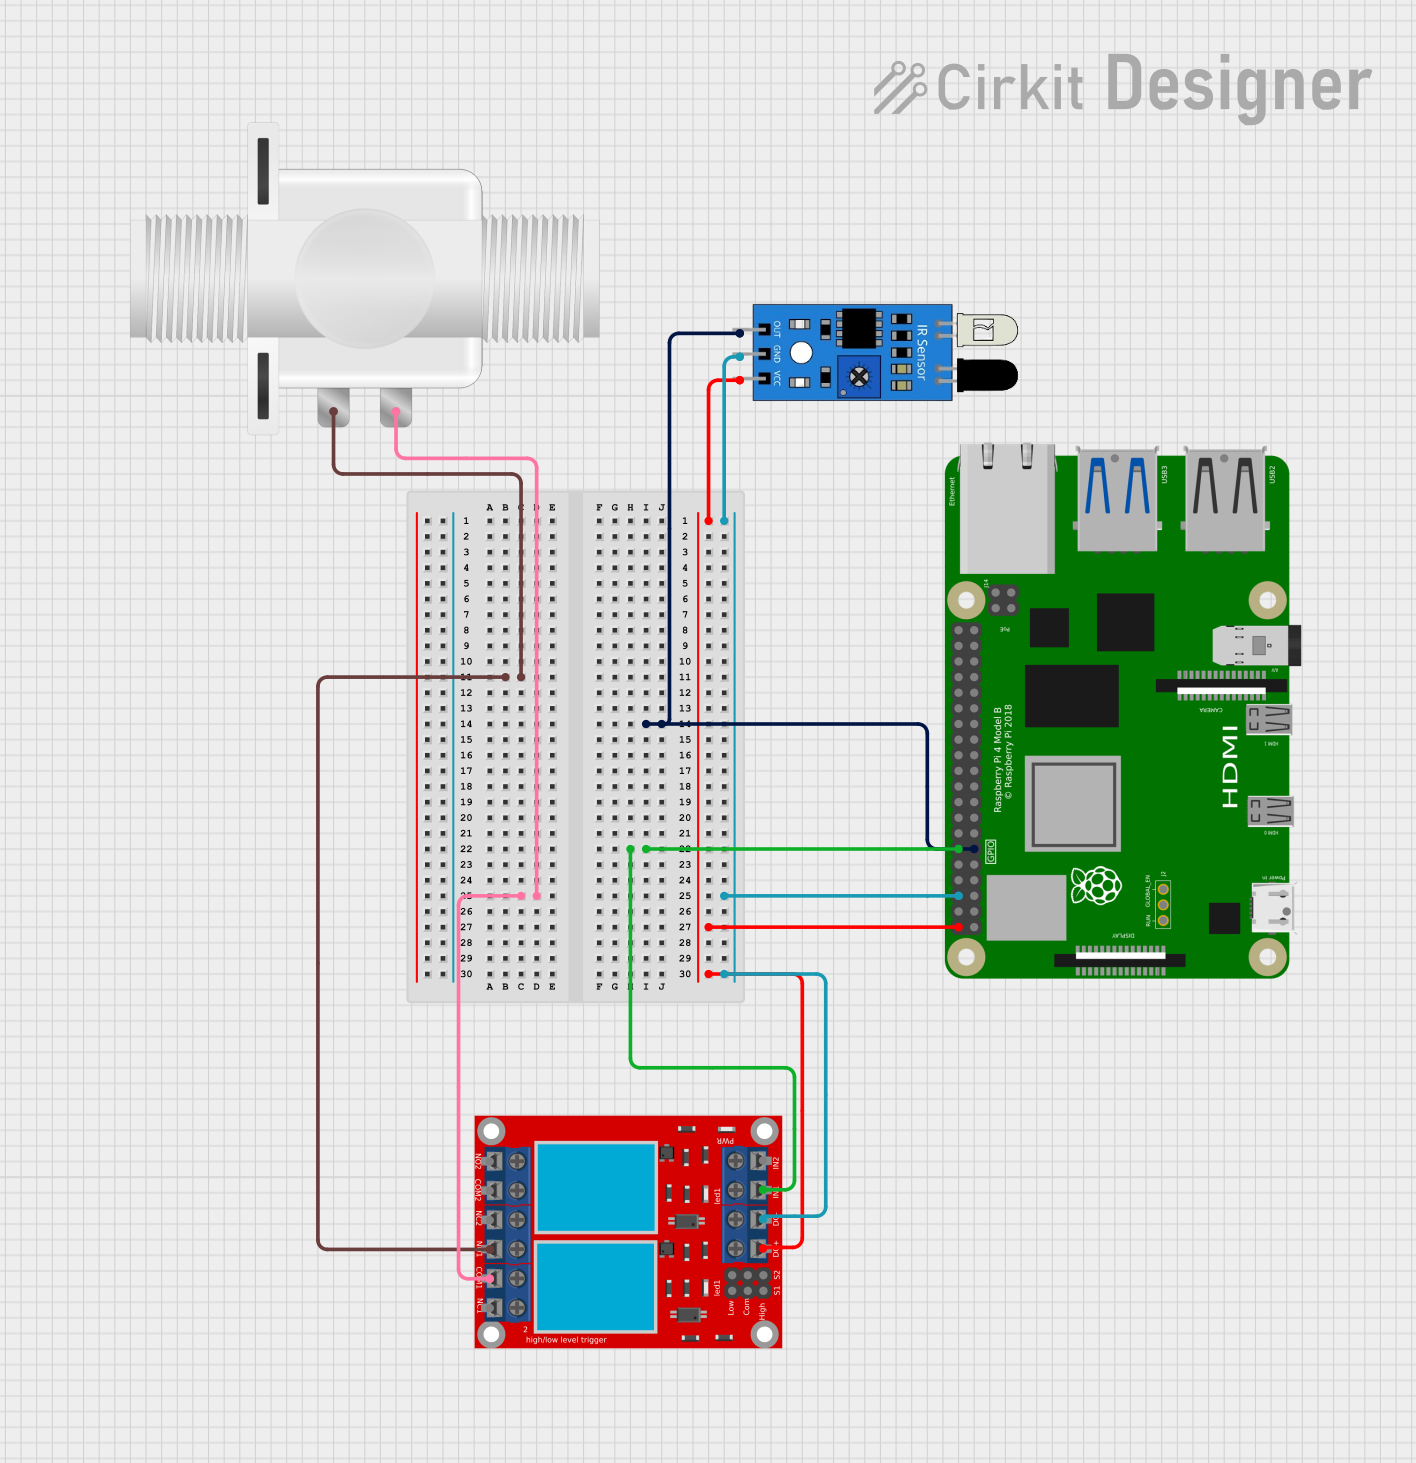
This circuit uses a Raspberry Pi 4B to control a solenoid valve via a 2-channel relay module. An IR sensor connected to the Raspberry Pi detects an event, which triggers the relay to activate the solenoid valve.
Arduino-Controlled RFM95 Pneumatic Solenoid Valve System
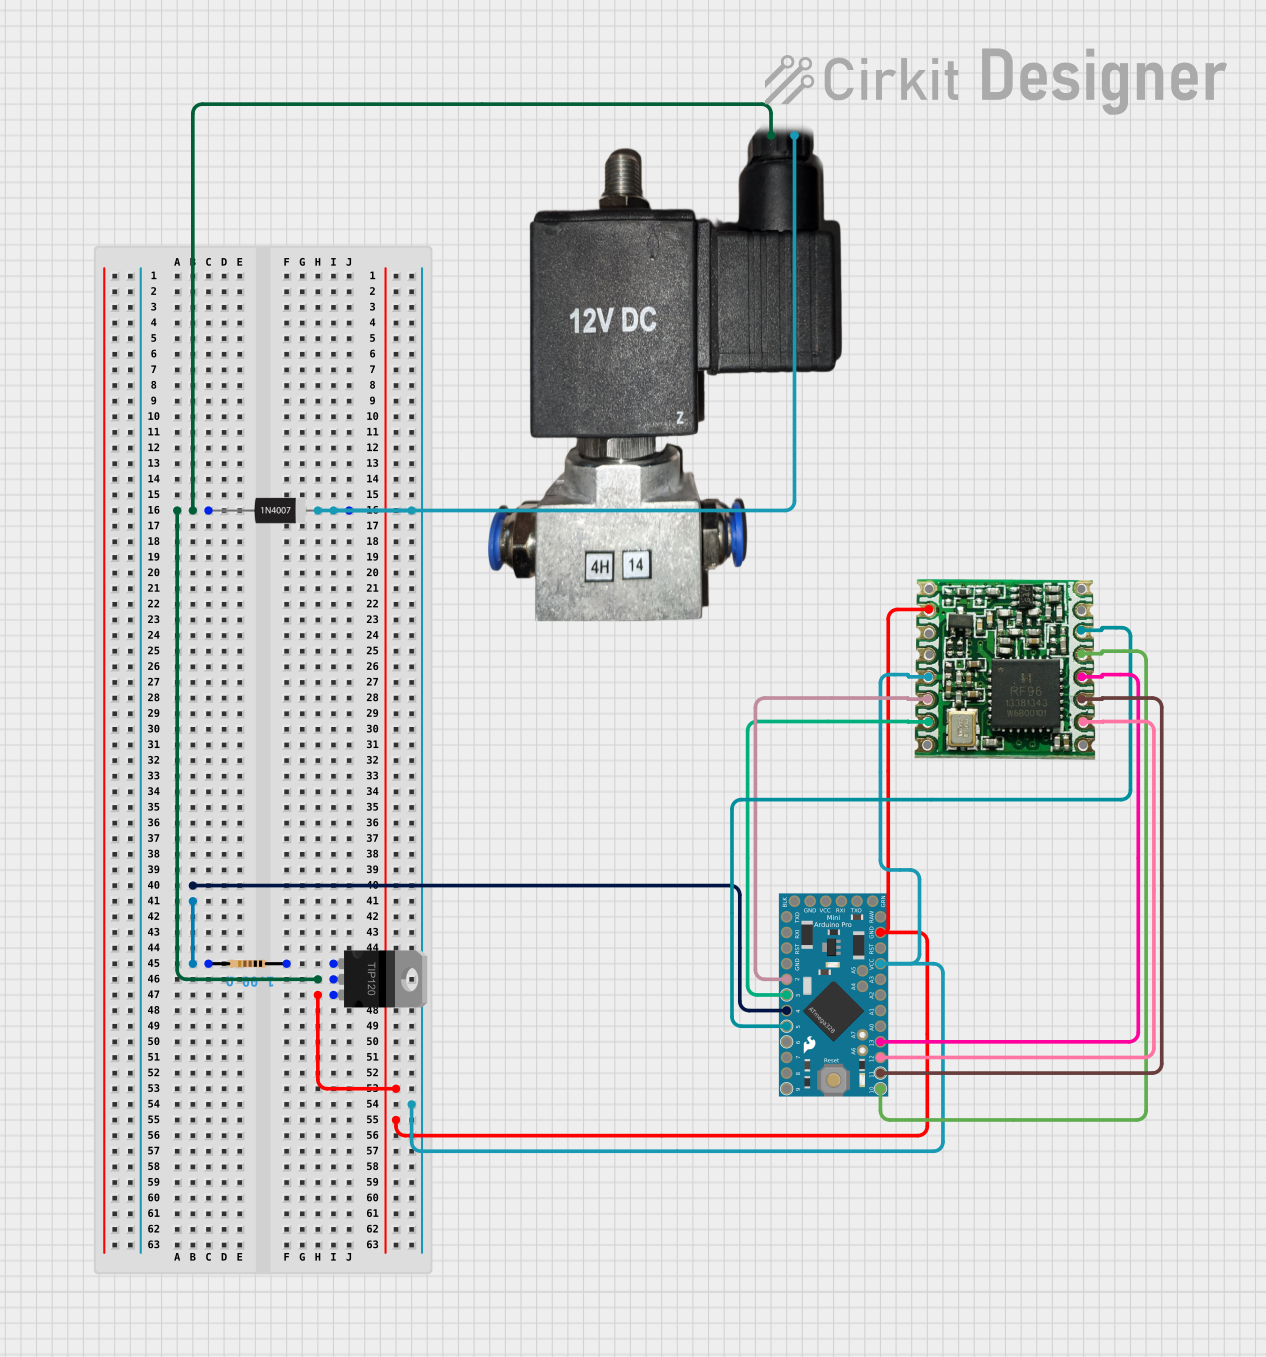
This circuit controls a 12v pneumatic solenoid valve using an Arduino Pro Mini microcontroller. The Arduino toggles the solenoid valve on and off with a 1-second interval, as programmed in the embedded code. A TIP120 Darlington transistor is used to switch the higher current required by the solenoid, and a 1N4007 diode provides back EMF protection. Additionally, an RFM95 module is interfaced with the Arduino for potential wireless communication capabilities.
ESP32-Based Wi-Fi Controlled Solenoid Valve with Relay

This circuit uses an ESP32 microcontroller to control a 12V relay, which in turn operates a plastic solenoid valve. The ESP32 toggles the relay on and off every second, allowing the solenoid valve to open and close accordingly.
ESP32-Controlled Solenoid Valve with Relay Switching
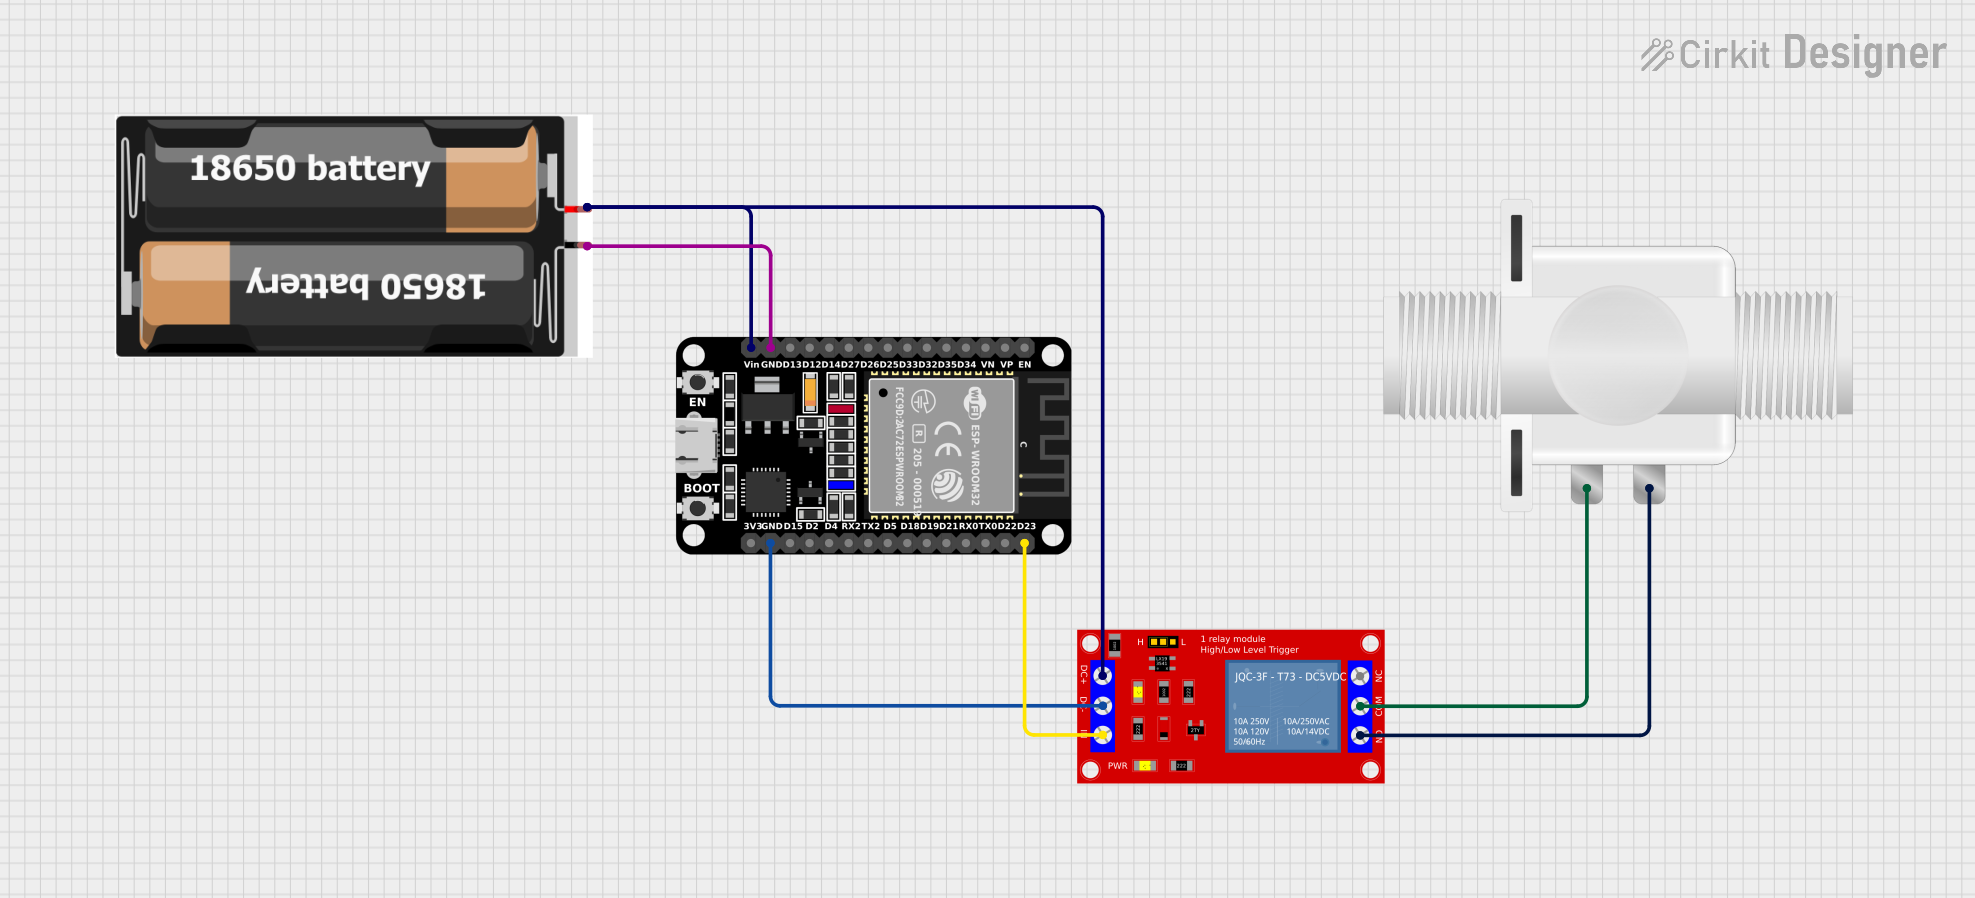
This circuit is designed to control a plastic solenoid valve using an ESP32 microcontroller. The ESP32 uses a digital output to switch a relay module, which provides or cuts off power to the valve. The entire system is powered by a pair of 18650 batteries.
Explore Projects Built with 2/2 solenoid valve
Raspberry Pi 4B Automated Irrigation System with IR Sensor and Solenoid Valve
This circuit uses a Raspberry Pi 4B to control a solenoid valve via a 2-channel relay module. An IR sensor connected to the Raspberry Pi detects an event, which triggers the relay to activate the solenoid valve.
Arduino-Controlled RFM95 Pneumatic Solenoid Valve System
This circuit controls a 12v pneumatic solenoid valve using an Arduino Pro Mini microcontroller. The Arduino toggles the solenoid valve on and off with a 1-second interval, as programmed in the embedded code. A TIP120 Darlington transistor is used to switch the higher current required by the solenoid, and a 1N4007 diode provides back EMF protection. Additionally, an RFM95 module is interfaced with the Arduino for potential wireless communication capabilities.
ESP32-Based Wi-Fi Controlled Solenoid Valve with Relay
This circuit uses an ESP32 microcontroller to control a 12V relay, which in turn operates a plastic solenoid valve. The ESP32 toggles the relay on and off every second, allowing the solenoid valve to open and close accordingly.
ESP32-Controlled Solenoid Valve with Relay Switching
This circuit is designed to control a plastic solenoid valve using an ESP32 microcontroller. The ESP32 uses a digital output to switch a relay module, which provides or cuts off power to the valve. The entire system is powered by a pair of 18650 batteries.
Common Applications and Use Cases
- Automated Irrigation Systems: To control water flow to plants.
- HVAC Systems: For regulating refrigerant or air flow.
- Industrial Automation: In assembly lines for controlling pneumatic or hydraulic systems.
- Fluid Dispensing: In beverage or chemical dispensing machines.
Technical Specifications
Key Technical Details
| Specification | Value |
|---|---|
| Manufacturer | Jectse |
| Manufacturer Part ID | jectseiogt8zvfgy-12 |
| Voltage Rating | 12V DC |
| Current Rating | 0.5A |
| Power Rating | 6W |
| Fluid Type | Air, Water, Oil |
| Maximum Pressure | 0-10 bar |
| Temperature Range | -10°C to 60°C |
Pin Configuration and Descriptions
| Pin Number | Description |
|---|---|
| 1 | Coil Positive (+) |
| 2 | Coil Negative (-) |
| 3 | Port A (Inlet) |
| 4 | Port B (Outlet) |
Usage Instructions
How to Use the Component in a Circuit
Wiring the Solenoid Valve:
- Connect the positive terminal of the power supply to Pin 1 (Coil Positive).
- Connect the negative terminal of the power supply to Pin 2 (Coil Negative).
- Connect the fluid source to Port A and the output to Port B.
Controlling the Valve:
- Use a relay or a transistor to control the solenoid valve from a microcontroller like Arduino.
- When the relay is activated, the solenoid will energize, allowing fluid to flow from Port A to Port B.
Important Considerations and Best Practices
- Ensure that the voltage and current ratings are within the specified limits to avoid damage.
- Use appropriate sealing and fittings to prevent leaks in fluid applications.
- Regularly check for wear and tear, especially in high-frequency applications.
Troubleshooting and FAQs
Common Issues Users Might Face
Valve Not Opening:
- Possible Cause: Insufficient voltage or current.
- Solution: Check power supply and connections.
Fluid Leaks:
- Possible Cause: Damaged seals or improper fittings.
- Solution: Inspect seals and replace if necessary.
Valve Sticking:
- Possible Cause: Dirt or debris in the valve.
- Solution: Clean the valve and ensure it is free of obstructions.
Tips for Troubleshooting
- Always double-check wiring connections before powering the circuit.
- Use a multimeter to verify voltage and current at the solenoid terminals.
- If using with an Arduino, ensure the code is correctly implemented to control the relay.
Example Arduino Code
Here is a simple example of how to control the 2/2 solenoid valve using an Arduino UNO:
// Define pin for relay control
const int relayPin = 7;

void setup() {
  // Set relay pin as output
  pinMode(relayPin, OUTPUT);
}

void loop() {
  // Activate the solenoid valve
  digitalWrite(relayPin, HIGH); // Turn on
  delay(5000);                   // Keep it on for 5 seconds

  // Deactivate the solenoid valve
  digitalWrite(relayPin, LOW);  // Turn off
  delay(5000);                   // Keep it off for 5 seconds
}
This code will turn the solenoid valve on for 5 seconds and then off for 5 seconds in a continuous loop. Adjust the delay() values as needed for your application.