Cirkit Designer Logo
Cirkit Designer
Your all-in-one circuit design IDE
Home / 
Component Documentation

How to Use Heater Element: Examples, Pinouts, and Specs

Image of Heater Element
Cirkit Designer LogoDesign with Heater Element in Cirkit Designer

Introduction

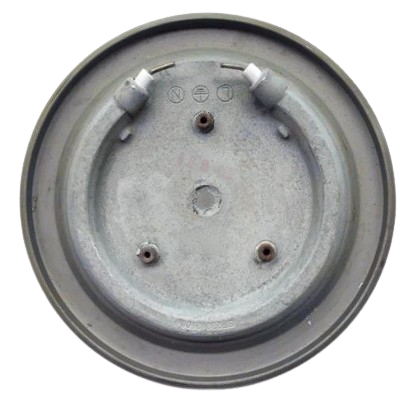
A heater element is a passive electrical component designed to convert electrical energy into heat through the process of Joule heating. When an electric current passes through the element, it encounters resistance, which results in the generation of heat. Heater elements are widely used in domestic appliances like toasters, ovens, and water heaters, as well as in industrial applications such as furnaces, kilns, and soldering stations.

Explore Projects Built with Heater Element

Use Cirkit Designer to design, explore, and prototype these projects online. Some projects support real-time simulation. Click "Open Project" to start designing instantly!
Heater Control Circuit with Power Socket Integration
Image of Simple Water Heater: A project utilizing Heater Element in a practical application
The circuit connects a heater to a power source via a socket. The heater is likely to be powered directly from the socket, with the positive and negative terminals of the socket providing the necessary voltage and ground connections to the heater. There are no control elements or sensors present in the circuit, indicating that the heater operates at a constant power level when connected.
Cirkit Designer LogoOpen Project in Cirkit Designer
Smart Kettle with LED Indicator and Thermal Switch
Image of Electric Kettle: A project utilizing Heater Element in a practical application
This circuit is a basic electric kettle control system. It includes a heater element powered by a 220V supply, controlled by a rocker switch and a thermal switch for safety. An LED indicator with a current-limiting resistor shows the operational status of the heater.
Cirkit Designer LogoOpen Project in Cirkit Designer
Temperature-Controlled Heating System with SSR and Titanium Resistor
Image of Wire Cut Four Slider 33-2 & 33-3 (Old): A project utilizing Heater Element in a practical application
This circuit is a temperature control system that uses a temperature controller to regulate a heating titanium resistor via a solid-state relay (SSR). The power transformer supplies the necessary voltage to the temperature controller, which in turn controls the SSR to manage the heating element.
Cirkit Designer LogoOpen Project in Cirkit Designer
Arduino UNO-Based Smart Water Heater Controller with Keypad and Temperature Sensor
Image of pemanas: A project utilizing Heater Element in a practical application
This circuit is a temperature-controlled water heating system using an Arduino UNO. It reads temperature data from a DS18B20 sensor, allows user input via a 4x4 membrane keypad, and controls a solid-state relay (SSR) to switch a water heater on or off based on the set temperature and differential values.
Cirkit Designer LogoOpen Project in Cirkit Designer

Explore Projects Built with Heater Element

Use Cirkit Designer to design, explore, and prototype these projects online. Some projects support real-time simulation. Click "Open Project" to start designing instantly!
Image of Simple Water Heater: A project utilizing Heater Element in a practical application
Heater Control Circuit with Power Socket Integration
The circuit connects a heater to a power source via a socket. The heater is likely to be powered directly from the socket, with the positive and negative terminals of the socket providing the necessary voltage and ground connections to the heater. There are no control elements or sensors present in the circuit, indicating that the heater operates at a constant power level when connected.
Cirkit Designer LogoOpen Project in Cirkit Designer
Image of Electric Kettle: A project utilizing Heater Element in a practical application
Smart Kettle with LED Indicator and Thermal Switch
This circuit is a basic electric kettle control system. It includes a heater element powered by a 220V supply, controlled by a rocker switch and a thermal switch for safety. An LED indicator with a current-limiting resistor shows the operational status of the heater.
Cirkit Designer LogoOpen Project in Cirkit Designer
Image of Wire Cut Four Slider 33-2 & 33-3 (Old): A project utilizing Heater Element in a practical application
Temperature-Controlled Heating System with SSR and Titanium Resistor
This circuit is a temperature control system that uses a temperature controller to regulate a heating titanium resistor via a solid-state relay (SSR). The power transformer supplies the necessary voltage to the temperature controller, which in turn controls the SSR to manage the heating element.
Cirkit Designer LogoOpen Project in Cirkit Designer
Image of pemanas: A project utilizing Heater Element in a practical application
Arduino UNO-Based Smart Water Heater Controller with Keypad and Temperature Sensor
This circuit is a temperature-controlled water heating system using an Arduino UNO. It reads temperature data from a DS18B20 sensor, allows user input via a 4x4 membrane keypad, and controls a solid-state relay (SSR) to switch a water heater on or off based on the set temperature and differential values.
Cirkit Designer LogoOpen Project in Cirkit Designer

Technical Specifications

Key Technical Details

  • Resistance: Specified in ohms (Ω), indicating the electrical resistance of the element.
  • Power Rating: Given in watts (W), representing the maximum power the element can handle.
  • Operating Voltage: The voltage range over which the element is designed to operate.
  • Temperature Range: The minimum and maximum temperatures the element can achieve.
  • Material: The type of material used, which affects the element's resistance and durability (e.g., Nichrome, Kanthal).

Pin Configuration and Descriptions

Pin Number Description Notes
1 Electrical Terminal Connect to positive voltage supply
2 Electrical Terminal Connect to ground or negative supply

Note: Heater elements typically have two terminals for electrical connection.

Usage Instructions

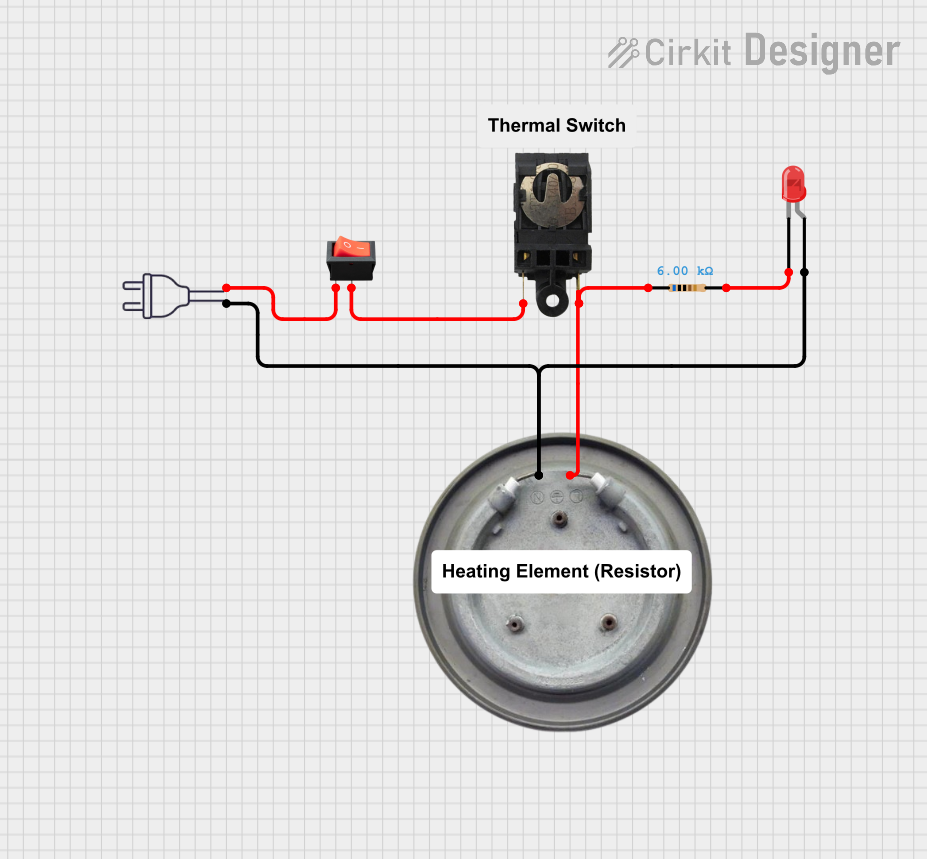
How to Use the Heater Element in a Circuit

  1. Power Source: Ensure that the power source matches the operating voltage and current requirements of the heater element.
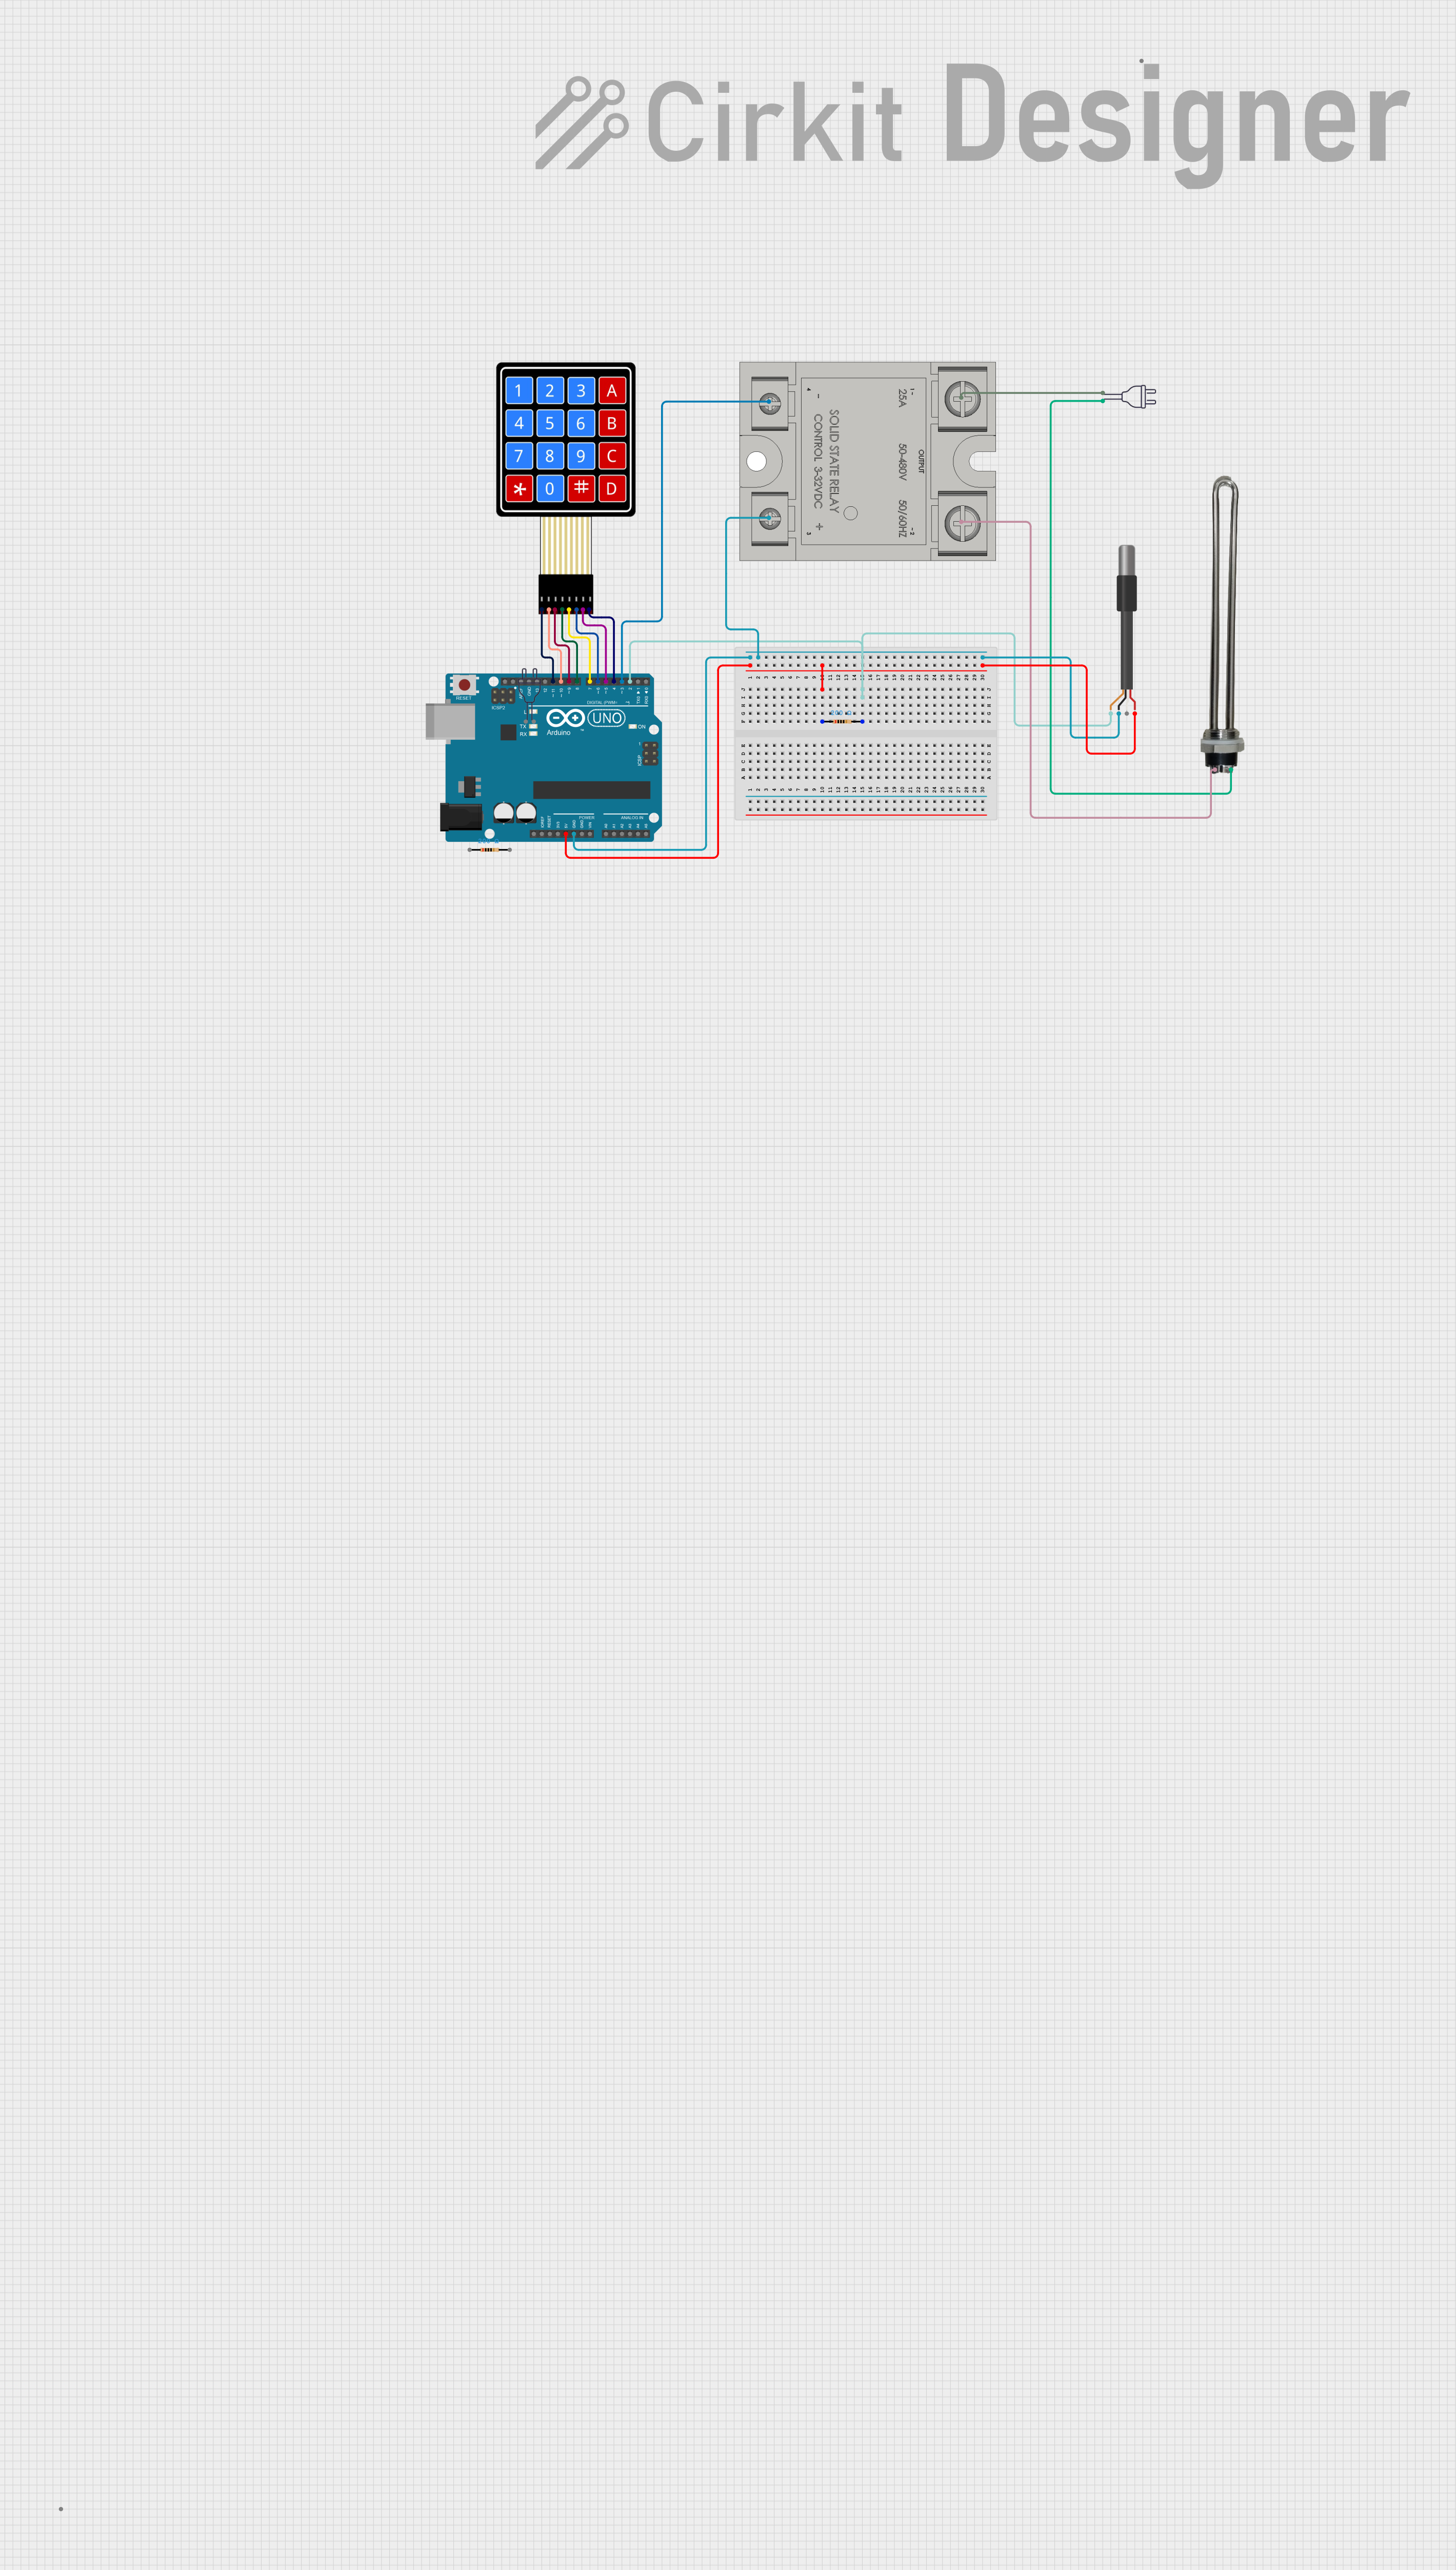
  2. Control Mechanism: Incorporate a thermostat or a microcontroller-based system to regulate the temperature and prevent overheating.
  3. Safety Precautions: Use a fuse or circuit breaker to protect against overcurrent conditions.

Important Considerations and Best Practices

  • Insulation: Properly insulate the heater element to prevent electrical hazards and improve heating efficiency.
  • Ventilation: Ensure adequate ventilation around the element to dissipate heat and prevent damage to surrounding components.
  • Mounting: Secure the element firmly in place to minimize movement and potential damage.

Example Arduino UNO Code

// Define the control pin for the heater element
const int heaterPin = 3; // Use a PWM-capable pin if analog control is desired

void setup() {
  pinMode(heaterPin, OUTPUT); // Set the heater pin as an output
}

void loop() {
  // Turn on the heater element
  digitalWrite(heaterPin, HIGH); // Apply voltage to the heater element
  delay(5000); // Keep the heater on for 5 seconds

  // Turn off the heater element
  digitalWrite(heaterPin, LOW); // Remove voltage from the heater element
  delay(5000); // Keep the heater off for 5 seconds
}

Note: This code example assumes direct control of the heater element. In practice, a relay or a solid-state switch should be used to handle the high current required by the heater element.

Troubleshooting and FAQs

Common Issues

  • Heater Not Heating: Check if the power supply is correctly connected and if the voltage and current ratings are adequate.
  • Overheating: Ensure that the control system is functioning properly and that the element is not powered continuously without regulation.
  • Element Burnout: This can occur if the element is overpowered or if it operates at high temperatures for extended periods. Replace the element if necessary.

Solutions and Tips for Troubleshooting

  • Power Supply Check: Verify that the power supply is delivering the correct voltage and current.
  • Control System Test: Test the thermostat or microcontroller system to ensure it is regulating the temperature as expected.
  • Visual Inspection: Look for any signs of damage or wear on the heater element and its connections.

FAQs

Q: Can I control the temperature of the heater element with an Arduino? A: Yes, you can use a temperature sensor in conjunction with an Arduino to create a feedback loop for temperature control.

Q: How do I determine the correct power rating for my application? A: Calculate the power required based on the desired temperature increase and the thermal properties of the space or material being heated.

Q: Is it safe to touch the heater element while it's operating? A: No, heater elements can reach very high temperatures and can cause burns upon contact. Always handle with caution and ensure the element has cooled down before touching.

Remember to follow all safety guidelines and consult with a professional if you are unsure about working with heater elements or high-power electrical systems.