Cirkit Designer Logo
Cirkit Designer
Your all-in-one circuit design IDE
Home / 
Component Documentation

How to Use parts/Adafruit HUSB238 USB-C PD Breakout: Examples, Pinouts, and Specs

Image of parts/Adafruit HUSB238 USB-C PD Breakout
Cirkit Designer LogoDesign with parts/Adafruit HUSB238 USB-C PD Breakout in Cirkit Designer

Introduction

The Adafruit HUSB238 USB-C PD Breakout is a versatile and powerful component designed to simplify the integration of USB-C Power Delivery (PD) into your electronic projects. This breakout board allows devices to negotiate and draw different power levels from USB-C power sources, making it ideal for a wide range of applications, from powering microcontrollers to charging batteries.

Explore Projects Built with parts/Adafruit HUSB238 USB-C PD Breakout

Use Cirkit Designer to design, explore, and prototype these projects online. Some projects support real-time simulation. Click "Open Project" to start designing instantly!
ESP32 CAM Wi-Fi Enabled Camera Module with USB Power
Image of abc: A project utilizing parts/Adafruit HUSB238 USB-C PD Breakout in a practical application
This circuit consists of an ESP32 CAM module powered by a Micro USB breakout board. The USB breakout board supplies 5V and ground to the ESP32 CAM, enabling it to function and perform tasks such as image capture and processing.
Cirkit Designer LogoOpen Project in Cirkit Designer
Battery-Powered USB-C PD Trigger with MP1584EN Power Regulation
Image of BatteriLading: A project utilizing parts/Adafruit HUSB238 USB-C PD Breakout in a practical application
This circuit is a power management system that uses multiple 18650 Li-ion batteries connected in series to provide a stable power output. The batteries are regulated by MP1584EN power regulator boards, which step down the voltage to a suitable level for the connected USB-C PD trigger board and a power jack. The system ensures a consistent power supply for devices connected to the USB-C port and the power jack.
Cirkit Designer LogoOpen Project in Cirkit Designer
Raspberry Pi 3B Powered 15.6-inch Touchscreen Display with USB Type-C Power Delivery
Image of Pi Touch Screen Kiosk: A project utilizing parts/Adafruit HUSB238 USB-C PD Breakout in a practical application
This circuit powers a 15.6-inch capacitive touch display and a Raspberry Pi 3B using a USB Type C power delivery breakout and two buck converters. The Raspberry Pi connects to the display via HDMI and USB for touch functionality, while the power delivery breakout provides regulated power to both the display and the Raspberry Pi through the buck converters.
Cirkit Designer LogoOpen Project in Cirkit Designer
ESP32-Powered NTP Clock with Multiple GC9A01 Displays
Image of InfoOrbsFork: A project utilizing parts/Adafruit HUSB238 USB-C PD Breakout in a practical application
This circuit features an ESP32 microcontroller connected to multiple GC9A01 displays and a USB Type C breakout for power. The ESP32 runs a sketch to retrieve the current time from an NTP server over WiFi and displays the hours and minutes across the GC9A01 displays, with each display showing a single digit or colon separator. Pushbuttons are connected to GPIOs on the ESP32, potentially for user input to control display functions or settings.
Cirkit Designer LogoOpen Project in Cirkit Designer

Explore Projects Built with parts/Adafruit HUSB238 USB-C PD Breakout

Use Cirkit Designer to design, explore, and prototype these projects online. Some projects support real-time simulation. Click "Open Project" to start designing instantly!
Image of abc: A project utilizing parts/Adafruit HUSB238 USB-C PD Breakout in a practical application
ESP32 CAM Wi-Fi Enabled Camera Module with USB Power
This circuit consists of an ESP32 CAM module powered by a Micro USB breakout board. The USB breakout board supplies 5V and ground to the ESP32 CAM, enabling it to function and perform tasks such as image capture and processing.
Cirkit Designer LogoOpen Project in Cirkit Designer
Image of BatteriLading: A project utilizing parts/Adafruit HUSB238 USB-C PD Breakout in a practical application
Battery-Powered USB-C PD Trigger with MP1584EN Power Regulation
This circuit is a power management system that uses multiple 18650 Li-ion batteries connected in series to provide a stable power output. The batteries are regulated by MP1584EN power regulator boards, which step down the voltage to a suitable level for the connected USB-C PD trigger board and a power jack. The system ensures a consistent power supply for devices connected to the USB-C port and the power jack.
Cirkit Designer LogoOpen Project in Cirkit Designer
Image of Pi Touch Screen Kiosk: A project utilizing parts/Adafruit HUSB238 USB-C PD Breakout in a practical application
Raspberry Pi 3B Powered 15.6-inch Touchscreen Display with USB Type-C Power Delivery
This circuit powers a 15.6-inch capacitive touch display and a Raspberry Pi 3B using a USB Type C power delivery breakout and two buck converters. The Raspberry Pi connects to the display via HDMI and USB for touch functionality, while the power delivery breakout provides regulated power to both the display and the Raspberry Pi through the buck converters.
Cirkit Designer LogoOpen Project in Cirkit Designer
Image of InfoOrbsFork: A project utilizing parts/Adafruit HUSB238 USB-C PD Breakout in a practical application
ESP32-Powered NTP Clock with Multiple GC9A01 Displays
This circuit features an ESP32 microcontroller connected to multiple GC9A01 displays and a USB Type C breakout for power. The ESP32 runs a sketch to retrieve the current time from an NTP server over WiFi and displays the hours and minutes across the GC9A01 displays, with each display showing a single digit or colon separator. Pushbuttons are connected to GPIOs on the ESP32, potentially for user input to control display functions or settings.
Cirkit Designer LogoOpen Project in Cirkit Designer

Common Applications and Use Cases

  • Microcontroller Projects: Power your Arduino, Raspberry Pi, or other microcontroller projects with a reliable USB-C power source.
  • Battery Charging: Use the breakout board to charge LiPo or other rechargeable batteries with USB-C PD.
  • Portable Devices: Integrate USB-C PD into portable devices to ensure they can be powered or charged from modern USB-C chargers.
  • Prototyping: Ideal for prototyping and testing USB-C PD capabilities in new designs.

Technical Specifications

Key Technical Details

Parameter Value
Input Voltage 5V to 20V (via USB-C)
Output Voltage Configurable (5V, 9V, 12V, 15V, 20V)
Maximum Current Up to 5A (depending on the power source)
Communication I2C
Dimensions 25mm x 20mm x 3mm

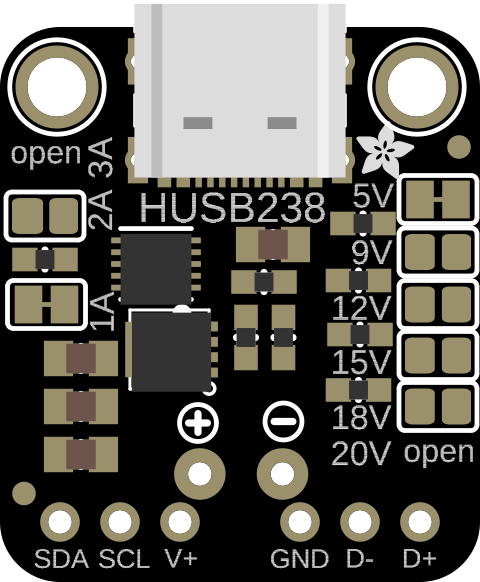
Pin Configuration and Descriptions

Pin Name Description
VIN Input voltage from USB-C source
GND Ground
SCL I2C clock line
SDA I2C data line
VOUT Output voltage (negotiated via USB-C PD)
INT Interrupt pin (indicates power negotiation status)
EN Enable pin (active high, enables the output voltage)

Usage Instructions

How to Use the Component in a Circuit

  1. Power Connection:

    • Connect the VIN pin to the USB-C power source.
    • Connect the GND pin to the ground of your circuit.
  2. I2C Communication:

    • Connect the SCL pin to the I2C clock line of your microcontroller.
    • Connect the SDA pin to the I2C data line of your microcontroller.
  3. Output Voltage:

    • Connect the VOUT pin to the load that requires the negotiated voltage.
    • Use the EN pin to enable or disable the output voltage.
  4. Interrupt Handling:

    • Connect the INT pin to a digital input on your microcontroller to monitor the power negotiation status.

Important Considerations and Best Practices

  • Voltage Selection: Ensure that the connected load can handle the negotiated voltage. Use appropriate voltage regulators if necessary.
  • Current Handling: Verify that the USB-C power source can supply the required current for your application.
  • I2C Address: The default I2C address for the HUSB238 is 0x08. Ensure this does not conflict with other I2C devices on the bus.
  • Heat Dissipation: For high-power applications, ensure adequate cooling to prevent overheating.

Example Code for Arduino UNO

Below is an example code to interface the Adafruit HUSB238 USB-C PD Breakout with an Arduino UNO using the I2C protocol.

#include <Wire.h>

#define HUSB238_I2C_ADDRESS 0x08 // Default I2C address for HUSB238

void setup() {
  Serial.begin(9600);
  Wire.begin(); // Initialize I2C communication

  // Request 9V from the USB-C PD source
  Wire.beginTransmission(HUSB238_I2C_ADDRESS);
  Wire.write(0x01); // Command to request voltage
  Wire.write(0x02); // 0x02 corresponds to 9V
  Wire.endTransmission();

  // Enable the output voltage
  pinMode(7, OUTPUT); // Assuming EN pin is connected to digital pin 7
  digitalWrite(7, HIGH);
}

void loop() {
  // Monitor the interrupt pin for power negotiation status
  int intPin = digitalRead(2); // Assuming INT pin is connected to digital pin 2
  if (intPin == HIGH) {
    Serial.println("Power negotiation successful.");
  } else {
    Serial.println("Power negotiation failed.");
  }

  delay(1000); // Wait for 1 second before checking again
}

Troubleshooting and FAQs

Common Issues Users Might Face

  1. No Output Voltage:

    • Solution: Ensure the EN pin is set high to enable the output voltage. Verify the power source is connected and capable of supplying the requested voltage and current.
  2. I2C Communication Failure:

    • Solution: Check the I2C connections (SCL and SDA). Ensure the correct I2C address (0x08) is used. Verify there are no address conflicts with other I2C devices.
  3. Overheating:

    • Solution: Ensure adequate cooling and ventilation. Use a heat sink if necessary for high-power applications.

Solutions and Tips for Troubleshooting

  • Check Connections: Verify all connections are secure and correctly wired.
  • Power Source: Ensure the USB-C power source is functioning and capable of delivering the required power.
  • Code Debugging: Use Serial.print statements to debug and monitor the status of I2C communication and power negotiation.

By following this documentation, users can effectively integrate the Adafruit HUSB238 USB-C PD Breakout into their projects, leveraging the power and flexibility of USB-C Power Delivery.