
How to Use USB_MICROB_PLUG: Examples, Pinouts, and Specs
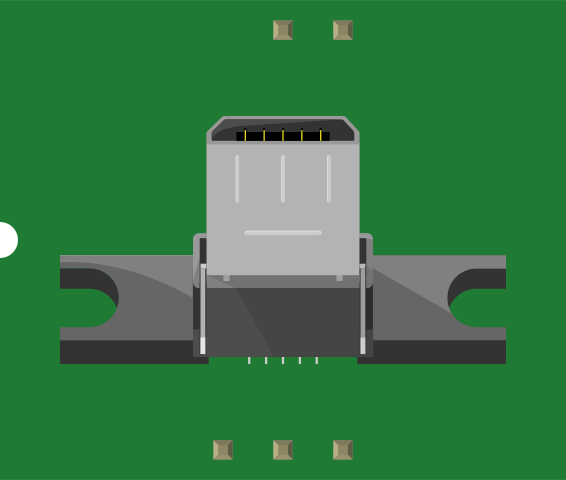
 Design with USB_MICROB_PLUG in Cirkit Designer
Introduction
The USB Micro-B Plug is a compact and widely used connector designed for data transfer and charging applications. It is commonly found in portable electronic devices such as smartphones, tablets, digital cameras, and other compact gadgets. Its small form factor makes it ideal for space-saving designs, while its robust construction ensures reliable performance in everyday use.
Explore Projects Built with USB_MICROB_PLUG
 Open Project in Cirkit Designer
 Open Project in Cirkit Designer
 Open Project in Cirkit Designer
 Open Project in Cirkit Designer
Explore Projects Built with USB_MICROB_PLUG
Open Project in Cirkit DesignerOpen Project in Cirkit DesignerOpen Project in Cirkit DesignerOpen Project in Cirkit DesignerCommon Applications and Use Cases
- Charging portable devices like smartphones, tablets, and power banks.
- Data transfer between devices and computers.
- Embedded systems requiring compact USB connectivity.
- Peripheral devices such as external hard drives, game controllers, and audio equipment.
Technical Specifications
The USB Micro-B Plug adheres to the USB 2.0 or USB 3.0 standard, depending on the specific variant. Below are the key technical details:
General Specifications
| Parameter | Value |
|---|---|
| Connector Type | USB Micro-B Plug |
| Standard Compliance | USB 2.0 / USB 3.0 |
| Voltage Rating | 5V DC |
| Current Rating | Up to 1.8A (USB 2.0), 3A (USB 3.0) |
| Data Transfer Rate | Up to 480 Mbps (USB 2.0) |
| Operating Temperature | -20°C to 85°C |
| Durability | 10,000 mating cycles |
Pin Configuration and Descriptions
The USB Micro-B Plug typically has 5 pins for USB 2.0 and an additional set of pins for USB 3.0. Below is the pinout for USB 2.0:
| Pin Number | Name | Description |
|---|---|---|
| 1 | VBUS | Power supply (5V DC) |
| 2 | D- | Data line (negative) |
| 3 | D+ | Data line (positive) |
| 4 | ID | Identification (used in OTG devices) |
| 5 | GND | Ground |
For USB 3.0 Micro-B Plugs, additional pins are present for SuperSpeed data transfer.
Usage Instructions
How to Use the USB Micro-B Plug in a Circuit
- Power Supply: Connect the VBUS pin to a regulated 5V DC power source and the GND pin to the circuit ground.
- Data Lines: Use the D+ and D- pins for data communication. Ensure proper impedance matching for reliable data transfer.
- OTG Applications: For On-The-Go (OTG) functionality, the ID pin is used to determine the device's role (host or peripheral). Leave it floating for standard devices or connect it to GND for host mode.
- Mechanical Mounting: Secure the connector to the PCB using solder pads or through-hole pins, depending on the connector type.
Important Considerations and Best Practices
- Avoid Overcurrent: Ensure the current drawn does not exceed the connector's rating to prevent overheating or damage.
- Cable Quality: Use high-quality USB cables to minimize signal loss and ensure reliable data transfer.
- ESD Protection: Add ESD protection diodes on the data lines to safeguard against electrostatic discharge.
- Connector Orientation: The USB Micro-B Plug is not reversible. Ensure proper orientation when connecting to avoid damage.
Example: Connecting to an Arduino UNO
The USB Micro-B Plug can be used to power an Arduino UNO or communicate with it via a USB-to-Serial adapter. Below is an example of Arduino code for serial communication:
// Example: Serial communication with a USB Micro-B Plug
// Ensure the USB Micro-B Plug is connected to a USB-to-Serial adapter
// and the adapter is connected to the Arduino UNO's RX/TX pins.

void setup() {
  Serial.begin(9600); // Initialize serial communication at 9600 baud
  while (!Serial) {
    // Wait for the serial port to connect (for native USB boards)
  }
  Serial.println("USB Micro-B Plug connected!");
}

void loop() {
  if (Serial.available() > 0) {
    // Read incoming data from the USB connection
    char received = Serial.read();
    Serial.print("Received: ");
    Serial.println(received);
  }
}
Troubleshooting and FAQs
Common Issues
No Power or Data Transfer
- Cause: Loose or improper connection.
- Solution: Ensure the plug is fully inserted into the socket and check for damaged cables.
Overheating
- Cause: Excessive current draw or poor-quality cables.
- Solution: Verify the current requirements of the connected device and use cables rated for the required current.
Data Transfer Errors
- Cause: Signal interference or poor cable quality.
- Solution: Use shielded cables and ensure proper grounding.
Connector Damage
- Cause: Frequent plugging/unplugging or improper handling.
- Solution: Replace the connector and avoid excessive force during use.
FAQs
Q: Can the USB Micro-B Plug be used for USB 3.0 applications?
A: Yes, but only the USB 3.0 Micro-B variant supports SuperSpeed data transfer. Ensure compatibility with the device.
Q: How do I identify the orientation of the USB Micro-B Plug?
A: The wider side of the plug typically faces upward when connecting to most devices.
Q: Is the USB Micro-B Plug compatible with USB-C?
A: No, USB Micro-B and USB-C are different standards. However, adapters are available for compatibility.
Q: Can I use the USB Micro-B Plug for OTG functionality?
A: Yes, the ID pin is used to enable OTG functionality. Connect it to GND for host mode or leave it floating for peripheral mode.