How to Use REX C100: Examples, Pinouts, and Specs
Introduction
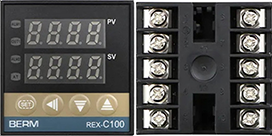
The REX C100 is a compact and versatile temperature controller designed for precise temperature regulation in various applications. It is widely used in industrial, laboratory, and DIY projects where accurate temperature control is essential. The REX C100 supports multiple input types, such as thermocouples and RTDs, and offers programmable settings for enhanced control. Its user-friendly interface and robust design make it a popular choice for temperature management in heating, cooling, and process control systems.
Explore Projects Built with REX C100


Explore Projects Built with REX C100
Common Applications
- Industrial ovens and furnaces
- Brewing and distillation systems
- 3D printer heated beds
- HVAC systems
- Laboratory equipment requiring precise temperature control
Technical Specifications
Key Technical Details
| Parameter | Specification |
|---|---|
| Input Types | Thermocouple (K, J, T, E, etc.), RTD (Pt100) |
| Input Voltage | 100-240V AC, 50/60Hz |
| Output Types | Relay, SSR (Solid State Relay) |
| Temperature Range | -199°C to 1300°C (depending on sensor) |
| Accuracy | ±0.5% of full scale |
| Control Mode | PID, ON/OFF |
| Display | Dual LED display (PV and SV) |
| Dimensions | 48mm x 48mm x 110mm |
| Operating Temperature | 0°C to 50°C |
Pin Configuration and Descriptions
The REX C100 has a terminal block at the rear for connecting power, sensors, and output devices. Below is the pin configuration:
| Pin Number | Label | Description |
|---|---|---|
| 1, 2 | AC Power | Connect to 100-240V AC power supply |
| 3, 4 | Sensor Input | Connect thermocouple or RTD (e.g., Pt100) |
| 5, 6 | Relay Output | Connect to heating or cooling device (Relay) |
| 7, 8 | SSR Output | Connect to Solid State Relay (SSR) |
| 9, 10 | Alarm Output | Optional alarm output for over/under temperature |
Note: Always refer to the specific wiring diagram provided with your REX C100 unit, as pin assignments may vary slightly depending on the model.
Usage Instructions
How to Use the REX C100 in a Circuit
- Power Connection: Connect pins 1 and 2 to a 100-240V AC power source.
- Sensor Connection: Attach the thermocouple or RTD sensor to pins 3 and 4. Ensure proper polarity for thermocouples.
- Output Connection:
- For relay output, connect the heating or cooling device to pins 5 and 6.
- For SSR output, connect the SSR to pins 7 and 8.
- Alarm (Optional): If using an alarm, connect it to pins 9 and 10.
- Programming:
- Power on the REX C100.
- Use the front panel buttons to set the desired temperature (Set Value, SV).
- Configure the control mode (PID or ON/OFF) and other parameters as needed.
Important Considerations and Best Practices
- Sensor Selection: Ensure the sensor type (e.g., K-type thermocouple or Pt100 RTD) matches the input configuration of the REX C100.
- PID Tuning: For optimal performance, fine-tune the PID parameters (Proportional, Integral, Derivative) based on your system's response.
- Electrical Safety: Always disconnect power before wiring or modifying connections.
- SSR Usage: If using an SSR, ensure it is rated for the load current and voltage of your heating or cooling device.
- Ventilation: Install the REX C100 in a well-ventilated area to prevent overheating.
Example: Connecting REX C100 to an Arduino UNO
The REX C100 can be used with an Arduino UNO to monitor or control temperature. Below is an example of reading temperature data from the REX C100 using an RS485-to-TTL module (if supported by your REX C100 model):
#include <ModbusMaster.h>

// Create ModbusMaster object
ModbusMaster node;

void setup() {
  Serial.begin(9600); // Initialize serial communication
  node.begin(1, Serial); // Set Modbus slave ID to 1
}

void loop() {
  uint8_t result;
  uint16_t data;

  // Read temperature (e.g., register 0x0001 for PV)
  result = node.readHoldingRegisters(0x0001, 1);

  if (result == node.ku8MBSuccess) {
    data = node.getResponseBuffer(0);
    Serial.print("Temperature: ");
    Serial.println(data / 10.0); // Convert to Celsius if needed
  } else {
    Serial.println("Error reading temperature");
  }

  delay(1000); // Wait 1 second before next read
}
Note: Ensure your REX C100 supports RS485 communication and configure the communication parameters (baud rate, slave ID, etc.) accordingly.
Troubleshooting and FAQs
Common Issues and Solutions
| Issue | Possible Cause | Solution |
|---|---|---|
| Display shows "EEEE" or "----" | Sensor not connected or faulty | Check sensor wiring and replace if needed |
| Temperature reading is inaccurate | Incorrect sensor type configured | Verify and set the correct sensor type |
| Output device not functioning | Incorrect wiring or output settings | Check wiring and configure output properly |
| Controller not powering on | No power supply or incorrect voltage | Verify power connection and voltage |
| Overheating or oscillation | Poor PID tuning | Adjust PID parameters for stability |
FAQs
Can I use the REX C100 with a DC power supply?
- No, the REX C100 requires a 100-240V AC power supply.
What is the maximum load for the relay output?
- The relay output is typically rated for 3A at 250V AC. Check your unit's specifications for exact ratings.
How do I reset the REX C100 to factory settings?
- Refer to the user manual for the specific procedure to reset the controller.
Can I use the REX C100 for cooling applications?
- Yes, the REX C100 can control cooling devices by configuring the output mode appropriately.
By following this documentation, you can effectively use the REX C100 for precise temperature control in your projects.