Cirkit Designer Logo
Cirkit Designer
Your all-in-one circuit design IDE
Home / 
Component Documentation

How to Use LCD 128x64 I2C ST7567S: Examples, Pinouts, and Specs

Image of LCD 128x64 I2C ST7567S
Cirkit Designer LogoDesign with LCD 128x64 I2C ST7567S in Cirkit Designer

Introduction

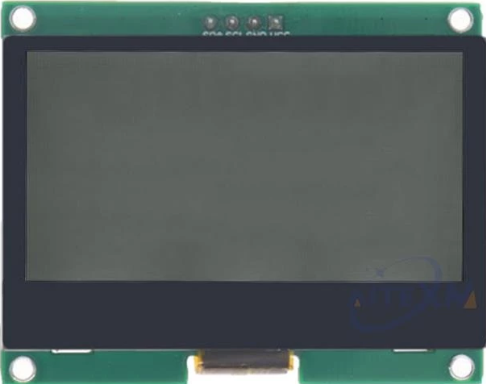
The LCD 128x64 I2C ST7567S (Manufacturer Part ID: 1570) is a graphical LCD display module with a resolution of 128x64 pixels. It is equipped with the ST7567S controller, which enables efficient rendering of both text and graphics. The module uses the I2C communication protocol, making it easy to interface with microcontrollers such as Arduino, Raspberry Pi, and other embedded systems.

Explore Projects Built with LCD 128x64 I2C ST7567S

Use Cirkit Designer to design, explore, and prototype these projects online. Some projects support real-time simulation. Click "Open Project" to start designing instantly!
A-Star 32U4 Mini and I2C LCD Screen Battery-Powered Display
Image of lcd disolay: A project utilizing LCD 128x64 I2C ST7567S in a practical application
This circuit features an A-Star 32U4 Mini microcontroller connected to a 16x2 I2C LCD screen. The microcontroller provides power and ground to the LCD, and communicates with it via the I2C protocol using the A4 (SDA) and A5 (SCL) pins.
Cirkit Designer LogoOpen Project in Cirkit Designer
Arduino Nano Controlled TFT Display with Multiple Pushbuttons
Image of rey: A project utilizing LCD 128x64 I2C ST7567S in a practical application
This circuit features an Arduino Nano microcontroller connected to a ST7735 128x128 1.44 TFT I2C Color display and multiple pushbuttons. The display is interfaced with the Arduino via digital pins for control signals and SPI pins for data transfer. The pushbuttons are connected to various digital and analog input pins on the Arduino, likely intended for user input to control the display or other functions within the code.
Cirkit Designer LogoOpen Project in Cirkit Designer
Arduino Leonardo Controlled LCD Display with I2C Interface
Image of ert: A project utilizing LCD 128x64 I2C ST7567S in a practical application
This circuit connects an Arduino Leonardo microcontroller to a 16x2 LCD display via an LCM1602 IIC interface module, enabling the display of text on the LCD. The Arduino is programmed to display the messages 'TEST LCD i2C' and 'KelasRobot.com' on the LCD. The IIC module facilitates communication between the Arduino and the LCD using the I2C protocol, simplifying the wiring and pin usage.
Cirkit Designer LogoOpen Project in Cirkit Designer
Arduino Leonardo Controlled I2C LCD Display for Text Scrolling
Image of final year project: A project utilizing LCD 128x64 I2C ST7567S in a practical application
This circuit features an Arduino Leonardo microcontroller connected to a 16x2 I2C LCD screen, powered by a 5V battery. The Arduino is programmed to display and continuously scroll a message on the LCD. The I2C communication protocol is used for the microcontroller to interface with the LCD, utilizing the SDA and SCL connections for data transfer.
Cirkit Designer LogoOpen Project in Cirkit Designer

Explore Projects Built with LCD 128x64 I2C ST7567S

Use Cirkit Designer to design, explore, and prototype these projects online. Some projects support real-time simulation. Click "Open Project" to start designing instantly!
Image of lcd disolay: A project utilizing LCD 128x64 I2C ST7567S in a practical application
A-Star 32U4 Mini and I2C LCD Screen Battery-Powered Display
This circuit features an A-Star 32U4 Mini microcontroller connected to a 16x2 I2C LCD screen. The microcontroller provides power and ground to the LCD, and communicates with it via the I2C protocol using the A4 (SDA) and A5 (SCL) pins.
Cirkit Designer LogoOpen Project in Cirkit Designer
Image of rey: A project utilizing LCD 128x64 I2C ST7567S in a practical application
Arduino Nano Controlled TFT Display with Multiple Pushbuttons
This circuit features an Arduino Nano microcontroller connected to a ST7735 128x128 1.44 TFT I2C Color display and multiple pushbuttons. The display is interfaced with the Arduino via digital pins for control signals and SPI pins for data transfer. The pushbuttons are connected to various digital and analog input pins on the Arduino, likely intended for user input to control the display or other functions within the code.
Cirkit Designer LogoOpen Project in Cirkit Designer
Image of ert: A project utilizing LCD 128x64 I2C ST7567S in a practical application
Arduino Leonardo Controlled LCD Display with I2C Interface
This circuit connects an Arduino Leonardo microcontroller to a 16x2 LCD display via an LCM1602 IIC interface module, enabling the display of text on the LCD. The Arduino is programmed to display the messages 'TEST LCD i2C' and 'KelasRobot.com' on the LCD. The IIC module facilitates communication between the Arduino and the LCD using the I2C protocol, simplifying the wiring and pin usage.
Cirkit Designer LogoOpen Project in Cirkit Designer
Image of final year project: A project utilizing LCD 128x64 I2C ST7567S in a practical application
Arduino Leonardo Controlled I2C LCD Display for Text Scrolling
This circuit features an Arduino Leonardo microcontroller connected to a 16x2 I2C LCD screen, powered by a 5V battery. The Arduino is programmed to display and continuously scroll a message on the LCD. The I2C communication protocol is used for the microcontroller to interface with the LCD, utilizing the SDA and SCL connections for data transfer.
Cirkit Designer LogoOpen Project in Cirkit Designer

Common Applications and Use Cases

  • Embedded systems requiring graphical or textual displays
  • Industrial control panels
  • Consumer electronics such as appliances and handheld devices
  • Educational and prototyping projects
  • IoT devices with visual feedback

Technical Specifications

Below are the key technical details of the LCD 128x64 I2C ST7567S:

Parameter Value
Manufacturer China
Manufacturer Part ID 1570
Display Resolution 128x64 pixels
Controller IC ST7567S
Communication Protocol I2C
Operating Voltage 3.3V to 5V
Operating Current ~2mA (typical)
Backlight LED (white)
Viewing Angle 6 o'clock
Operating Temperature -20°C to +70°C
Dimensions 93mm x 70mm x 12mm

Pin Configuration and Descriptions

The LCD module has a 4-pin interface for I2C communication. Below is the pinout:

Pin Name Description
1 GND Ground connection
2 VCC Power supply (3.3V to 5V)
3 SDA I2C data line
4 SCL I2C clock line

Usage Instructions

How to Use the Component in a Circuit

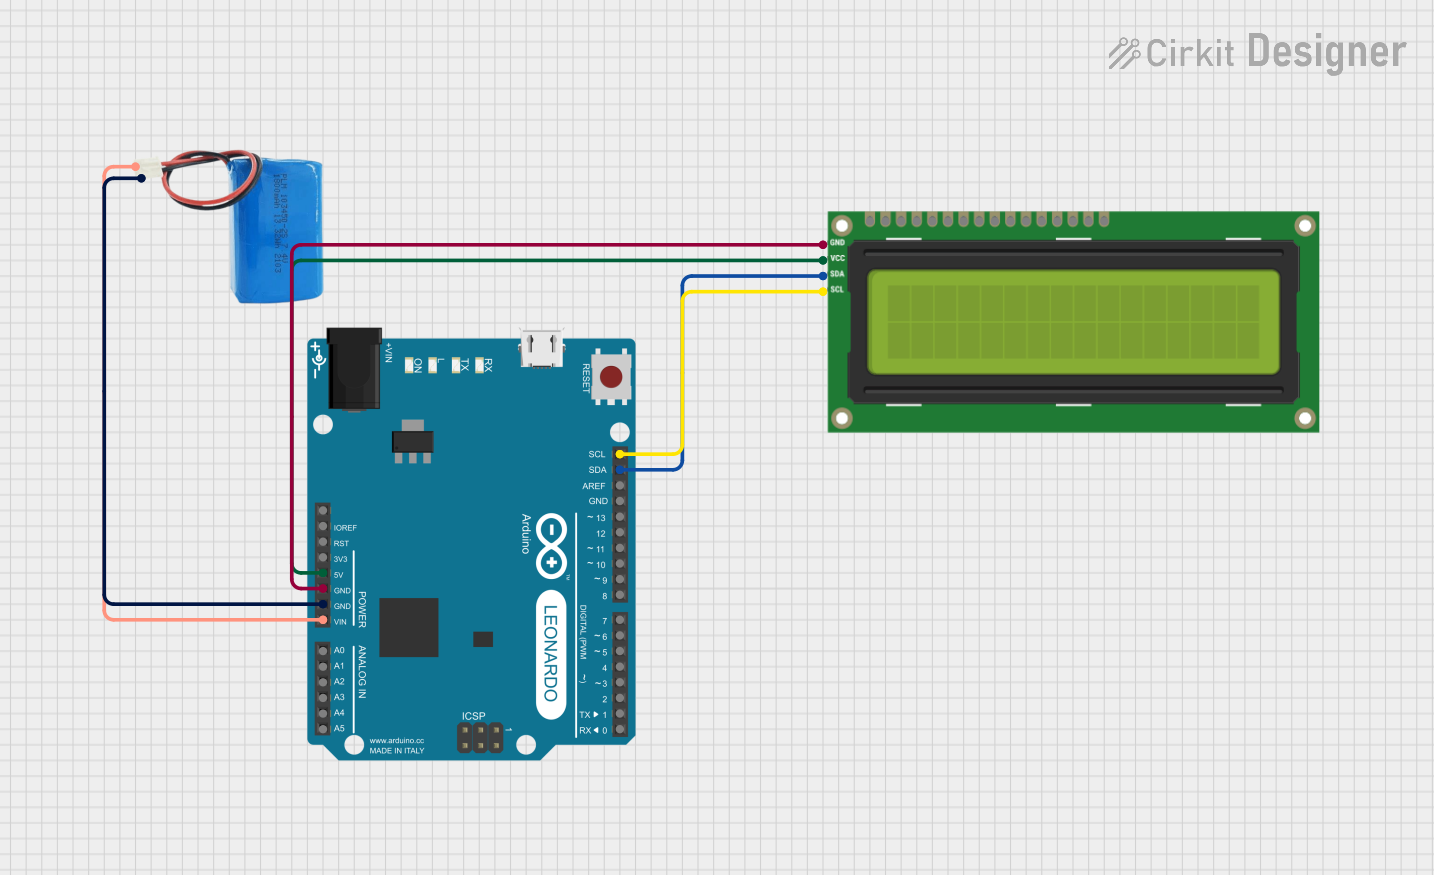
  1. Power Supply: Connect the VCC pin to a 3.3V or 5V power source and the GND pin to ground.
  2. I2C Connection: Connect the SDA and SCL pins to the corresponding I2C pins on your microcontroller. For Arduino UNO:
    • SDA connects to A4.
    • SCL connects to A5.
  3. Pull-Up Resistors: Ensure that the I2C lines (SDA and SCL) have pull-up resistors (typically 4.7kΩ to 10kΩ) if not already present on the module.
  4. Initialization: Use a compatible library (e.g., U8g2 or Adafruit GFX) to initialize and control the display.

Important Considerations and Best Practices

  • Voltage Compatibility: Ensure the module's operating voltage matches your microcontroller's I2C voltage level.
  • I2C Address: The default I2C address of the module is typically 0x3C or 0x3D. Check the datasheet or test to confirm.
  • Contrast Adjustment: Some modules may have a potentiometer or software control for adjusting contrast.
  • Avoid Noise: Keep I2C lines short and use proper decoupling capacitors to minimize noise.

Example Code for Arduino UNO

Below is an example of how to use the LCD 128x64 I2C ST7567S with an Arduino UNO using the U8g2 library:

#include <Wire.h>
#include <U8g2lib.h>

// Initialize the display with the ST7567S controller and I2C communication
U8G2_ST7567_128X64_F_HW_I2C u8g2(U8G2_R0, /* reset=*/ U8X8_PIN_NONE);

void setup() {
  u8g2.begin(); // Initialize the display
}

void loop() {
  u8g2.clearBuffer(); // Clear the display buffer
  
  // Draw text on the display
  u8g2.setFont(u8g2_font_ncenB08_tr); // Select a font
  u8g2.drawStr(0, 20, "Hello, World!"); // Draw "Hello, World!" at (0, 20)
  
  // Draw a rectangle
  u8g2.drawFrame(10, 30, 50, 20); // Draw a rectangle at (10, 30) with width 50 and height 20
  
  u8g2.sendBuffer(); // Send the buffer to the display
  delay(1000); // Wait for 1 second
}

Troubleshooting and FAQs

Common Issues and Solutions

  1. Display Not Turning On

    • Cause: Incorrect power supply or loose connections.
    • Solution: Verify that VCC and GND are properly connected and the voltage is within the specified range.
  2. No Output on the Display

    • Cause: Incorrect I2C address or uninitialized display.
    • Solution: Check the I2C address using an I2C scanner sketch and ensure the display is initialized in the code.
  3. Flickering or Noise on the Display

    • Cause: Electrical noise or insufficient pull-up resistors on I2C lines.
    • Solution: Add or adjust pull-up resistors (4.7kΩ to 10kΩ) and ensure proper grounding.
  4. Contrast Issues

    • Cause: Incorrect contrast settings.
    • Solution: Adjust the contrast using the potentiometer (if available) or software commands.

FAQs

Q1: Can this display work with 3.3V microcontrollers like ESP32?
A1: Yes, the module supports 3.3V operation and is compatible with 3.3V logic levels.

Q2: What is the maximum I2C clock speed supported?
A2: The ST7567S controller supports I2C clock speeds up to 400kHz (Fast Mode).

Q3: Can I use this display with SPI instead of I2C?
A3: No, this specific module is designed for I2C communication only.

Q4: How do I find the I2C address of the module?
A4: Use an I2C scanner sketch to detect the module's address. The default is typically 0x3C or 0x3D.

By following this documentation, you can effectively integrate the LCD 128x64 I2C ST7567S into your projects and troubleshoot common issues.