How to Use Rain sensor MH series: Examples, Pinouts, and Specs
Introduction
The Rain Sensor MH Series is a versatile and reliable moisture-detection module designed to sense rainfall. It is commonly used in automation systems to activate or deactivate devices such as irrigation systems, alarms, or other weather-dependent equipment. By detecting the presence of rain, this sensor helps conserve water and automate garden care, making it an essential component for smart home and agricultural applications.
Explore Projects Built with Rain sensor MH series
Explore Projects Built with Rain sensor MH series
Common Applications and Use Cases
- Automatic irrigation systems for gardens and farms
- Weather monitoring and data collection
- Smart home automation systems
- Rain-triggered alarms or notifications
- Water conservation systems
Technical Specifications
The Rain Sensor MH Series consists of two main parts: the rain detection board and the control module. Below are the key technical details:
General Specifications
| Parameter | Value |
|---|---|
| Operating Voltage | 3.3V - 5V |
| Output Type | Digital and Analog |
| Digital Output Voltage | 0V (rain detected) or 5V (no rain) |
| Analog Output Voltage | Proportional to moisture level |
| Current Consumption | < 20mA |
| Dimensions (Control Module) | 30mm x 16mm x 8mm |
| Dimensions (Sensor Board) | 54mm x 40mm x 2mm |
| Operating Temperature | -40°C to 85°C |
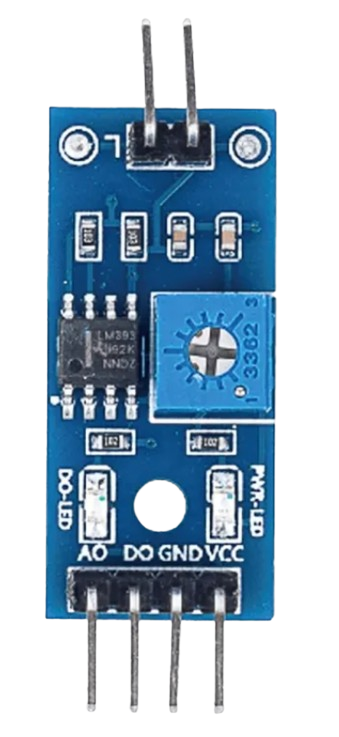
Pin Configuration and Descriptions
Control Module Pinout
| Pin Name | Type | Description |
|---|---|---|
| VCC | Power Input | Connect to 3.3V or 5V power supply |
| GND | Ground | Connect to the ground of the power supply |
| D0 | Digital Out | Outputs HIGH (5V) when no rain is detected, LOW (0V) when rain is detected |
| A0 | Analog Out | Outputs an analog voltage proportional to the moisture level detected |
Rain Detection Board
The rain detection board has two terminals that connect to the control module. These terminals are used to sense the presence of water droplets on the board's surface.
Usage Instructions
How to Use the Rain Sensor in a Circuit
Connect the Control Module to Power:
- Connect the
VCCpin to a 3.3V or 5V power source. - Connect the
GNDpin to the ground of the power source.
- Connect the
Connect the Sensor Board:
- Attach the rain detection board to the control module using the provided terminals.
Read the Output:
- Use the
D0pin for digital output to detect the presence of rain (HIGH or LOW signal). - Use the
A0pin for analog output to measure the intensity of rainfall.
- Use the
Optional: Connect to a Microcontroller:
- For example, connect the
D0orA0pin to an Arduino UNO for further processing.
- For example, connect the
Important Considerations and Best Practices
- Placement: Install the rain detection board in an open area where it can directly sense rainfall. Avoid placing it under obstructions like roofs or trees.
- Cleaning: Regularly clean the rain detection board to remove dirt or debris that may affect its sensitivity.
- Waterproofing: Ensure the control module is protected from water exposure, as it is not waterproof.
- Power Supply: Use a stable power source to avoid erratic readings.
Example Code for Arduino UNO
Below is an example of how to use the Rain Sensor MH Series with an Arduino UNO:
// Define pin connections
const int digitalPin = 2; // Connect D0 to digital pin 2
const int analogPin = A0; // Connect A0 to analog pin A0

void setup() {
  pinMode(digitalPin, INPUT); // Set digital pin as input
  Serial.begin(9600); // Initialize serial communication
}

void loop() {
  // Read digital output (rain detected or not)
  int rainStatus = digitalRead(digitalPin);
  if (rainStatus == LOW) {
    Serial.println("Rain detected!"); // Print message if rain is detected
  } else {
    Serial.println("No rain detected."); // Print message if no rain is detected
  }

  // Read analog output (moisture level)
  int moistureLevel = analogRead(analogPin);
  Serial.print("Moisture Level: ");
  Serial.println(moistureLevel); // Print the moisture level value

  delay(1000); // Wait for 1 second before the next reading
}
Troubleshooting and FAQs
Common Issues and Solutions
No Output from the Sensor:
- Cause: Loose connections or incorrect wiring.
- Solution: Double-check all connections, ensuring the VCC and GND pins are properly connected.
Erratic Readings:
- Cause: Dirty or damaged rain detection board.
- Solution: Clean the board with a soft cloth and ensure it is free of debris.
Sensor Not Detecting Rain:
- Cause: Insufficient sensitivity or improper placement.
- Solution: Adjust the placement of the sensor to ensure it is exposed to rainfall. Check the potentiometer on the control module (if available) to adjust sensitivity.
Analog Output Not Changing:
- Cause: Faulty sensor board or control module.
- Solution: Test the sensor with a multimeter to verify functionality. Replace the faulty component if necessary.
FAQs
Q: Can the Rain Sensor MH Series be used outdoors?
A: Yes, but only the rain detection board should be exposed to the elements. The control module must be housed in a waterproof enclosure.
Q: How do I adjust the sensitivity of the sensor?
A: Some versions of the Rain Sensor MH Series include a potentiometer on the control module. Rotate the potentiometer to adjust the sensitivity.
Q: Can this sensor detect the intensity of rainfall?
A: Yes, the analog output (A0) provides a voltage proportional to the moisture level, which can be used to estimate rainfall intensity.
Q: Is the sensor compatible with 3.3V microcontrollers?
A: Yes, the Rain Sensor MH Series operates at 3.3V to 5V, making it compatible with most microcontrollers, including 3.3V systems like ESP32.
By following this documentation, you can effectively integrate the Rain Sensor MH Series into your projects for reliable and automated rain detection.