How to Use HC-12: Examples, Pinouts, and Specs
Introduction
The HC-12 is a wireless serial communication module that operates in the 433 MHz frequency range. It is designed for long-range data transmission, with a range of up to 1,000 meters in open space under optimal conditions. The module supports UART (Universal Asynchronous Receiver-Transmitter) communication, making it easy to interface with microcontrollers, such as Arduino, Raspberry Pi, and other embedded systems.
Explore Projects Built with HC-12


Explore Projects Built with HC-12
Common Applications and Use Cases
- Remote control systems
- Wireless sensor networks
- Home automation
- Industrial monitoring and control
- Robotics and drone communication
- Data logging and telemetry
Technical Specifications
The HC-12 module is highly versatile and offers a range of configurable parameters to suit various applications. Below are its key technical specifications:
| Parameter | Value |
|---|---|
| Operating Frequency | 433.4 MHz to 473.0 MHz |
| Communication Range | Up to 1,000 meters (open space) |
| Modulation Method | GFSK (Gaussian Frequency Shift Keying) |
| Supply Voltage | 3.2V to 5.5V |
| Operating Current | 16 mA (transmitting), 3.5 mA (receiving) |
| Baud Rate | 1,200 bps to 115,200 bps |
| Default Baud Rate | 9,600 bps |
| Transmit Power | Up to 100 mW (20 dBm) |
| Antenna Interface | IPEX or soldered wire antenna |
| Operating Temperature | -40°C to +85°C |
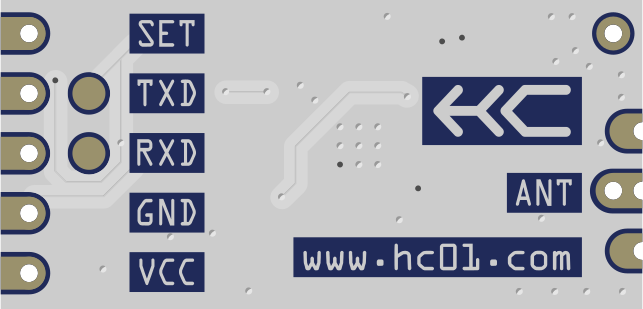
Pin Configuration and Descriptions
The HC-12 module has a total of 4 pins. Below is the pinout and description:
| Pin | Name | Description |
|---|---|---|
| 1 | VCC | Power supply input (3.2V to 5.5V). Connect to the 5V or 3.3V pin of your microcontroller. |
| 2 | GND | Ground. Connect to the ground of your circuit. |
| 3 | TXD | Transmit data pin. Connect to the RX pin of your microcontroller. |
| 4 | RXD | Receive data pin. Connect to the TX pin of your microcontroller. |
Usage Instructions
The HC-12 module is straightforward to use and can be integrated into a variety of projects. Below are the steps to use the module in a circuit:
Basic Circuit Connection
- Power Supply: Connect the VCC pin to a 3.3V or 5V power source and the GND pin to the ground.
- UART Communication: Connect the TXD pin of the HC-12 to the RX pin of your microcontroller, and the RXD pin of the HC-12 to the TX pin of your microcontroller.
- Antenna: Attach an appropriate antenna to the module for optimal range and performance.
Configuring the HC-12
The HC-12 can be configured using AT commands sent via the UART interface. To enter AT command mode:
- Pull the "SET" pin (not listed in the basic pinout above) low before powering on the module.
- Send AT commands using a serial terminal or microcontroller.
Example AT commands:
AT: Test the connection. The module should respond with "OK".AT+BAUDx: Set the baud rate (replacexwith the desired value, e.g.,AT+BAUD4for 9,600 bps).AT+RFx: Set the RF channel (replacexwith a value from 1 to 100).
Arduino Example Code
Below is an example of how to use the HC-12 module with an Arduino UNO for basic communication:
#include <SoftwareSerial.h>

// Define RX and TX pins for SoftwareSerial
SoftwareSerial HC12(10, 11); // RX = Pin 10, TX = Pin 11

void setup() {
  Serial.begin(9600);       // Start the hardware serial port
  HC12.begin(9600);         // Start the HC-12 serial port
  Serial.println("HC-12 Test");
}

void loop() {
  // Check if data is available from the HC-12
  if (HC12.available()) {
    String received = HC12.readString(); // Read data from HC-12
    Serial.print("Received: ");
    Serial.println(received);           // Print received data to Serial Monitor
  }

  // Check if data is available from the Serial Monitor
  if (Serial.available()) {
    String toSend = Serial.readString(); // Read data from Serial Monitor
    HC12.print(toSend);                  // Send data to HC-12
  }
}
Important Considerations and Best Practices
- Power Supply: Ensure a stable power supply to avoid communication issues. Use decoupling capacitors if necessary.
- Antenna: Use a proper antenna to maximize the communication range.
- Baud Rate: Ensure the baud rate of the HC-12 matches the baud rate of your microcontroller.
- Interference: Avoid placing the module near sources of electromagnetic interference, such as motors or high-frequency circuits.
Troubleshooting and FAQs
Common Issues and Solutions
No Response to AT Commands:
- Ensure the "SET" pin is pulled low before powering on the module.
- Check the baud rate of your serial terminal (default is 9,600 bps).
Poor Communication Range:
- Verify that the antenna is properly connected.
- Ensure there are no obstacles or interference in the communication path.
Data Loss or Corruption:
- Check for mismatched baud rates between the HC-12 and the microcontroller.
- Use shielded cables or reduce the communication distance if interference is suspected.
Module Not Powering On:
- Confirm that the power supply voltage is within the 3.2V to 5.5V range.
- Check all connections for loose wires or poor solder joints.
FAQs
Q: Can I use multiple HC-12 modules in the same area?
A: Yes, you can use multiple modules by configuring them to operate on different RF channels using the AT+RFx command.
Q: What is the maximum data rate of the HC-12?
A: The HC-12 supports baud rates up to 115,200 bps, but the effective data rate may vary depending on the environment and configuration.
Q: Can the HC-12 communicate with other 433 MHz devices?
A: No, the HC-12 uses a proprietary protocol and cannot directly communicate with other 433 MHz devices that use different protocols.
Q: How do I reset the HC-12 to factory settings?
A: Use the AT+DEFAULT command to reset the module to its default configuration.
By following this documentation, you should be able to successfully integrate and troubleshoot the HC-12 module in your projects.