Cirkit Designer Logo
Cirkit Designer
Your all-in-one circuit design IDE
Home / 
Component Documentation

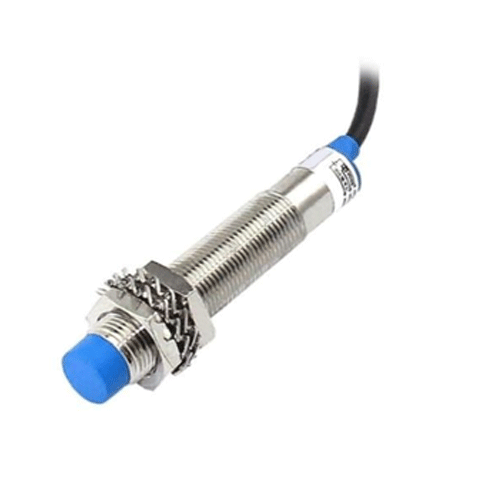
How to Use proximity sensor: Examples, Pinouts, and Specs

Image of proximity sensor
Cirkit Designer LogoDesign with proximity sensor in Cirkit Designer

Introduction

A proximity sensor is an electronic component that detects the presence or absence of an object within a specified range without any physical contact. These sensors are widely used in various applications such as mobile phones, robotics, industrial controls, and vehicles for object detection, distance measurement, and touch-free switching.

Common applications include:

  • Counting items on a conveyor belt in manufacturing.
  • Detecting the presence of a user's hand in touchless faucets and soap dispensers.
  • Activating screens or functions in smartphones when brought close to the ear or face.
  • Assisting in parking and collision avoidance systems in vehicles.

Explore Projects Built with proximity sensor

Use Cirkit Designer to design, explore, and prototype these projects online. Some projects support real-time simulation. Click "Open Project" to start designing instantly!
Arduino Nano-Based Ultrasonic Distance Sensor with Buzzer and Vibration Motor
Image of 传感发出尖锐爆鸣: A project utilizing proximity sensor in a practical application
This circuit is a proximity alert system using an Arduino Nano, an HC-SR04 ultrasonic sensor, a buzzer, and a vibration motor. The Arduino Nano reads distance data from the ultrasonic sensor and activates the buzzer and vibration motor when an object is detected within a specified threshold distance.
Cirkit Designer LogoOpen Project in Cirkit Designer
Arduino Nano Controlled Ambient Light Sensing and NeoPixel Display
Image of GuesturLED: A project utilizing proximity sensor in a practical application
This circuit features an Arduino Nano microcontroller interfaced with an APDS-9930 Proximity and Ambient Light Sensor for sensing environmental light and proximity. The Arduino Nano also controls an Adafruit Quarter 60 NeoPixel Ring, likely for visual feedback or display purposes. The sensor communicates with the Arduino via I2C (SDA and SCL connections), and the NeoPixel Ring is driven by a digital output (D8) from the Arduino.
Cirkit Designer LogoOpen Project in Cirkit Designer
Arduino-Based Infrared Proximity Sensing System
Image of sds: A project utilizing proximity sensor in a practical application
This circuit integrates an Arduino UNO with an infrared proximity sensor. The sensor is powered by the Arduino's 5V output and its ground is connected to the Arduino's ground. The sensor's output voltage (Vout) is connected to digital pin D2 on the Arduino, allowing the microcontroller to read proximity data from the sensor.
Cirkit Designer LogoOpen Project in Cirkit Designer
Arduino UNO Proximity and Ambient Light Sensor with APDS-9930
Image of APDS-9930 sensor: A project utilizing proximity sensor in a practical application
This circuit interfaces an Arduino UNO with an APDS-9930 Proximity and Ambient Light Sensor. The Arduino reads proximity data from the sensor via I2C communication and prints the values to the Serial Monitor.
Cirkit Designer LogoOpen Project in Cirkit Designer

Explore Projects Built with proximity sensor

Use Cirkit Designer to design, explore, and prototype these projects online. Some projects support real-time simulation. Click "Open Project" to start designing instantly!
Image of 传感发出尖锐爆鸣: A project utilizing proximity sensor in a practical application
Arduino Nano-Based Ultrasonic Distance Sensor with Buzzer and Vibration Motor
This circuit is a proximity alert system using an Arduino Nano, an HC-SR04 ultrasonic sensor, a buzzer, and a vibration motor. The Arduino Nano reads distance data from the ultrasonic sensor and activates the buzzer and vibration motor when an object is detected within a specified threshold distance.
Cirkit Designer LogoOpen Project in Cirkit Designer
Image of GuesturLED: A project utilizing proximity sensor in a practical application
Arduino Nano Controlled Ambient Light Sensing and NeoPixel Display
This circuit features an Arduino Nano microcontroller interfaced with an APDS-9930 Proximity and Ambient Light Sensor for sensing environmental light and proximity. The Arduino Nano also controls an Adafruit Quarter 60 NeoPixel Ring, likely for visual feedback or display purposes. The sensor communicates with the Arduino via I2C (SDA and SCL connections), and the NeoPixel Ring is driven by a digital output (D8) from the Arduino.
Cirkit Designer LogoOpen Project in Cirkit Designer
Image of sds: A project utilizing proximity sensor in a practical application
Arduino-Based Infrared Proximity Sensing System
This circuit integrates an Arduino UNO with an infrared proximity sensor. The sensor is powered by the Arduino's 5V output and its ground is connected to the Arduino's ground. The sensor's output voltage (Vout) is connected to digital pin D2 on the Arduino, allowing the microcontroller to read proximity data from the sensor.
Cirkit Designer LogoOpen Project in Cirkit Designer
Image of APDS-9930 sensor: A project utilizing proximity sensor in a practical application
Arduino UNO Proximity and Ambient Light Sensor with APDS-9930
This circuit interfaces an Arduino UNO with an APDS-9930 Proximity and Ambient Light Sensor. The Arduino reads proximity data from the sensor via I2C communication and prints the values to the Serial Monitor.
Cirkit Designer LogoOpen Project in Cirkit Designer

Technical Specifications

Key Technical Details

  • Operating Voltage: Typically 3.3V to 5V
  • Sensing Distance: Varies by model (e.g., 2mm to 10cm)
  • Output Type: Digital (High/Low) or Analog (Voltage level proportional to distance)
  • Current Consumption: Depends on the model and operating conditions

Pin Configuration and Descriptions

Pin Number Name Description
1 VCC Power supply (3.3V to 5V)
2 GND Ground connection
3 OUT Output signal (Digital or Analog)
4 (Optional) Additional pin for specific functions (e.g., Enable, Control)

Usage Instructions

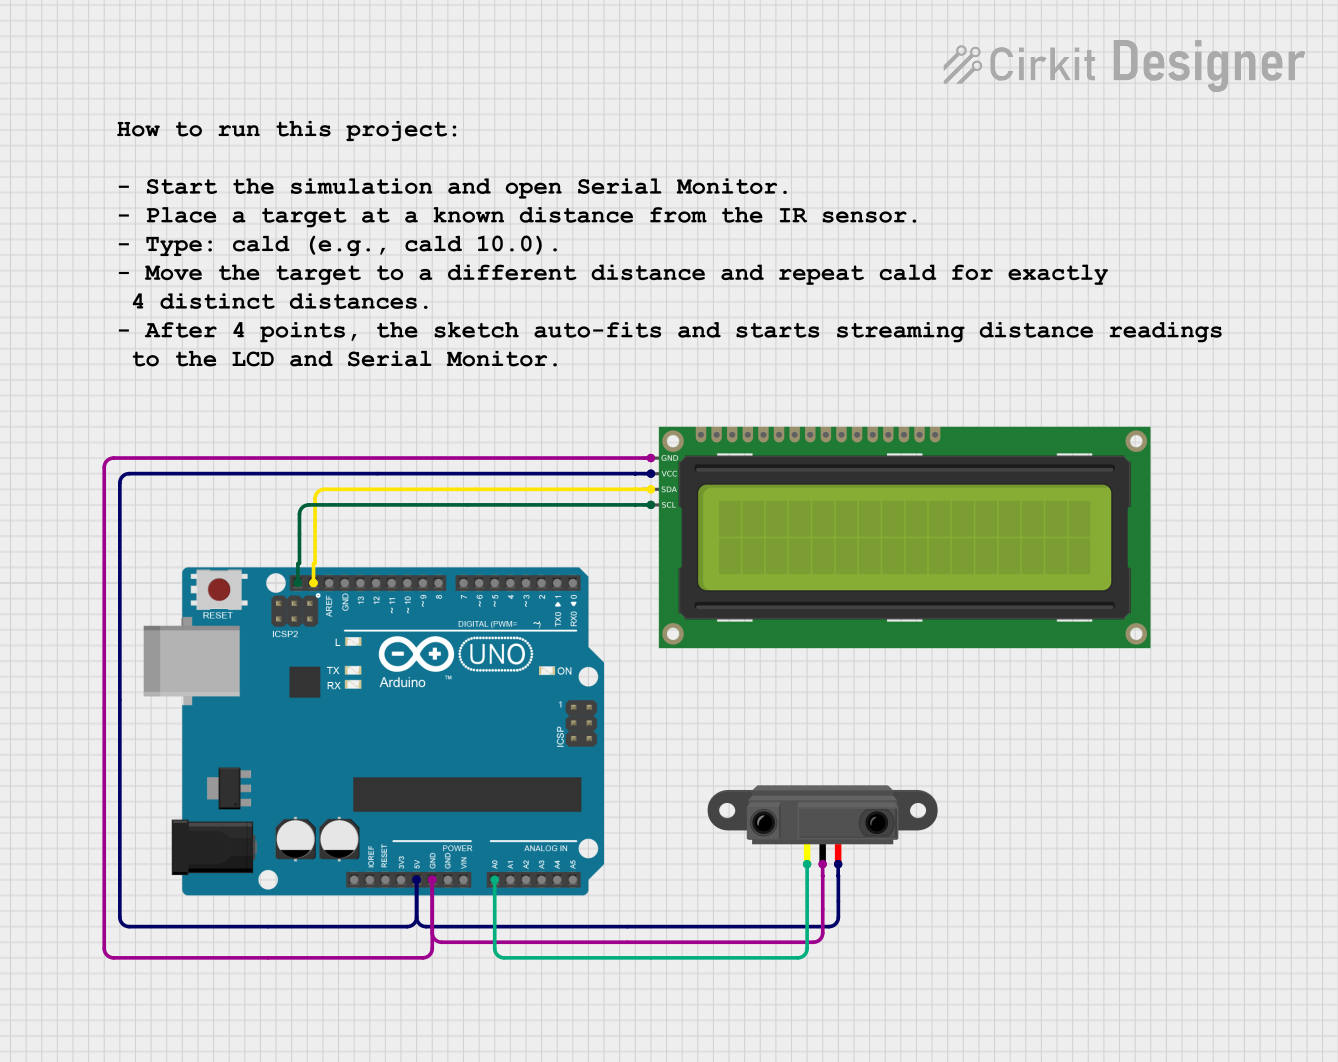
How to Use the Component in a Circuit

  1. Power Supply: Connect the VCC pin to a power source within the sensor's operating voltage range and the GND pin to the ground of the power source.
  2. Output Connection: Connect the OUT pin to a digital or analog input on a microcontroller, depending on the output type of the proximity sensor.
  3. Mounting: Position the sensor facing the area where object detection is required, ensuring there are no obstructions in the sensor's field of view.

Important Considerations and Best Practices

  • Voltage Levels: Ensure that the voltage levels of the sensor's output are compatible with the microcontroller's input voltage levels.
  • Interference: Avoid placing the sensor near devices that emit strong electromagnetic fields, as this may interfere with its operation.
  • Calibration: Some sensors may require calibration to accurately detect objects at different distances.
  • Environmental Factors: Consider the sensor's performance in different environmental conditions such as temperature, humidity, and the presence of dust or moisture.

Example Code for Arduino UNO

// Example code for interfacing a digital proximity sensor with an Arduino UNO

const int sensorPin = 2; // Digital pin connected to the sensor's output
const int ledPin = 13;   // Onboard LED pin

void setup() {
  pinMode(sensorPin, INPUT); // Set the sensor pin as an input
  pinMode(ledPin, OUTPUT);   // Set the LED pin as an output
}

void loop() {
  int sensorValue = digitalRead(sensorPin); // Read the sensor output
  if (sensorValue == HIGH) {
    // If the sensor detects an object, turn on the LED
    digitalWrite(ledPin, HIGH);
  } else {
    // If the sensor does not detect an object, turn off the LED
    digitalWrite(ledPin, LOW);
  }
}

Troubleshooting and FAQs

Common Issues

  • Sensor Not Detecting Objects: Ensure the sensor is properly powered and the object is within the sensing range.
  • False Triggering: Adjust the sensor's position or sensitivity to avoid false detections caused by background noise or interference.
  • Inconsistent Readings: Check for loose connections and ensure the sensor is not affected by environmental factors.

Solutions and Tips for Troubleshooting

  • Power Supply Issues: Verify that the power supply is stable and within the sensor's specified voltage range.
  • Connection Check: Recheck all connections, including VCC, GND, and OUT pins, for any loose or incorrect connections.
  • Sensor Calibration: If applicable, recalibrate the sensor according to the manufacturer's instructions.

FAQs

Q: Can a proximity sensor detect through materials? A: It depends on the type of sensor and the material. Some sensors can detect through non-metallic materials, but the sensing range may be reduced.

Q: How do I increase the sensing range of my proximity sensor? A: The sensing range is typically fixed based on the sensor's design. However, some models may allow adjustment through onboard potentiometers or software settings.

Q: Are proximity sensors waterproof? A: Not all proximity sensors are waterproof. Check the specifications or consult the manufacturer for sensors rated for use in wet or outdoor environments.