How to Use DC 12V Submersible Water Pump: Examples, Pinouts, and Specs

Introduction
The DC 12V Submersible Water Pump is a compact and efficient pump designed to operate underwater. It is commonly used for moving water in aquariums, fountains, hydroponic systems, or small-scale irrigation setups. Powered by a 12V DC power source, this pump is energy-efficient, easy to use, and highly reliable for continuous operation in various water circulation applications.
Explore Projects Built with DC 12V Submersible Water Pump
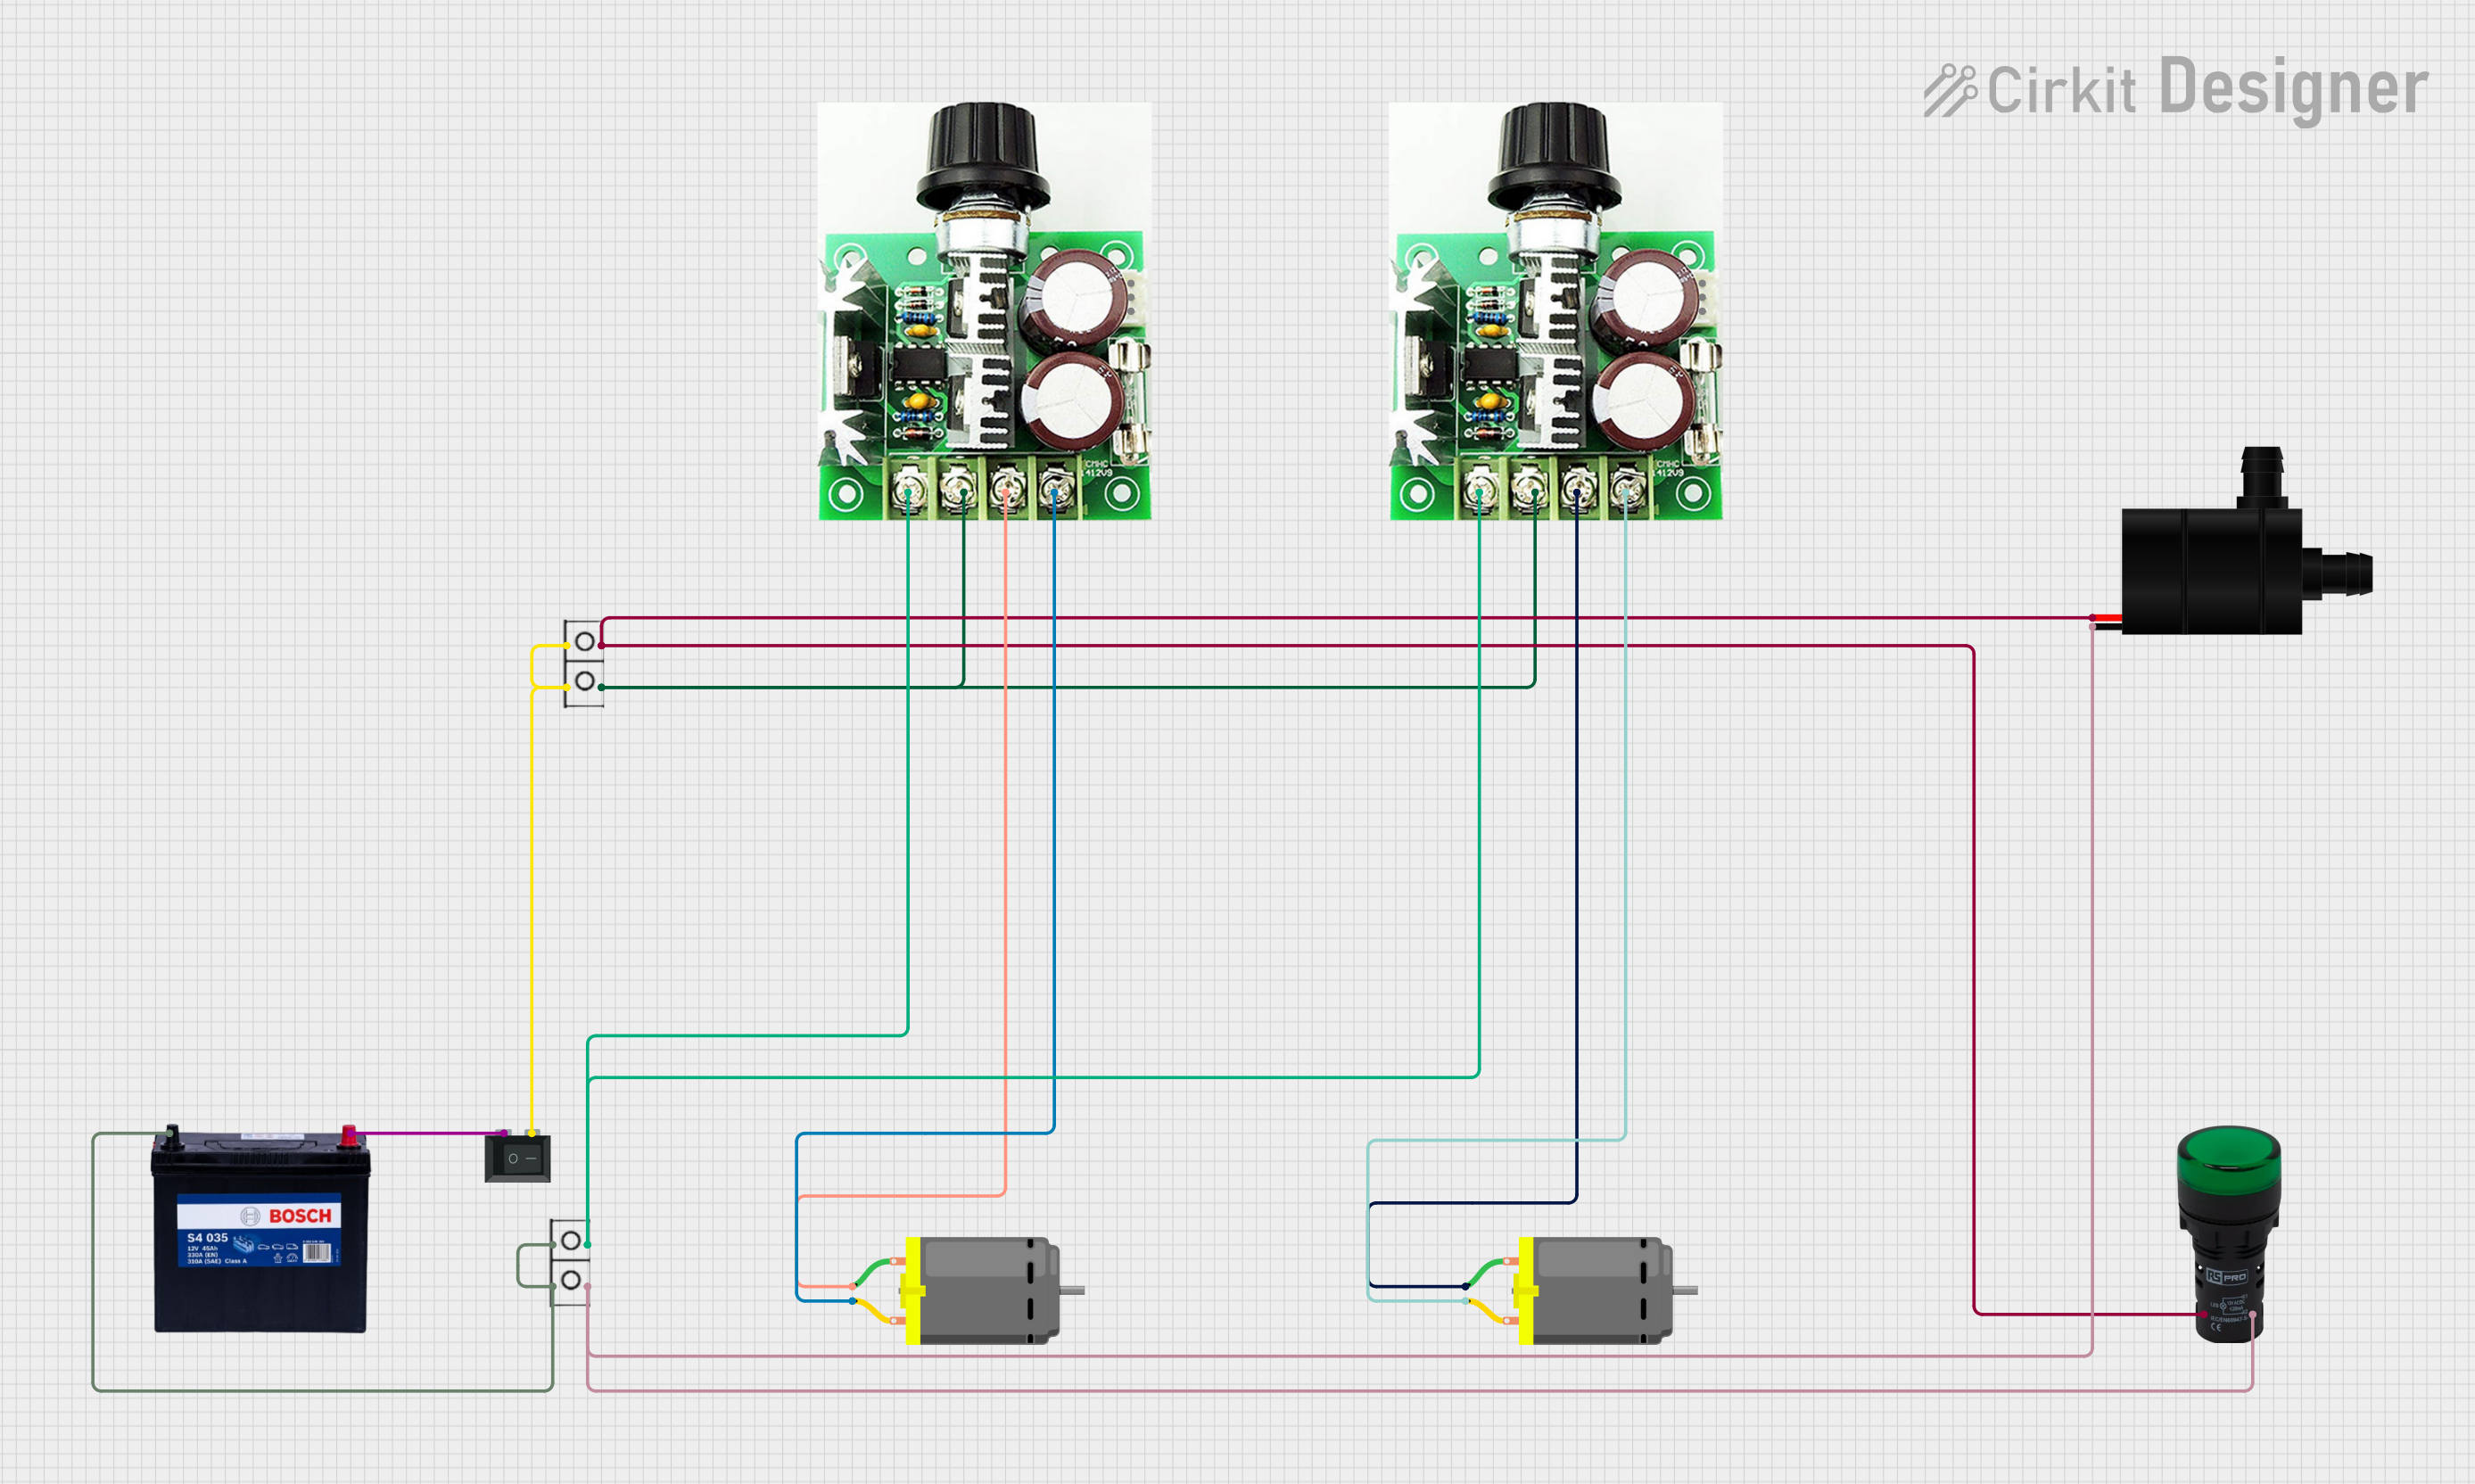
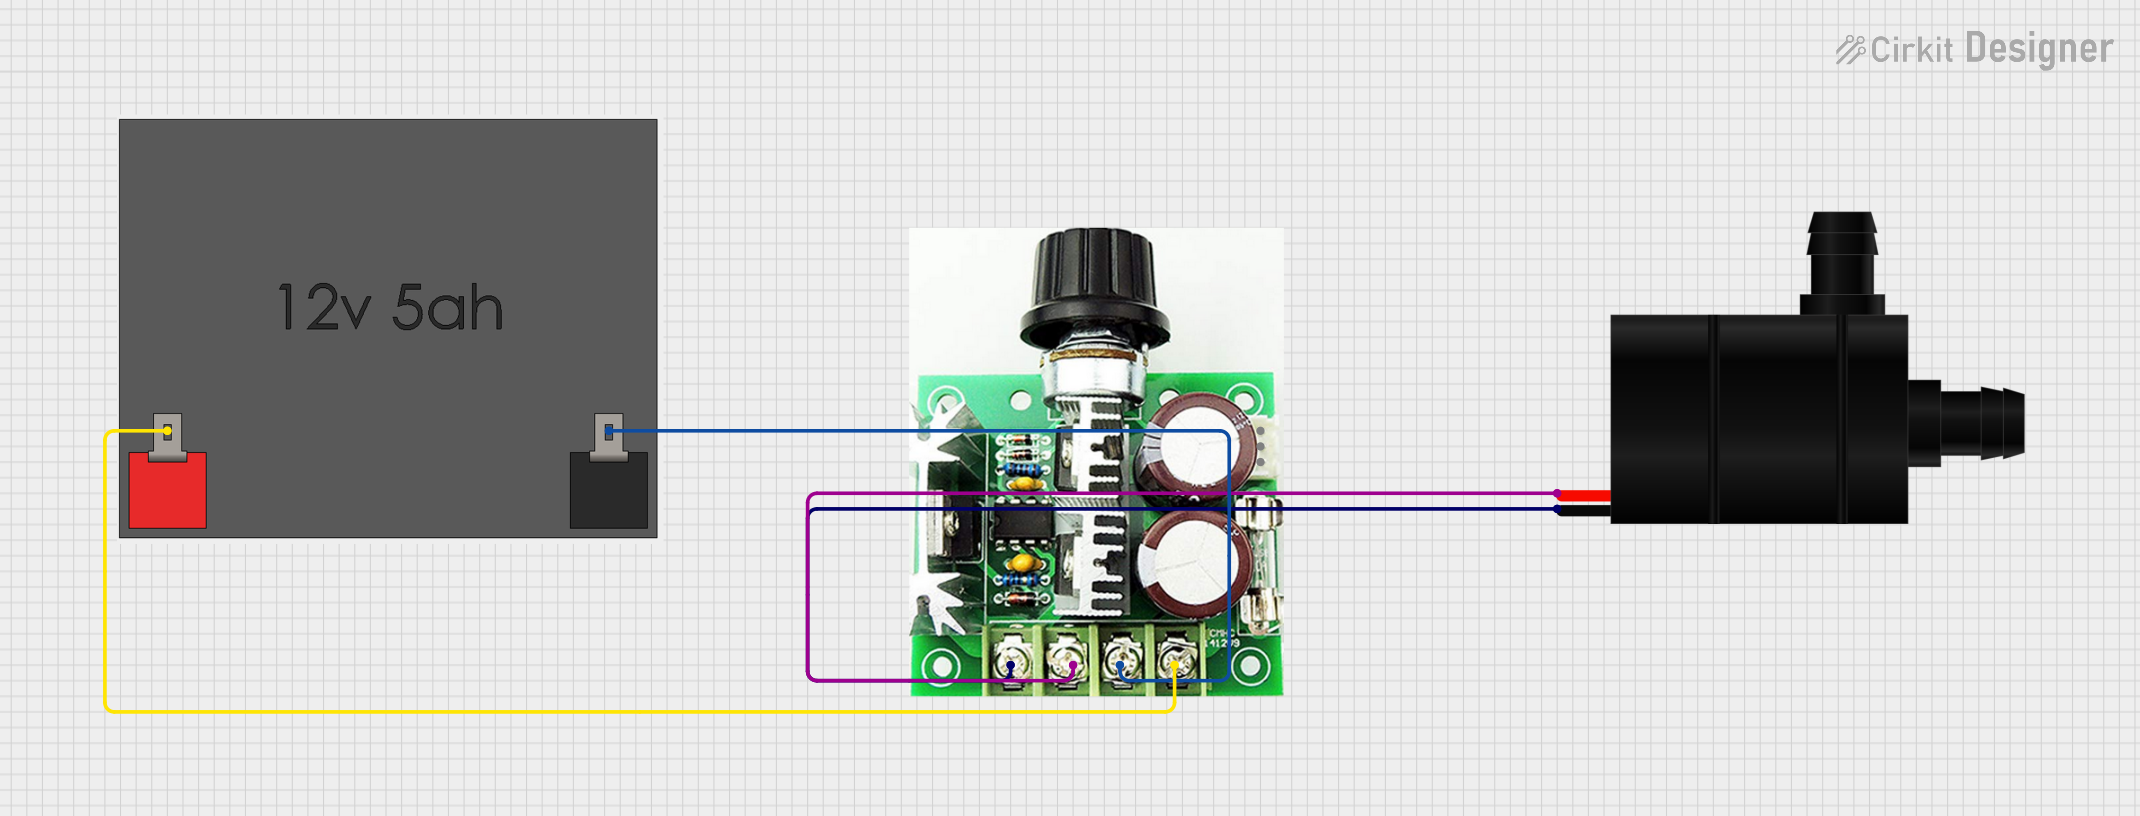
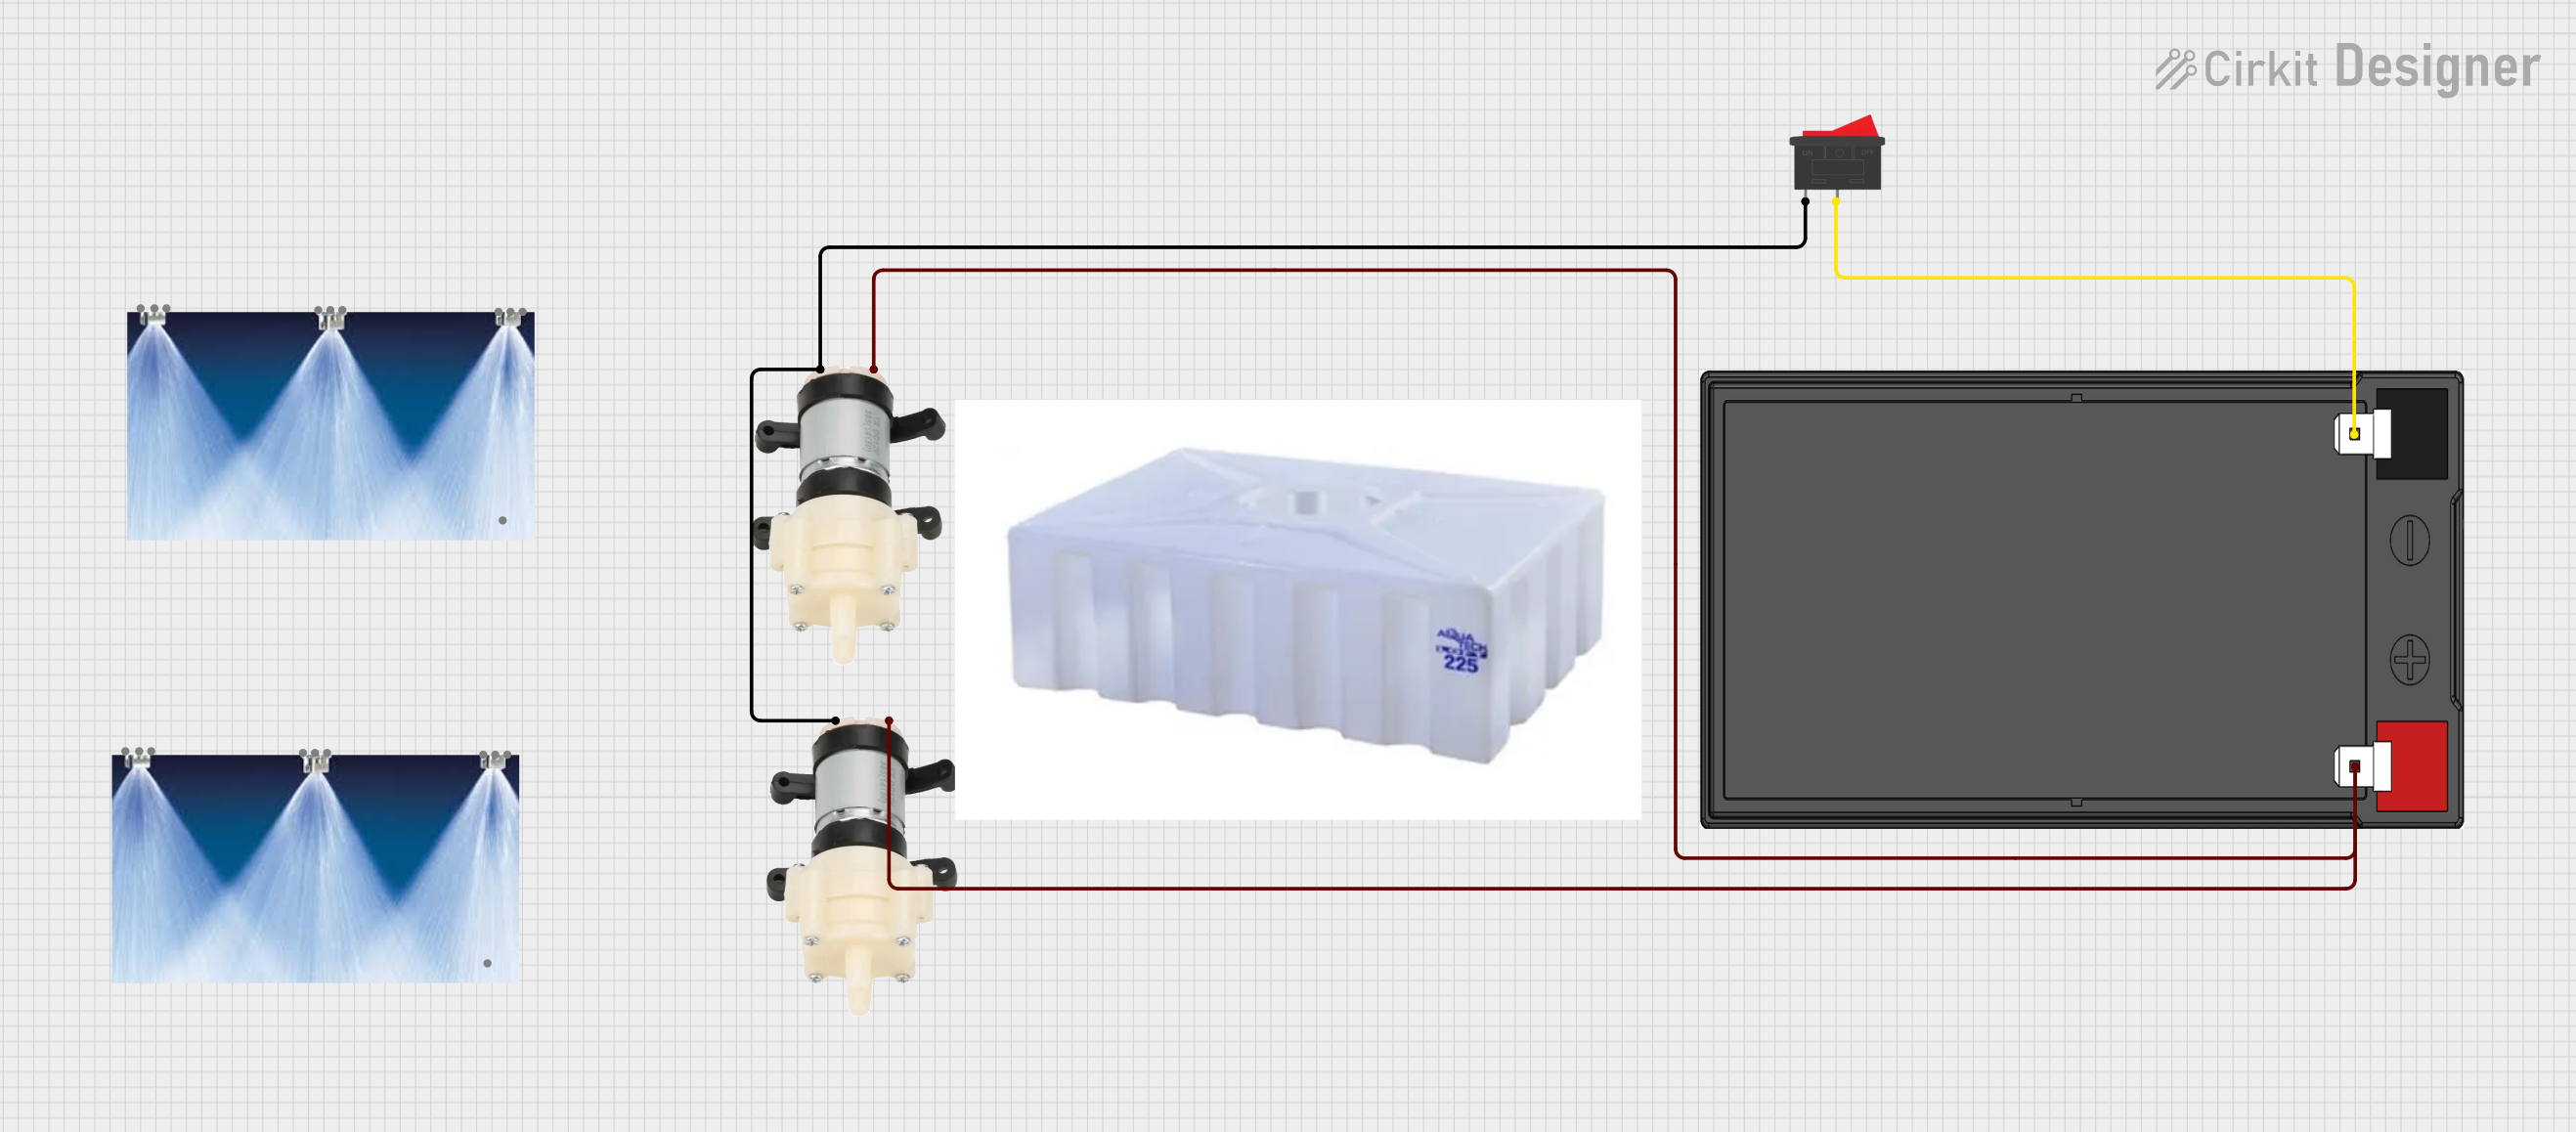
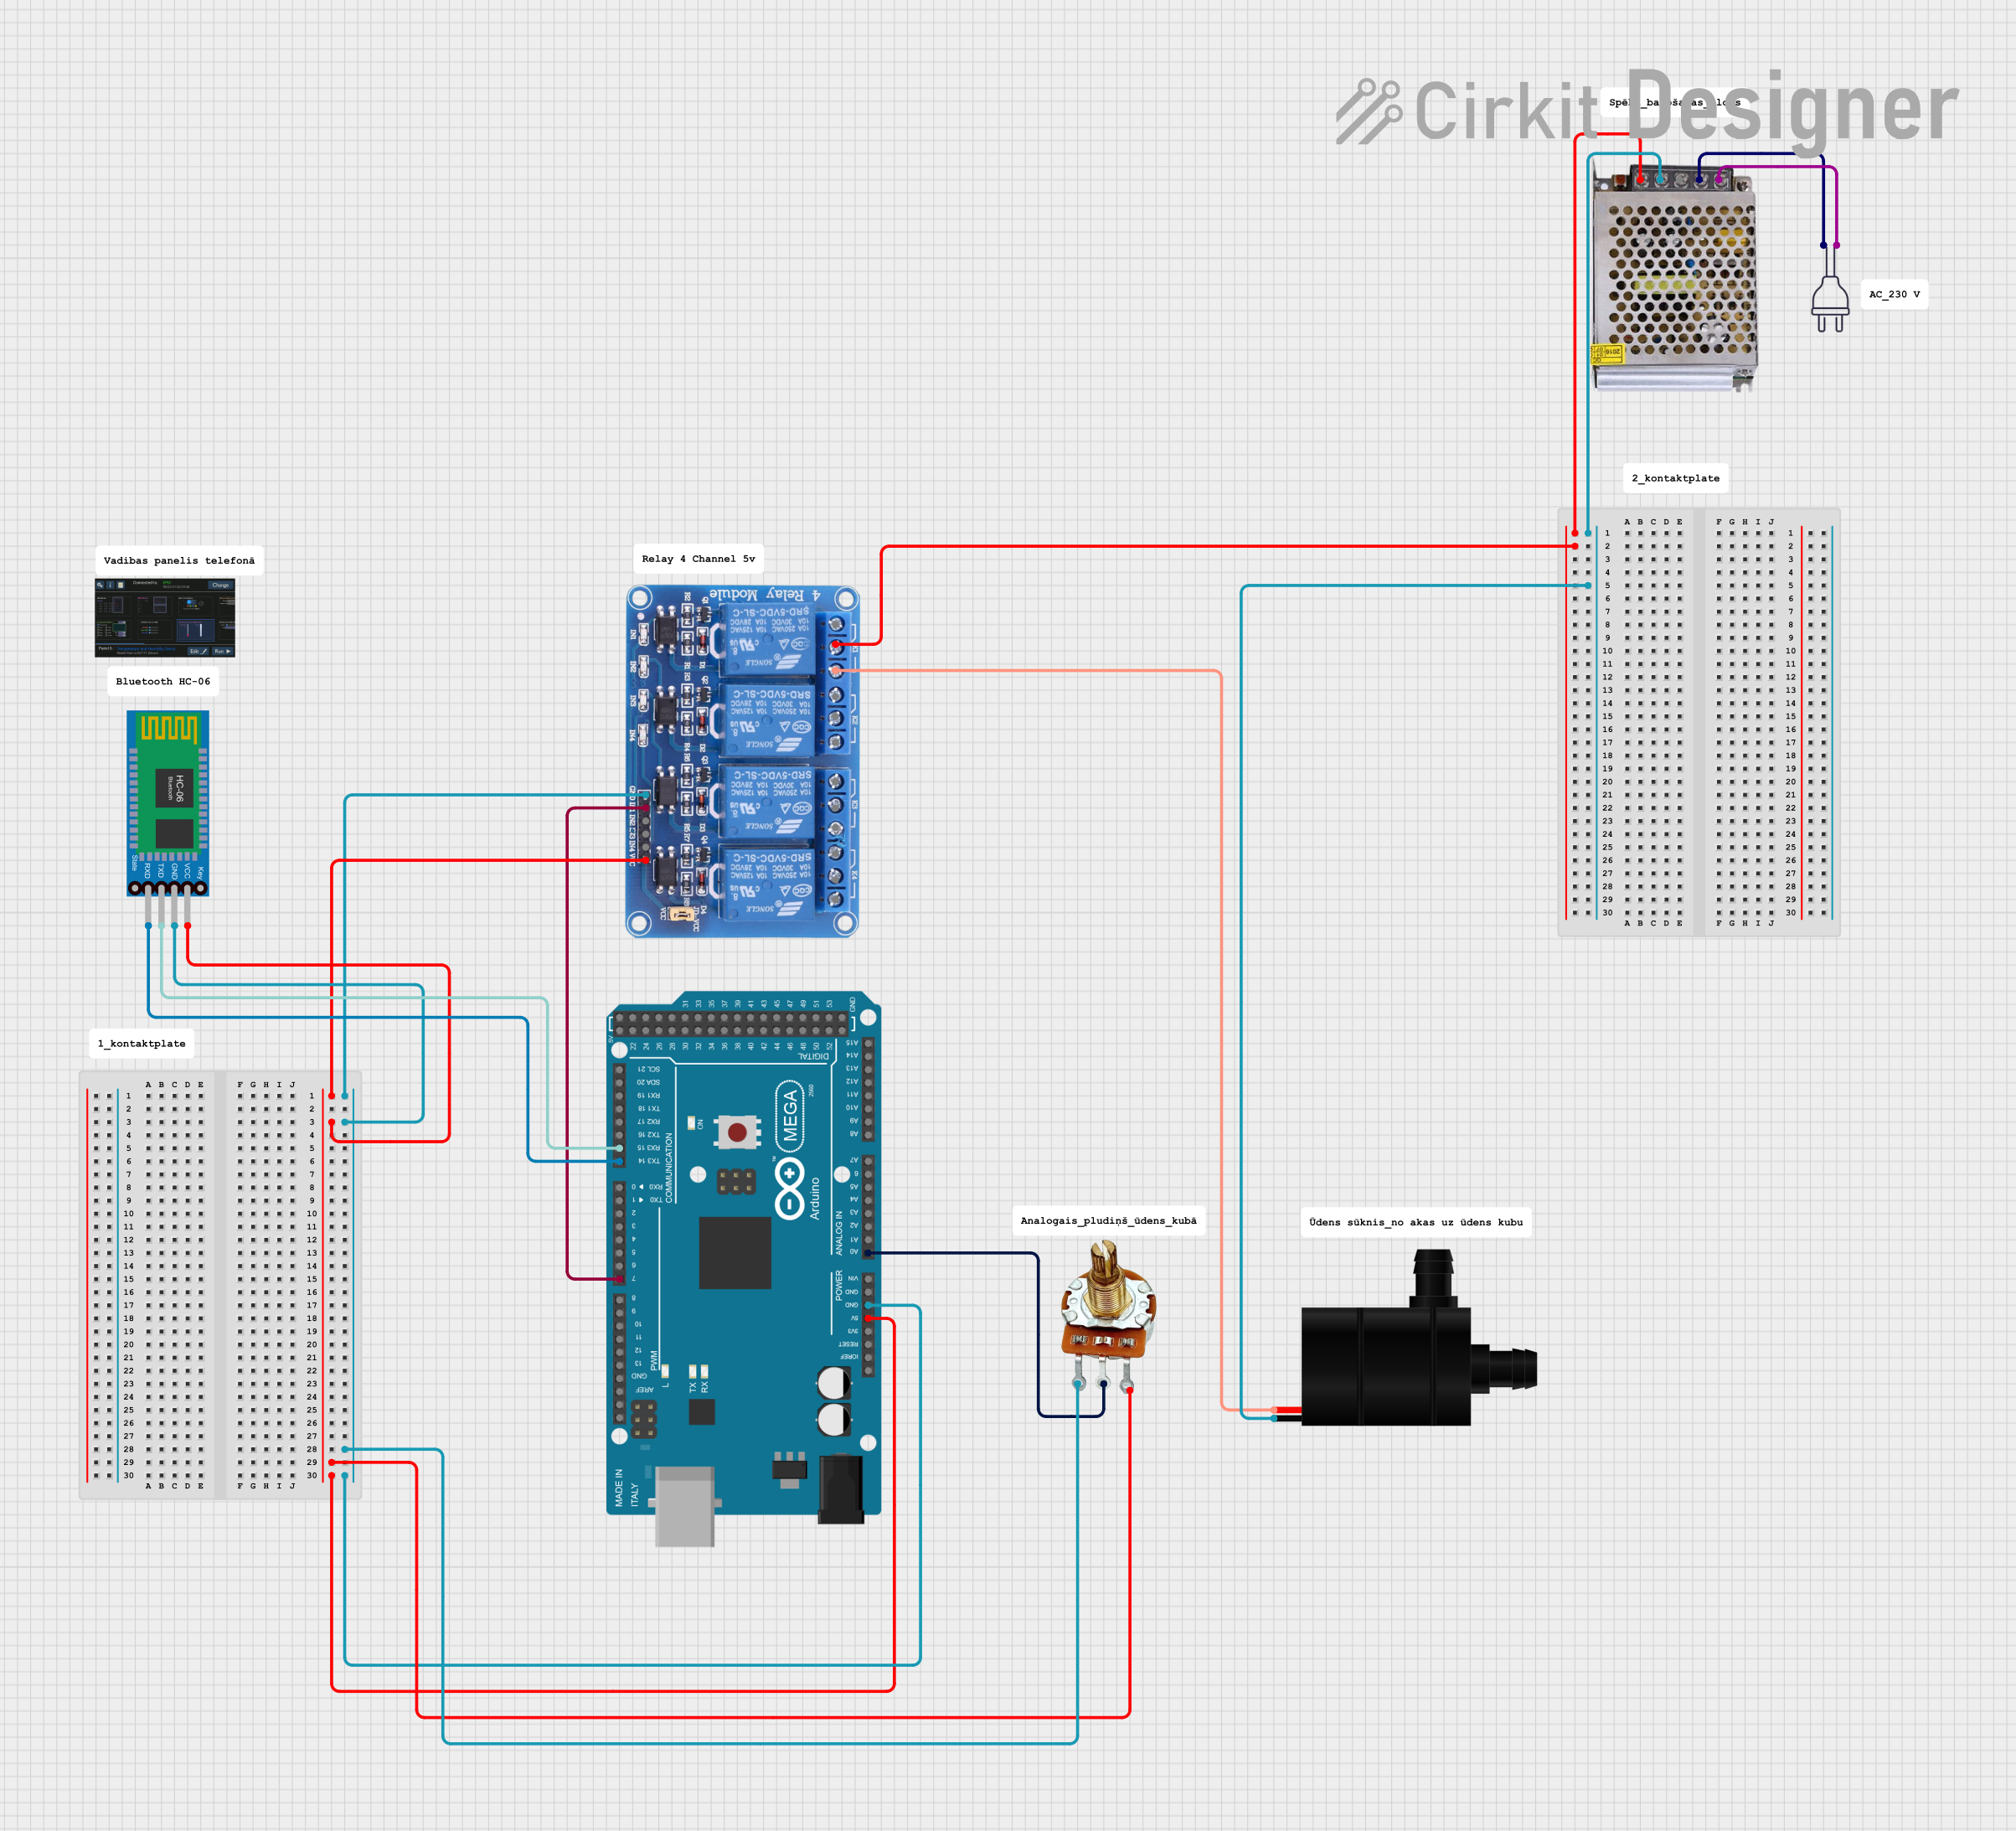
Explore Projects Built with DC 12V Submersible Water Pump
Common Applications:
- Aquarium water circulation and filtration
- Garden fountains and decorative water features
- Hydroponic and aquaponic systems
- Small-scale irrigation systems
- Cooling systems for electronics or machinery
Technical Specifications
Below are the key technical details of the DC 12V Submersible Water Pump:
| Parameter | Specification |
|---|---|
| Operating Voltage | 12V DC |
| Operating Current | 0.5A to 1.2A (depending on load) |
| Power Consumption | 6W to 15W |
| Maximum Flow Rate | 240 liters per hour (L/h) |
| Maximum Lift Height | 3 meters |
| Pump Type | Submersible |
| Material | Plastic (ABS or similar) |
| Inlet/Outlet Diameter | 8mm to 10mm |
| Cable Length | ~1 meter |
| Operating Temperature | 0°C to 50°C |
| Waterproof Rating | IP68 |
Pin Configuration and Descriptions
The DC 12V Submersible Water Pump typically has a simple two-wire connection:
| Wire Color | Function | Description |
|---|---|---|
| Red | Positive (+) | Connect to the positive terminal of the 12V DC power source. |
| Black | Negative (-) | Connect to the negative terminal of the 12V DC power source. |
Usage Instructions
How to Use the Pump in a Circuit
- Power Supply: Ensure you have a stable 12V DC power source capable of supplying at least 1.5A of current.
- Wiring:
- Connect the red wire of the pump to the positive terminal of the power supply.
- Connect the black wire of the pump to the negative terminal of the power supply.
- Submersion:
- Place the pump fully underwater before powering it on. Ensure the water level is sufficient to cover the pump completely.
- Operation:
- Turn on the power supply to start the pump. Water will begin to flow through the outlet.
- Flow Adjustment:
- If the pump has a flow control knob, adjust it to regulate the water flow as needed.
Important Considerations and Best Practices
- Do not run the pump dry: Operating the pump without water can damage the motor and reduce its lifespan.
- Water quality: Avoid using the pump in water containing debris or particles that could clog the inlet.
- Voltage limits: Ensure the input voltage does not exceed 12V DC to prevent damage.
- Cooling: Since the pump is submersible, it relies on water for cooling. Always keep it submerged during operation.
- Polarity: Double-check the wiring polarity before powering the pump to avoid damage.
Example: Using the Pump with an Arduino UNO
The DC 12V Submersible Water Pump can be controlled using an Arduino UNO and a relay module. Below is an example circuit and code to turn the pump on and off using a digital pin.
Circuit Setup:
- Connect the pump's red wire to the relay module's NO (Normally Open) terminal.
- Connect the pump's black wire to the negative terminal of the 12V power supply.
- Connect the relay module's COM (Common) terminal to the positive terminal of the 12V power supply.
- Connect the relay module's VCC, GND, and IN pins to the Arduino's 5V, GND, and a digital pin (e.g., pin 7), respectively.
Arduino Code:
// Define the relay control pin
const int relayPin = 7;

void setup() {
  pinMode(relayPin, OUTPUT); // Set the relay pin as an output
  digitalWrite(relayPin, LOW); // Ensure the pump is off initially
}

void loop() {
  digitalWrite(relayPin, HIGH); // Turn the pump on
  delay(5000); // Keep the pump on for 5 seconds
  digitalWrite(relayPin, LOW); // Turn the pump off
  delay(5000); // Keep the pump off for 5 seconds
}
Troubleshooting and FAQs
Common Issues and Solutions
Pump does not start:
- Cause: Incorrect wiring or insufficient power supply.
- Solution: Verify the wiring connections and ensure the power supply provides 12V DC with sufficient current.
Low water flow:
- Cause: Clogged inlet or insufficient water level.
- Solution: Clean the inlet and ensure the pump is fully submerged.
Pump makes unusual noise:
- Cause: Air trapped inside the pump or running the pump dry.
- Solution: Submerge the pump completely and allow any trapped air to escape.
Pump overheats:
- Cause: Operating the pump outside the recommended temperature range or without water.
- Solution: Ensure the pump is submerged and operating within the specified temperature range.
FAQs
Q: Can this pump be used with liquids other than water?
A: The pump is designed for water. Using it with other liquids may damage the internal components or reduce its lifespan.
Q: Is the pump safe for saltwater use?
A: Yes, the pump can be used in saltwater, but regular cleaning is recommended to prevent corrosion.
Q: Can the pump be used continuously?
A: Yes, the pump is designed for continuous operation, provided it is submerged and used within its specifications.
Q: How do I clean the pump?
A: Disconnect the pump from the power supply, remove it from the water, and clean the inlet and outlet with a soft brush to remove debris.