Cirkit Designer Logo
Cirkit Designer
Your all-in-one circuit design IDE
Home / 
Component Documentation

How to Use Baofeng Transceiver: Examples, Pinouts, and Specs

Image of Baofeng Transceiver
Cirkit Designer LogoDesign with Baofeng Transceiver in Cirkit Designer

Introduction

The Baofeng UV-5R is a portable, handheld two-way radio widely used in amateur radio and emergency communication. Known for its affordability and versatility, the UV-5R operates on various frequency bands, making it a popular choice among hobbyists, preppers, and professionals alike. This documentation provides a comprehensive guide to understanding, using, and troubleshooting the Baofeng UV-5R transceiver.

Explore Projects Built with Baofeng Transceiver

Use Cirkit Designer to design, explore, and prototype these projects online. Some projects support real-time simulation. Click "Open Project" to start designing instantly!
Arduino Pro Mini FM Radio with LCD Display and Battery Power
Image of DIY FM Radio RDA5807M V2: A project utilizing Baofeng Transceiver in a practical application
This circuit is a portable FM radio receiver with an integrated display and audio output. It uses an Arduino Pro Mini to control an RDA5807M FM receiver module, an ADS1115 ADC for additional analog inputs, and a PAM8403 amplifier to drive loudspeakers. The circuit also includes a rotary encoder for user input, an LCD screen for displaying information, and a boost converter for power management.
Cirkit Designer LogoOpen Project in Cirkit Designer
Satellite-Based Timing and Navigation System with SDR and Atomic Clock Synchronization
Image of GPS 시스템 측정 구성도_Confirm: A project utilizing Baofeng Transceiver in a practical application
This circuit appears to be a complex system involving power supply management, GPS and timing synchronization, and data communication. It includes a SI-TEX G1 Satellite Compass for GPS data, an XHTF1021 Atomic Rubidium Clock for precise timing, and Ettus USRP B200 units for software-defined radio communication. Power is supplied through various SMPS units and distributed via terminal blocks and DC jacks. Data communication is facilitated by Beelink MINI S12 N95 computers, RS232 splitters, and a 1000BASE-T Media Converter for network connectivity. RF Directional Couplers are used to interface antennas with the USRP units, and the entire system is likely contained within cases for protection and organization.
Cirkit Designer LogoOpen Project in Cirkit Designer
Battery-Powered nRF52840 and HT-RA62 Communication Module
Image of NRF52840+HT-RA62: A project utilizing Baofeng Transceiver in a practical application
This circuit is a wireless communication system powered by a 18650 Li-ion battery, featuring an nRF52840 ProMicro microcontroller and an HT-RA62 transceiver module. The nRF52840 handles the control logic and interfaces with the HT-RA62 for data transmission, while the battery provides the necessary power for the entire setup.
Cirkit Designer LogoOpen Project in Cirkit Designer
Dual-Mode LoRa and GSM Communication Device with ESP32
Image of modul gateway: A project utilizing Baofeng Transceiver in a practical application
This circuit features an ESP32 Devkit V1 microcontroller interfaced with an RFM95 LoRa transceiver module for long-range communication and a SIM800L GSM module for cellular connectivity. Two LM2596 step-down modules are used to regulate the 12V battery voltage down to 3.3V required by the ESP32, RFM95, and SIM800L. The ESP32 facilitates data exchange between the RFM95 and SIM800L, enabling the system to send/receive data over both LoRa and GSM networks.
Cirkit Designer LogoOpen Project in Cirkit Designer

Explore Projects Built with Baofeng Transceiver

Use Cirkit Designer to design, explore, and prototype these projects online. Some projects support real-time simulation. Click "Open Project" to start designing instantly!
Image of DIY FM Radio RDA5807M V2: A project utilizing Baofeng Transceiver in a practical application
Arduino Pro Mini FM Radio with LCD Display and Battery Power
This circuit is a portable FM radio receiver with an integrated display and audio output. It uses an Arduino Pro Mini to control an RDA5807M FM receiver module, an ADS1115 ADC for additional analog inputs, and a PAM8403 amplifier to drive loudspeakers. The circuit also includes a rotary encoder for user input, an LCD screen for displaying information, and a boost converter for power management.
Cirkit Designer LogoOpen Project in Cirkit Designer
Image of GPS 시스템 측정 구성도_Confirm: A project utilizing Baofeng Transceiver in a practical application
Satellite-Based Timing and Navigation System with SDR and Atomic Clock Synchronization
This circuit appears to be a complex system involving power supply management, GPS and timing synchronization, and data communication. It includes a SI-TEX G1 Satellite Compass for GPS data, an XHTF1021 Atomic Rubidium Clock for precise timing, and Ettus USRP B200 units for software-defined radio communication. Power is supplied through various SMPS units and distributed via terminal blocks and DC jacks. Data communication is facilitated by Beelink MINI S12 N95 computers, RS232 splitters, and a 1000BASE-T Media Converter for network connectivity. RF Directional Couplers are used to interface antennas with the USRP units, and the entire system is likely contained within cases for protection and organization.
Cirkit Designer LogoOpen Project in Cirkit Designer
Image of NRF52840+HT-RA62: A project utilizing Baofeng Transceiver in a practical application
Battery-Powered nRF52840 and HT-RA62 Communication Module
This circuit is a wireless communication system powered by a 18650 Li-ion battery, featuring an nRF52840 ProMicro microcontroller and an HT-RA62 transceiver module. The nRF52840 handles the control logic and interfaces with the HT-RA62 for data transmission, while the battery provides the necessary power for the entire setup.
Cirkit Designer LogoOpen Project in Cirkit Designer
Image of modul gateway: A project utilizing Baofeng Transceiver in a practical application
Dual-Mode LoRa and GSM Communication Device with ESP32
This circuit features an ESP32 Devkit V1 microcontroller interfaced with an RFM95 LoRa transceiver module for long-range communication and a SIM800L GSM module for cellular connectivity. Two LM2596 step-down modules are used to regulate the 12V battery voltage down to 3.3V required by the ESP32, RFM95, and SIM800L. The ESP32 facilitates data exchange between the RFM95 and SIM800L, enabling the system to send/receive data over both LoRa and GSM networks.
Cirkit Designer LogoOpen Project in Cirkit Designer

Technical Specifications

Key Technical Details

Specification Value
Frequency Range 136-174 MHz (VHF), 400-520 MHz (UHF)
Output Power 1W / 4W
Voltage 7.4V DC
Battery Capacity 1800mAh
Channel Capacity 128 Channels
Frequency Step 2.5/5/6.25/10/12.5/25 kHz
Operating Temperature -20°C to +60°C
Antenna Impedance 50Ω
Dimensions 110 x 58 x 32 mm
Weight 250g (with battery and antenna)

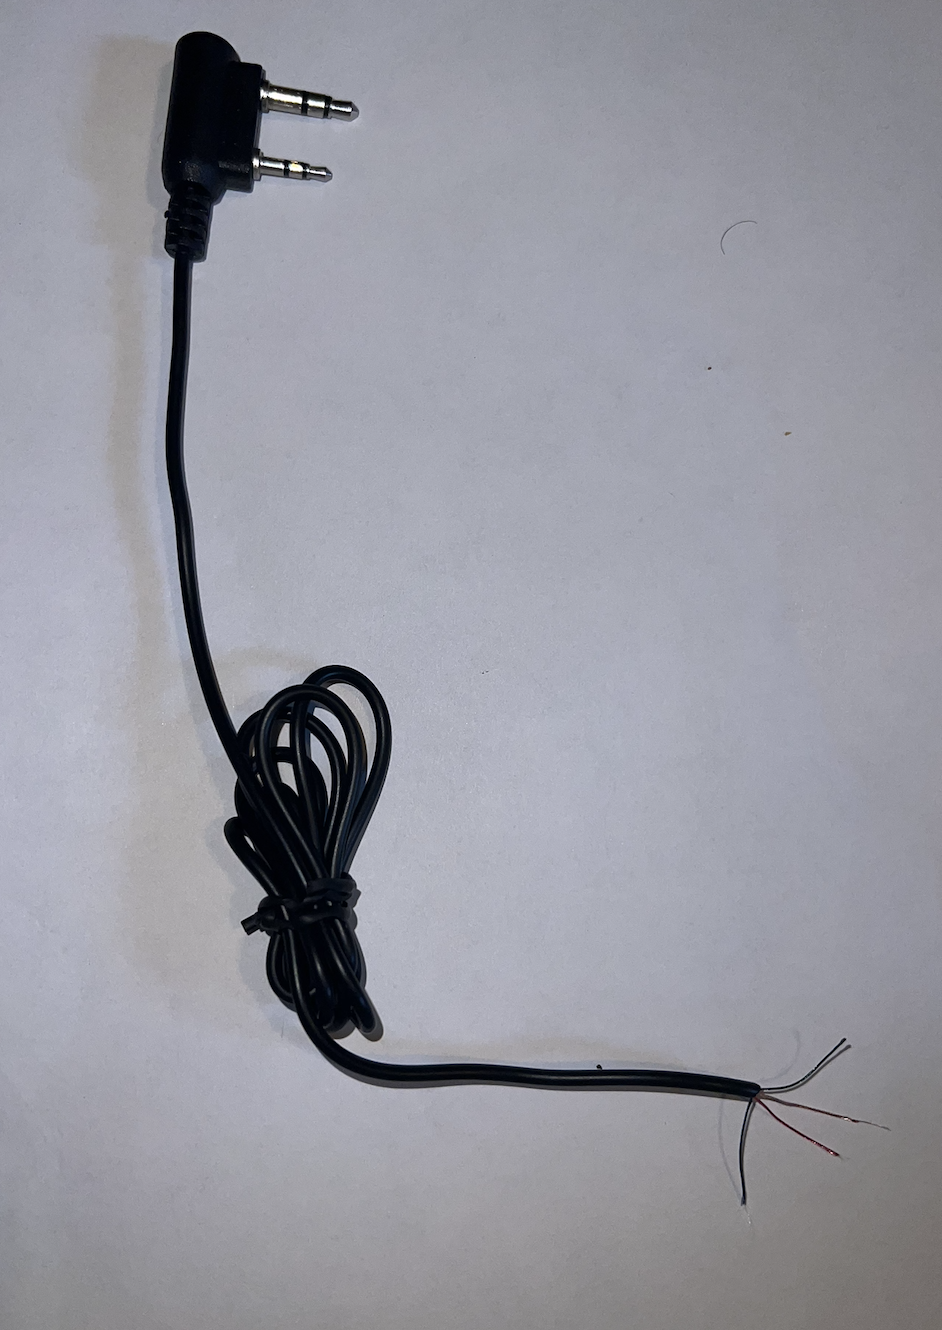
Pin Configuration and Descriptions

The Baofeng UV-5R uses a Kenwood-style 2-pin connector for external accessories such as microphones and programming cables. Below is the pin configuration:

Pin Number Description
1 Speaker Output (SPK)
2 Microphone Input (MIC)
3 Ground (GND)
4 Push-to-Talk (PTT)

Usage Instructions

How to Use the Baofeng UV-5R in a Circuit

  1. Powering the Device:

    • Ensure the battery is fully charged before use.
    • Insert the battery into the back of the transceiver until it clicks into place.
  2. Programming Frequencies:

    • Use the keypad to manually enter frequencies or use a programming cable and software (e.g., CHIRP) for bulk programming.
    • To manually enter a frequency, switch to VFO mode by pressing the [VFO/MR] button, then use the keypad to enter the desired frequency.
  3. Transmitting and Receiving:

    • Select the desired channel or frequency.
    • Press and hold the [PTT] button to transmit. Release the [PTT] button to receive.
  4. Connecting External Accessories:

    • Use the Kenwood-style 2-pin connector to attach external microphones, speakers, or programming cables.

Important Considerations and Best Practices

  • Antenna: Always attach the antenna before powering on the transceiver to avoid damage.
  • Battery Maintenance: Regularly charge the battery and avoid overcharging to prolong battery life.
  • Frequency Compliance: Ensure you are operating on frequencies that you are licensed to use, especially in amateur radio bands.
  • Environmental Conditions: Avoid exposing the transceiver to extreme temperatures, moisture, or dust.

Troubleshooting and FAQs

Common Issues and Solutions

  1. No Power:

    • Ensure the battery is properly inserted and fully charged.
    • Check the battery contacts for dirt or corrosion.
  2. Cannot Transmit:

    • Verify that the [PTT] button is functioning.
    • Ensure you are on a valid frequency and that the channel is not busy.
    • Check if the transceiver is set to the correct power level.
  3. Poor Audio Quality:

    • Check the antenna connection.
    • Ensure the microphone is not obstructed.
    • Verify that you are within range of the receiving station.
  4. Programming Issues:

    • Ensure the programming cable is properly connected.
    • Use compatible software (e.g., CHIRP) and verify the correct COM port is selected.

FAQs

Q: How do I reset the Baofeng UV-5R to factory settings? A: To reset the transceiver, turn it off, then press and hold the [MENU] button while turning it back on. Select "RESET ALL" from the menu and confirm.

Q: Can I use the Baofeng UV-5R with an Arduino UNO? A: Yes, you can interface the Baofeng UV-5R with an Arduino UNO for various projects, such as remote control or automated messaging. Below is an example code snippet for interfacing the transceiver with an Arduino UNO:

#include <SoftwareSerial.h>

// Define the pins for the SoftwareSerial
SoftwareSerial baofeng(10, 11); // RX, TX

void setup() {
  // Start the serial communication with the computer
  Serial.begin(9600);
  // Start the serial communication with the Baofeng UV-5R
  baofeng.begin(9600);
}

void loop() {
  // Check if data is available from the Baofeng UV-5R
  if (baofeng.available()) {
    // Read the data and send it to the computer
    Serial.write(baofeng.read());
  }
  
  // Check if data is available from the computer
  if (Serial.available()) {
    // Read the data and send it to the Baofeng UV-5R
    baofeng.write(Serial.read());
  }
}

This code sets up a SoftwareSerial connection between the Arduino UNO and the Baofeng UV-5R, allowing for bidirectional communication.

Conclusion

The Baofeng UV-5R is a versatile and affordable transceiver suitable for a wide range of applications. By following this documentation, users can effectively utilize the UV-5R in their projects and troubleshoot common issues. Whether you are a beginner or an experienced user, the Baofeng UV-5R offers a reliable solution for your communication needs.