
How to Use JST XH 3A Male: Examples, Pinouts, and Specs
 Design with JST XH 3A Male in Cirkit Designer
Introduction
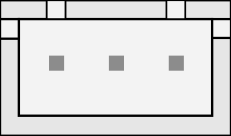
The JST XH 3A Male connector is a widely used electrical connector designed for secure and reliable connections in electronic circuits. It features a 2.5mm pitch and is capable of handling up to 3A of current, making it suitable for a variety of low- to medium-power applications. Its compact design and robust construction make it a popular choice in consumer electronics, robotics, battery packs, and other applications requiring dependable electrical connections.
Explore Projects Built with JST XH 3A Male
 Open Project in Cirkit Designer
 Open Project in Cirkit Designer
 Open Project in Cirkit Designer
 Open Project in Cirkit Designer
Explore Projects Built with JST XH 3A Male
Open Project in Cirkit DesignerOpen Project in Cirkit DesignerOpen Project in Cirkit DesignerOpen Project in Cirkit DesignerCommon Applications:
- Battery connections in RC vehicles, drones, and robotics
- Power delivery in small electronic devices
- Signal and data connections in circuit boards
- Interfacing with sensors and modules in embedded systems
Technical Specifications
Below are the key technical details of the JST XH 3A Male connector:
| Parameter | Specification |
|---|---|
| Pitch | 2.5mm |
| Current Rating | Up to 3A |
| Voltage Rating | 250V AC/DC |
| Contact Resistance | ≤ 20mΩ |
| Insulation Resistance | ≥ 1000MΩ |
| Operating Temperature | -25°C to +85°C |
| Material (Housing) | Nylon 66 (UL94V-0 rated) |
| Material (Contacts) | Tin-plated copper alloy |
Pin Configuration and Descriptions
The JST XH 3A Male connector typically comes in multiple pin configurations (e.g., 2-pin, 3-pin, 4-pin, etc.). Below is an example of a 3-pin configuration:
| Pin Number | Description | Typical Use |
|---|---|---|
| 1 | VCC (Power) | Positive voltage supply |
| 2 | GND (Ground) | Ground connection |
| 3 | Signal/Data | Signal or data transmission |
Usage Instructions
How to Use the JST XH 3A Male Connector in a Circuit
Connector Assembly:
- Ensure the male connector is paired with a compatible JST XH female connector.
- Crimp the wires to the male connector's terminals using a crimping tool designed for JST connectors.
- Insert the crimped terminals into the connector housing until they click into place.
Wiring:
- Match the pin configuration of the male connector with the corresponding female connector.
- Verify the polarity and ensure the VCC, GND, and Signal/Data lines are correctly aligned.
Mounting:
- Secure the connector to the PCB or device using soldering or a locking mechanism, if applicable.
- Avoid excessive force when connecting or disconnecting to prevent damage.
Important Considerations and Best Practices
- Current Handling: Do not exceed the 3A current rating to avoid overheating or damage.
- Wire Gauge: Use wires with an appropriate gauge (e.g., 22-28 AWG) to ensure proper current handling.
- Secure Connections: Double-check that the terminals are fully inserted into the housing to prevent loose connections.
- Environmental Conditions: Avoid exposing the connector to temperatures or humidity levels beyond its rated specifications.
Example: Connecting to an Arduino UNO
The JST XH 3A Male connector can be used to supply power or transmit signals to an Arduino UNO. Below is an example of connecting a 3-pin JST XH connector to an Arduino:
// Example: Reading a sensor connected via a JST XH 3A Male connector
// Pin 1 (VCC) -> Arduino 5V
// Pin 2 (GND) -> Arduino GND
// Pin 3 (Signal) -> Arduino A0 (Analog Input)

const int sensorPin = A0;  // Signal pin connected to A0
int sensorValue = 0;      // Variable to store sensor reading

void setup() {
  Serial.begin(9600);  // Initialize serial communication
  pinMode(sensorPin, INPUT);  // Set sensor pin as input
}

void loop() {
  sensorValue = analogRead(sensorPin);  // Read sensor value
  Serial.print("Sensor Value: ");
  Serial.println(sensorValue);  // Print sensor value to Serial Monitor
  delay(500);  // Wait for 500ms before next reading
}
Troubleshooting and FAQs
Common Issues and Solutions
Loose Connections:
- Issue: The connector feels loose or disconnects easily.
- Solution: Ensure the terminals are fully inserted into the housing and the locking mechanism is engaged.
Overheating:
- Issue: The connector becomes hot during operation.
- Solution: Check that the current does not exceed the 3A rating. Use thicker wires if necessary.
Signal Interference:
- Issue: Data transmission is unreliable.
- Solution: Verify that the signal wire is properly shielded and not running parallel to high-power lines.
Connector Damage:
- Issue: The housing or terminals are damaged.
- Solution: Replace the damaged connector and avoid applying excessive force during use.
FAQs
Q1: Can the JST XH 3A Male connector handle AC power?
A1: Yes, it can handle up to 250V AC, but it is primarily designed for low-voltage DC applications.
Q2: What tools are required for crimping the terminals?
A2: A JST-compatible crimping tool is recommended for precise and secure crimping.
Q3: Can I use this connector for high-frequency signals?
A3: While it can handle low-frequency signals, it is not ideal for high-frequency applications due to potential signal degradation.
Q4: Is the JST XH 3A Male connector waterproof?
A4: No, it is not waterproof. For outdoor or moisture-prone environments, consider using waterproof connectors.