Cirkit Designer Logo
Cirkit Designer
Your all-in-one circuit design IDE
Home / 
Component Documentation

How to Use Adafruit OLED Monochrome 128x64 1.3 inch: Examples, Pinouts, and Specs

Image of Adafruit OLED Monochrome 128x64 1.3 inch
Cirkit Designer LogoDesign with Adafruit OLED Monochrome 128x64 1.3 inch in Cirkit Designer

Introduction

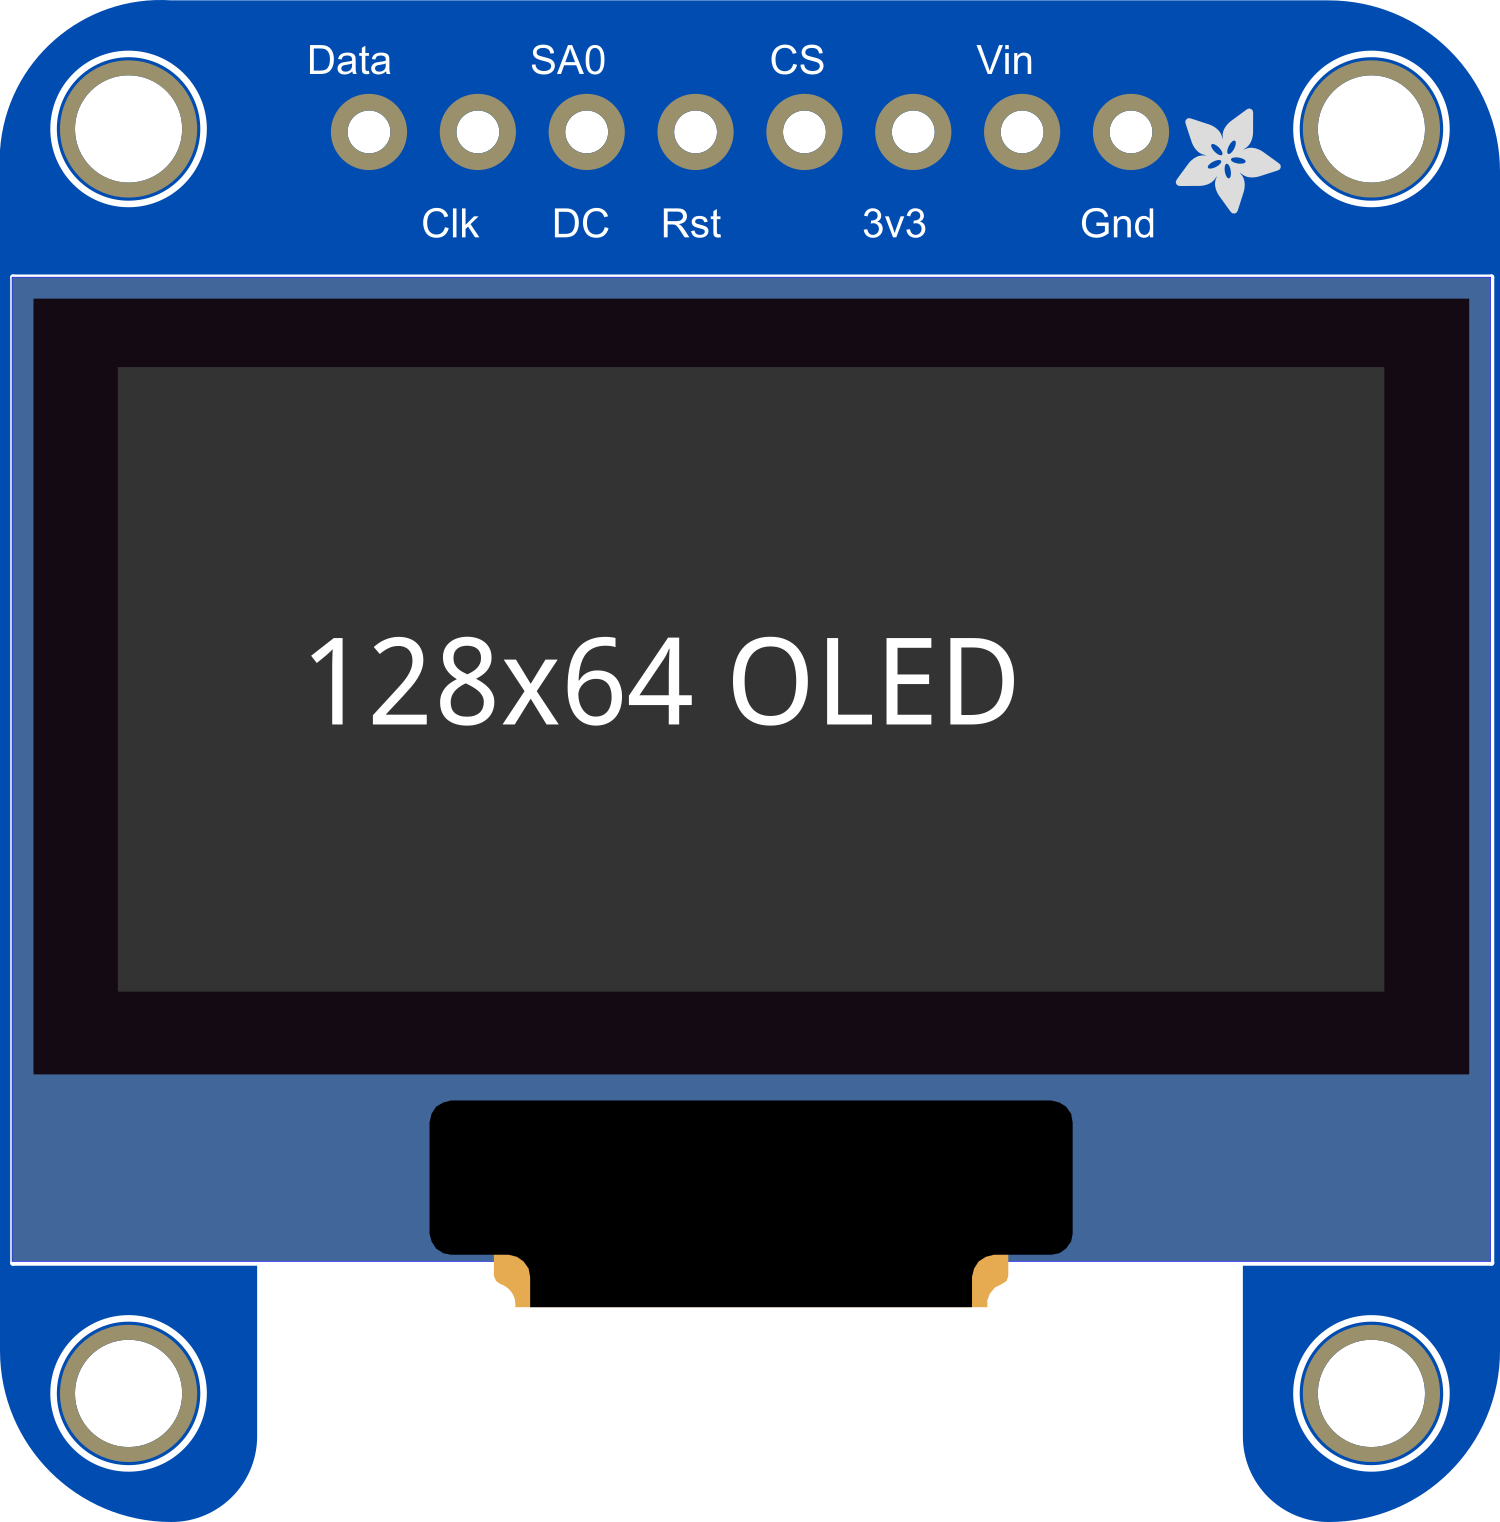
The Adafruit OLED Monochrome 128x64 1.3 inch display module is a compact and versatile screen suitable for adding a visual interface to your electronics projects. With its high contrast and sharp display, it is perfect for displaying text, graphics, and animations. Common applications include wearable devices, small handheld instruments, and user interfaces for various DIY projects.

Explore Projects Built with Adafruit OLED Monochrome 128x64 1.3 inch

Use Cirkit Designer to design, explore, and prototype these projects online. Some projects support real-time simulation. Click "Open Project" to start designing instantly!
Arduino 101 OLED Display Animation Project
Image of wokwi animater test: A project utilizing Adafruit OLED Monochrome 128x64 1.3 inch in a practical application
This circuit consists of an Arduino 101 microcontroller connected to a 0.96" OLED display via I2C communication. The Arduino runs a program that initializes the OLED and continuously displays an animated sequence of frames on the screen.
Cirkit Designer LogoOpen Project in Cirkit Designer
ESP32 Devkit V1 and OLED Display Bitmap Viewer
Image of Esp32_monochromeimage: A project utilizing Adafruit OLED Monochrome 128x64 1.3 inch in a practical application
This circuit consists of an ESP32 Devkit V1 microcontroller connected to a 1.3" OLED display via I2C communication. The ESP32 initializes the OLED display and renders a predefined bitmap image on it.
Cirkit Designer LogoOpen Project in Cirkit Designer
Arduino Nano Controlled OLED Display Interface
Image of Chandru: A project utilizing Adafruit OLED Monochrome 128x64 1.3 inch in a practical application
This circuit connects an Arduino Nano to an OLED 128x64 I2C Monochrome Display. The Arduino provides power to the OLED display and communicates with it via the I2C protocol, using its A4 and A5 pins as SDA and SCK lines, respectively. The embedded code initializes the display and draws a single pixel on it, which suggests that the circuit is designed for visual output, possibly for a user interface or data visualization.
Cirkit Designer LogoOpen Project in Cirkit Designer
Arduino UNO OLED Display Interface for Real-Time Data Visualization
Image of a2: A project utilizing Adafruit OLED Monochrome 128x64 1.3 inch in a practical application
This circuit consists of an Arduino UNO microcontroller connected to a 1.3" OLED display. The Arduino provides power and communicates with the OLED display via I2C protocol, utilizing the SCL and SDA pins for data transmission.
Cirkit Designer LogoOpen Project in Cirkit Designer

Explore Projects Built with Adafruit OLED Monochrome 128x64 1.3 inch

Use Cirkit Designer to design, explore, and prototype these projects online. Some projects support real-time simulation. Click "Open Project" to start designing instantly!
Image of wokwi animater test: A project utilizing Adafruit OLED Monochrome 128x64 1.3 inch in a practical application
Arduino 101 OLED Display Animation Project
This circuit consists of an Arduino 101 microcontroller connected to a 0.96" OLED display via I2C communication. The Arduino runs a program that initializes the OLED and continuously displays an animated sequence of frames on the screen.
Cirkit Designer LogoOpen Project in Cirkit Designer
Image of Esp32_monochromeimage: A project utilizing Adafruit OLED Monochrome 128x64 1.3 inch in a practical application
ESP32 Devkit V1 and OLED Display Bitmap Viewer
This circuit consists of an ESP32 Devkit V1 microcontroller connected to a 1.3" OLED display via I2C communication. The ESP32 initializes the OLED display and renders a predefined bitmap image on it.
Cirkit Designer LogoOpen Project in Cirkit Designer
Image of Chandru: A project utilizing Adafruit OLED Monochrome 128x64 1.3 inch in a practical application
Arduino Nano Controlled OLED Display Interface
This circuit connects an Arduino Nano to an OLED 128x64 I2C Monochrome Display. The Arduino provides power to the OLED display and communicates with it via the I2C protocol, using its A4 and A5 pins as SDA and SCK lines, respectively. The embedded code initializes the display and draws a single pixel on it, which suggests that the circuit is designed for visual output, possibly for a user interface or data visualization.
Cirkit Designer LogoOpen Project in Cirkit Designer
Image of a2: A project utilizing Adafruit OLED Monochrome 128x64 1.3 inch in a practical application
Arduino UNO OLED Display Interface for Real-Time Data Visualization
This circuit consists of an Arduino UNO microcontroller connected to a 1.3" OLED display. The Arduino provides power and communicates with the OLED display via I2C protocol, utilizing the SCL and SDA pins for data transmission.
Cirkit Designer LogoOpen Project in Cirkit Designer

Technical Specifications

Key Technical Details

  • Resolution: 128x64 pixels
  • Screen Size: 1.3 inches (diagonal)
  • Color: Monochrome (White)
  • Interface: I2C/SPI (depending on model)
  • Operating Voltage: 3.3V to 5V
  • Driver IC: SSD1306

Pin Configuration and Descriptions

Pin Number Name Description
1 GND Ground connection
2 VCC Power supply (3.3V to 5V)
3 SCL Serial Clock Line for I2C
4 SDA Serial Data Line for I2C
5 RES Reset pin (active low)
6 DC Data/Command control pin (SPI)
7 CS Chip Select for SPI
8 D1 SPI MOSI line
9 D0 SPI Clock line

Usage Instructions

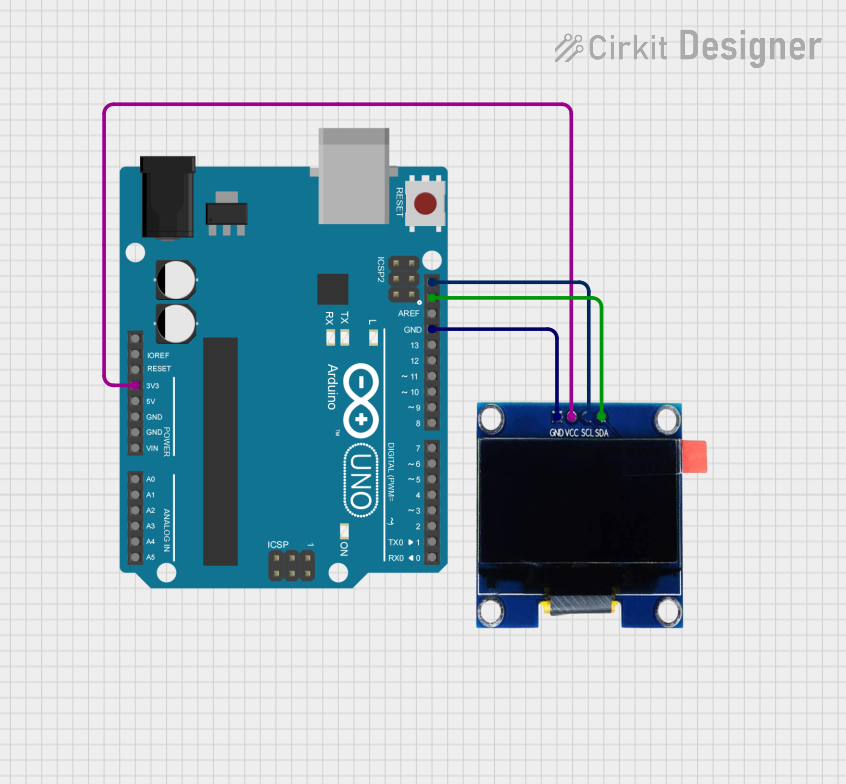
Integration with a Circuit

  1. Power Connections: Connect the VCC pin to a 3.3V or 5V power supply and the GND pin to the ground.
  2. Data Connections (I2C): Connect the SCL and SDA pins to the corresponding SCL and SDA pins on your microcontroller (e.g., Arduino UNO).
  3. Data Connections (SPI): Connect D0 to the SPI clock, D1 to the SPI MOSI, CS to the chip select, DC to the data/command control, and RES to the reset pin on your microcontroller.

Important Considerations and Best Practices

  • Use pull-up resistors on the I2C lines if they are not included on the microcontroller board.
  • Ensure that the power supply is stable and within the specified voltage range to prevent damage.
  • When using SPI, make sure to configure the correct data mode and clock speed for the SSD1306 driver.

Example Code for Arduino UNO (I2C)

#include <Wire.h>
#include <Adafruit_GFX.h>
#include <Adafruit_SSD1306.h>

#define SCREEN_WIDTH 128 // OLED display width, in pixels
#define SCREEN_HEIGHT 64 // OLED display height, in pixels

// Declaration for an SSD1306 display connected to I2C
#define OLED_RESET     -1 // Reset pin # (or -1 if sharing Arduino reset pin)
Adafruit_SSD1306 display(SCREEN_WIDTH, SCREEN_HEIGHT, &Wire, OLED_RESET);

void setup() {
  // Initialize with the I2C addr 0x3C (for the 128x64)
  if(!display.begin(SSD1306_SWITCHCAPVCC, 0x3C)) {
    Serial.println(F("SSD1306 allocation failed"));
    for(;;); // Don't proceed, loop forever
  }

  // Clear the buffer
  display.clearDisplay();

  // Draw a single pixel in white
  display.drawPixel(10, 10, SSD1306_WHITE);

  // Display the drawing
  display.display();
}

void loop() {
  // Nothing here for this simple example
}

Troubleshooting and FAQs

Common Issues

  • Display Not Turning On: Check the power connections and ensure the voltage is within the specified range.
  • Garbled or No Display: Ensure that the I2C or SPI connections are correct and secure. Also, check that the correct address or SPI settings are used in the code.
  • Dim Display: Adjust the contrast settings in the code or check for a low power supply voltage.

Solutions and Tips for Troubleshooting

  • Double-check wiring against the pin configuration table.
  • Use example sketches provided by the Adafruit SSD1306 library to test basic functionality.
  • Use serial debugging to check for initialization errors or communication issues.

FAQs

Q: Can I use this display with a 5V microcontroller like an Arduino UNO? A: Yes, the display can be powered with 5V and is compatible with 5V logic levels.

Q: How do I install the Adafruit SSD1306 library? A: You can install the library through the Arduino Library Manager by searching for "Adafruit SSD1306" and installing it.

Q: What is the maximum refresh rate of the display? A: The refresh rate depends on several factors, including the communication speed and the complexity of the content being displayed. For simple text and graphics, the display can be refreshed several times per second.

Q: Can I display images on this OLED? A: Yes, you can display bitmap images using the Adafruit GFX library functions. Images need to be converted to a bitmap array in the correct format.