How to Use Analog Hall Effect Sensor: Examples, Pinouts, and Specs

 Design with Analog Hall Effect Sensor in Cirkit Designer
Analog Hall Effect Sensor Documentation
1. Introduction
The Analog Hall Effect Sensor is a magnetic field sensor that detects the presence, polarity, and strength of a magnetic field. It produces an analog voltage output that is proportional to the magnetic field strength. This sensor is widely used in applications requiring non-contact magnetic field detection, offering high sensitivity and reliability.
Common Applications:
- Position sensing: Detecting the position of a magnet in linear or rotary systems.
- Speed sensing: Measuring the speed of rotating objects (e.g., in motors or wheels).
- Current sensing: Measuring current in a conductor by detecting the magnetic field generated.
- Proximity sensing: Detecting the presence of magnetic objects.
- Magnetic field mapping: Measuring the strength and distribution of magnetic fields.
The Analog Hall Effect Sensor is commonly used in conjunction with microcontrollers like the Arduino UNO for real-time data acquisition and control.
2. Technical Specifications
The following table outlines the key technical details of the Analog Hall Effect Sensor:
| Parameter | Value |
|---|---|
| Operating Voltage (Vcc) | 3.3V to 5V |
| Output Voltage Range | 0V to Vcc |
| Sensitivity | Typically 1.3 mV/Gauss |
| Magnetic Polarity | Detects both North and South poles |
| Operating Temperature | -40°C to +85°C |
| Response Time | < 10 µs |
| Current Consumption | ~4 mA |
Pin Configuration and Descriptions
| Pin | Name | Description |
|---|---|---|
| 1 | Vcc | Power supply input (3.3V to 5V). Connect to the positive terminal of the power source. |
| 2 | GND | Ground. Connect to the negative terminal of the power source. |
| 3 | OUT | Analog output. Produces a voltage proportional to the magnetic field strength. |
3. Usage Instructions
Connecting the Sensor to a Circuit
To use the Analog Hall Effect Sensor in a circuit:
- Power the sensor: Connect the
Vccpin to a 3.3V or 5V power source and theGNDpin to ground. - Read the output: Connect the
OUTpin to an analog input pin of a microcontroller (e.g., Arduino UNO) or an analog-to-digital converter (ADC). - Place the sensor: Position the sensor near the magnetic field source. The output voltage will vary based on the field strength and polarity.
Important Considerations:
- Magnetic Polarity: The sensor can detect both North and South poles. The output voltage increases or decreases depending on the polarity.
- Noise Filtering: Use a decoupling capacitor (e.g., 0.1 µF) between
VccandGNDto reduce noise. - Distance Sensitivity: The sensor's output decreases with distance from the magnetic source. Ensure proper placement for accurate readings.
- Avoid Overvoltage: Do not exceed the maximum operating voltage (5V) to prevent damage.
4. Example Arduino UNO Integration
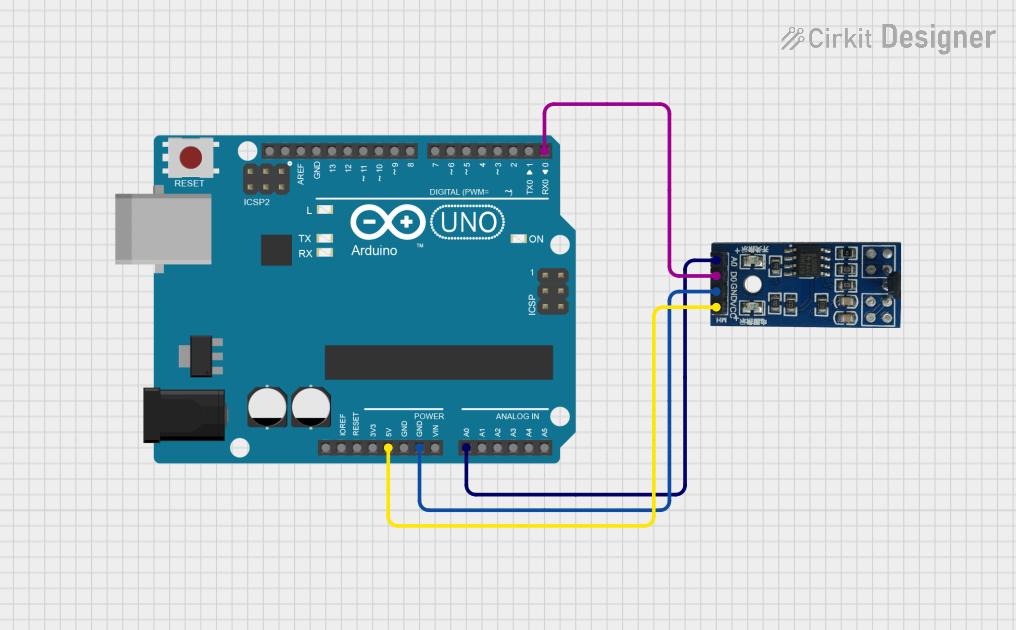
Below is an example of how to use the Analog Hall Effect Sensor with an Arduino UNO to read and display the magnetic field strength.
Circuit Diagram:
- Connect the
Vccpin of the sensor to the 5V pin on the Arduino. - Connect the
GNDpin of the sensor to the GND pin on the Arduino. - Connect the
OUTpin of the sensor to the A0 analog input pin on the Arduino.
Arduino Code:
// Analog Hall Effect Sensor Example with Arduino UNO
// Reads the sensor's output and displays the magnetic field strength in the Serial Monitor.

const int sensorPin = A0; // Analog pin connected to the sensor's OUT pin
int sensorValue = 0;      // Variable to store the sensor reading

void setup() {
  Serial.begin(9600); // Initialize serial communication at 9600 baud
  pinMode(sensorPin, INPUT); // Set the sensor pin as an input
}

void loop() {
  // Read the analog value from the sensor
  sensorValue = analogRead(sensorPin);

  // Convert the analog value to voltage (assuming 5V reference)
  float voltage = sensorValue * (5.0 / 1023.0);

  // Display the voltage in the Serial Monitor
  Serial.print("Magnetic Field Voltage: ");
  Serial.print(voltage);
  Serial.println(" V");

  delay(500); // Wait for 500ms before the next reading
}
Explanation of the Code:
- The
analogRead()function reads the sensor's output voltage as a value between 0 and 1023. - The voltage is calculated by scaling the analog value to the Arduino's reference voltage (5V).
- The voltage is printed to the Serial Monitor, which can be used to infer the magnetic field strength.
5. Troubleshooting and FAQs
Common Issues and Solutions:
| Issue | Possible Cause | Solution |
|---|---|---|
| No output voltage | Incorrect wiring or power supply issue | Verify connections and ensure the sensor is powered with 3.3V to 5V. |
| Output voltage is constant (no change) | Sensor is too far from the magnetic source | Move the sensor closer to the magnetic field source. |
| Output voltage is noisy | Electrical noise or interference | Add a decoupling capacitor (e.g., 0.1 µF) between Vcc and GND. |
| Sensor overheats | Overvoltage or incorrect connections | Ensure the supply voltage does not exceed 5V and check the wiring. |
Frequently Asked Questions:
Can the sensor detect non-magnetic materials?
- No, the sensor only detects magnetic fields generated by ferromagnetic materials or magnets.
What is the maximum distance for detection?
- The detection range depends on the strength of the magnetic field. Stronger magnets can be detected from a greater distance.
Can I use this sensor with a 3.3V microcontroller?
- Yes, the sensor operates within a voltage range of 3.3V to 5V, making it compatible with 3.3V systems.
How do I measure the magnetic field strength in Gauss?
- The sensor's sensitivity (e.g., 1.3 mV/Gauss) can be used to calculate the field strength. Divide the output voltage by the sensitivity to get the field strength in Gauss.
This documentation provides a comprehensive guide to understanding, using, and troubleshooting the Analog Hall Effect Sensor. Whether you're a beginner or an experienced user, this sensor is a versatile tool for magnetic field detection in a wide range of applications.
Explore Projects Built with Analog Hall Effect Sensor

 Open Project in Cirkit Designer
 Open Project in Cirkit Designer
 Open Project in Cirkit Designer
 Open Project in Cirkit Designer
Explore Projects Built with Analog Hall Effect Sensor

 Open Project in Cirkit Designer
 Open Project in Cirkit Designer
 Open Project in Cirkit Designer
 Open Project in Cirkit Designer