Cirkit Designer Logo
Cirkit Designer
Your all-in-one circuit design IDE
Home / 
Component Documentation

How to Use Adafruit Feather 32u4 Bluefruit: Examples, Pinouts, and Specs

Image of Adafruit Feather 32u4 Bluefruit
Cirkit Designer LogoDesign with Adafruit Feather 32u4 Bluefruit in Cirkit Designer

Introduction

The Adafruit Feather 32u4 Bluefruit is an all-in-one microcontroller and Bluetooth Low Energy (BLE) development board. It is part of the Feather ecosystem - a complete line of development boards from Adafruit that are both standalone and stackable. They're able to be powered by a variety of battery options and are equipped with built-in USB charging. This board is ideal for makers and hobbyists who want to add wireless connectivity to their projects with ease.

Explore Projects Built with Adafruit Feather 32u4 Bluefruit

Use Cirkit Designer to design, explore, and prototype these projects online. Some projects support real-time simulation. Click "Open Project" to start designing instantly!
Touch-Sensitive Interface with Adafruit MPR121 and Feather 32u4 Bluefruit
Image of MPR121: A project utilizing Adafruit Feather 32u4 Bluefruit in a practical application
This circuit integrates an Adafruit MPR121 capacitive touch sensor with an Adafruit Feather 32u4 Bluefruit microcontroller. The MPR121 is powered by the Feather and communicates via I2C (SCL and SDA) to detect touch inputs, which can be processed or transmitted wirelessly by the Feather.
Cirkit Designer LogoOpen Project in Cirkit Designer
Adafruit Feather 32u4 Bluefruit with MPR121 Capacitive Touch Sensor Interface
Image of ALi WTSE: A project utilizing Adafruit Feather 32u4 Bluefruit in a practical application
This circuit integrates an Adafruit MPR121 capacitive touch sensor with an Adafruit Feather 32u4 Bluefruit microcontroller. The MPR121 is powered by the 3.3V supply from the Feather and communicates with the microcontroller via I2C, with SCL connected to pin 3 and SDA connected to pin 2 of the Feather. This setup allows the Feather to detect touch inputs from the MPR121 for further processing or wireless communication.
Cirkit Designer LogoOpen Project in Cirkit Designer
ESP32-Based Vibration Feedback System with Quad Alphanumeric Display and ADXL343 Accelerometer
Image of EC444 - Quest 3: A project utilizing Adafruit Feather 32u4 Bluefruit in a practical application
This circuit features an Adafruit HUZZAH32 ESP32 Feather board as the central microcontroller, which is connected to an Adafruit Quad AlphaNumeric Featherwing display and an Adafruit ADXL343 accelerometer via I2C communication (SCL and SDA lines). The ESP32 controls a vibration motor connected to one of its GPIO pins (A5_IO4) and shares a common power supply (3.3V) and ground (GND) with the other components. The purpose of this circuit is likely to read acceleration data, display information on the alphanumeric display, and provide haptic feedback through the vibration motor.
Cirkit Designer LogoOpen Project in Cirkit Designer
Solar-Powered Environmental Data Logger with Adafruit Feather M0 Express
Image of Lake Thoreau Monitoring Station: A project utilizing Adafruit Feather 32u4 Bluefruit in a practical application
This circuit is designed for environmental data collection and logging, utilizing an Adafruit Feather M0 Express microcontroller as the central processing unit. It interfaces with a BME280 sensor for atmospheric temperature, humidity, and pressure measurements, an SGP30 sensor for monitoring air quality (eCO2 and TVOC), and a STEMMA soil sensor for detecting soil moisture and temperature. The system is powered by a solar panel and a 3.7v LiPo battery, managed by an Adafruit BQ24074 Solar-DC-USB Lipo Charger, and provides easy access to the microcontroller's connections through an Adafruit Terminal Breakout FeatherWing.
Cirkit Designer LogoOpen Project in Cirkit Designer

Explore Projects Built with Adafruit Feather 32u4 Bluefruit

Use Cirkit Designer to design, explore, and prototype these projects online. Some projects support real-time simulation. Click "Open Project" to start designing instantly!
Image of MPR121: A project utilizing Adafruit Feather 32u4 Bluefruit in a practical application
Touch-Sensitive Interface with Adafruit MPR121 and Feather 32u4 Bluefruit
This circuit integrates an Adafruit MPR121 capacitive touch sensor with an Adafruit Feather 32u4 Bluefruit microcontroller. The MPR121 is powered by the Feather and communicates via I2C (SCL and SDA) to detect touch inputs, which can be processed or transmitted wirelessly by the Feather.
Cirkit Designer LogoOpen Project in Cirkit Designer
Image of ALi WTSE: A project utilizing Adafruit Feather 32u4 Bluefruit in a practical application
Adafruit Feather 32u4 Bluefruit with MPR121 Capacitive Touch Sensor Interface
This circuit integrates an Adafruit MPR121 capacitive touch sensor with an Adafruit Feather 32u4 Bluefruit microcontroller. The MPR121 is powered by the 3.3V supply from the Feather and communicates with the microcontroller via I2C, with SCL connected to pin 3 and SDA connected to pin 2 of the Feather. This setup allows the Feather to detect touch inputs from the MPR121 for further processing or wireless communication.
Cirkit Designer LogoOpen Project in Cirkit Designer
Image of EC444 - Quest 3: A project utilizing Adafruit Feather 32u4 Bluefruit in a practical application
ESP32-Based Vibration Feedback System with Quad Alphanumeric Display and ADXL343 Accelerometer
This circuit features an Adafruit HUZZAH32 ESP32 Feather board as the central microcontroller, which is connected to an Adafruit Quad AlphaNumeric Featherwing display and an Adafruit ADXL343 accelerometer via I2C communication (SCL and SDA lines). The ESP32 controls a vibration motor connected to one of its GPIO pins (A5_IO4) and shares a common power supply (3.3V) and ground (GND) with the other components. The purpose of this circuit is likely to read acceleration data, display information on the alphanumeric display, and provide haptic feedback through the vibration motor.
Cirkit Designer LogoOpen Project in Cirkit Designer
Image of Lake Thoreau Monitoring Station: A project utilizing Adafruit Feather 32u4 Bluefruit in a practical application
Solar-Powered Environmental Data Logger with Adafruit Feather M0 Express
This circuit is designed for environmental data collection and logging, utilizing an Adafruit Feather M0 Express microcontroller as the central processing unit. It interfaces with a BME280 sensor for atmospheric temperature, humidity, and pressure measurements, an SGP30 sensor for monitoring air quality (eCO2 and TVOC), and a STEMMA soil sensor for detecting soil moisture and temperature. The system is powered by a solar panel and a 3.7v LiPo battery, managed by an Adafruit BQ24074 Solar-DC-USB Lipo Charger, and provides easy access to the microcontroller's connections through an Adafruit Terminal Breakout FeatherWing.
Cirkit Designer LogoOpen Project in Cirkit Designer

Common Applications and Use Cases

  • Wearable electronics
  • Wireless sensor networks
  • IoT devices
  • Bluetooth-enabled robotics
  • DIY smart home devices

Technical Specifications

Key Technical Details

  • Microcontroller: ATmega32u4
  • Operating Voltage: 3.3V
  • Input Voltage: 3.7-6V via battery and up to 12V via the USB pin
  • Clock Speed: 8 MHz
  • Digital I/O Pins: 20
  • PWM Channels: 7
  • Analog Input Channels: 12
  • DC Current per I/O Pin: 10 mA
  • Flash Memory: 32 KB (ATmega32u4) of which 4 KB used by bootloader
  • SRAM: 2.5 KB (ATmega32u4)
  • EEPROM: 1 KB (ATmega32u4)
  • Bluetooth: Bluetooth 4.0 Low Energy (BLE)

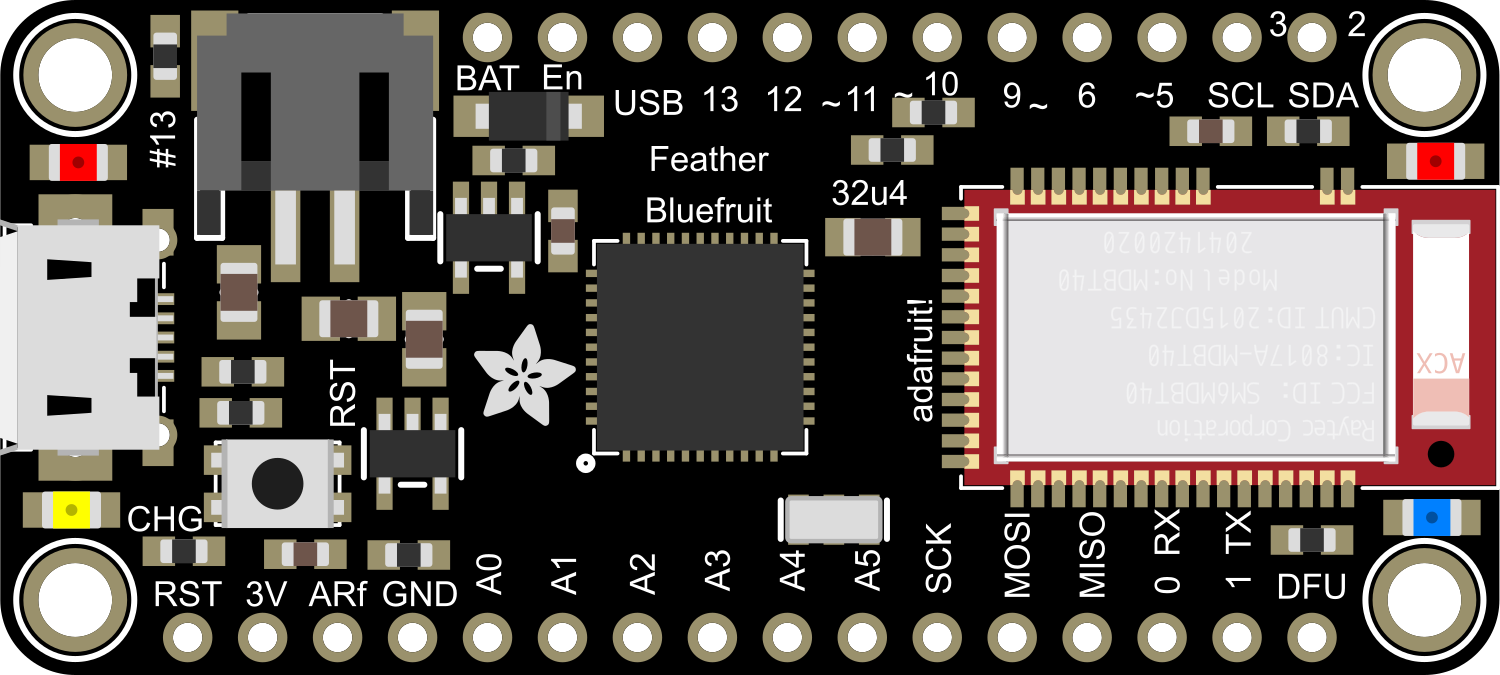
Pin Configuration and Descriptions

Pin Number Function Description
1 GND Ground
2 BAT Battery +
3 EN Enable pin for the 3.3V regulator
4 USB USB raw voltage (4.5-5.5V)
5 RST Reset pin
6-11 Analog A0-A5 Analog pins
12-19 Digital 0-7 Digital pins, PWM available on 3, 5, 6, 9, 10, 11
20-25 Digital 8-13 Digital pins, SPI/I2C available
26 RX UART receive pin
27 TX UART transmit pin
28 SDA I2C data pin
29 SCL I2C clock pin
30 MISO SPI MISO pin
31 MOSI SPI MOSI pin
32 SCK SPI clock pin

Usage Instructions

How to Use the Component in a Circuit

  1. Powering the Board:

    • You can power the Adafruit Feather 32u4 Bluefruit via the USB connection or with an external battery.
    • The board has a built-in charging circuit for a 3.7V LiPo battery.
  2. Programming the Board:

    • The board is programmable via the Arduino IDE. Select "Adafruit Feather 32u4" from the Tools > Board menu.
    • Use a micro-USB cable to connect the board to your computer.
  3. Connecting Bluetooth:

    • The board can be used as a BLE client (peripheral) or server (central).
    • Use the Adafruit Bluefruit LE Connect app to connect and communicate with the board.

Important Considerations and Best Practices

  • Antenna Design: Ensure that the BLE antenna is not obstructed by metal to maintain signal strength.
  • Power Management: Use the EN pin to disable the 3.3V regulator when running on battery power to conserve energy.
  • I/O Voltage: All pins are 3.3V logic. Do not input more than 3.3V to any I/O pin to avoid damage.

Example Code for Arduino UNO

#include <SPI.h>
#include <Wire.h>
#include <Adafruit_BLE.h>
#include <Adafruit_BluefruitLE_SPI.h>

// SHARED SPI SETTINGS (see Adafruit_BLE_SPI.h for definitions)
#define BLUEFRUIT_SPI_CS               8
#define BLUEFRUIT_SPI_IRQ              7
#define BLUEFRUIT_SPI_RST              4    // Optional but recommended, set to -1 if unused

// Create the bluefruit object, using SPI interface
Adafruit_BluefruitLE_SPI ble(BLUEFRUIT_SPI_CS, BLUEFRUIT_SPI_IRQ, BLUEFRUIT_SPI_RST);

void setup() {
  Serial.begin(115200);
  Serial.println(F("Adafruit Bluefruit Feather 32u4 Basic Demo"));
  Serial.println(F("-----------------------------------------"));

  // Initialise the module
  Serial.print(F("Initialising the Bluefruit LE module: "));

  if (!ble.begin()) {
    Serial.println(F("Couldn't find Bluefruit, make sure it's in CoMmanD mode & check wiring?"));
  }
  Serial.println(F("OK!"));

  // Perform a factory reset to make sure everything is in a known state
  Serial.println(F("Performing a factory reset: "));
  if (!ble.factoryReset()) {
    Serial.println(F("Couldn't factory reset"));
  }

  // Set BLE UART baud rate to default
  ble.echo(false);
  ble.info();
  ble.verbose(false);  // Turn off verbose mode for lower debug output (optional)
}

void loop() {
  // Placeholder for user code.
}

Troubleshooting and FAQs

Common Issues Users Might Face

  • Device Not Recognized: Ensure the micro-USB cable is properly connected and the computer recognizes the USB device.
  • Unable to Upload Sketches: Check that the correct board and port are selected in the Arduino IDE.
  • Bluetooth Connection Issues: Make sure the BLE antenna is not obstructed and the device is charged.

Solutions and Tips for Troubleshooting

  • Reset the Board: Press the reset button on the board twice quickly to enter bootloader mode if the board is not recognized.
  • Check Battery Connection: If using a battery, ensure it is properly connected and charged.
  • Update Firmware: Ensure the board's BLE firmware is up to date using the Bluefruit LE Connect app.

FAQs

Q: Can I use the Adafruit Feather 32u4 Bluefruit with my smartphone?

A: Yes, you can use it with both iOS and Android devices using the Adafruit Bluefruit LE Connect app.

Q: What is the range of the Bluetooth connection?

A: The BLE range is typically up to 10 meters (33 feet), but it can vary depending on obstacles and interference.

Q: How do I update the BLE firmware?

A: You can update the firmware using the Adafruit Bluefruit LE Connect app. Follow the instructions within the app to complete the update.

Q: Can I use the Adafruit Feather 32u4 Bluefruit with external sensors?

A: Yes, the board has multiple analog and digital I/O pins that can be used to connect a variety of sensors and peripherals.