How to Use RTV LEAK TEST: Examples, Pinouts, and Specs
Introduction
The RTV Leak Test is a diagnostic tool or procedure used to detect leaks in RTV (Room Temperature Vulcanizing) silicone sealants. RTV silicone is commonly used in sealing applications where flexibility, durability, and resistance to environmental factors are critical. This test ensures that the sealant has been applied correctly and that no leaks are present, which could compromise the integrity of the sealed system.
Explore Projects Built with RTV LEAK TEST
Explore Projects Built with RTV LEAK TEST
Common Applications and Use Cases
- Automotive Industry: Ensuring proper sealing of engine components, gaskets, and housings.
- Plumbing: Verifying watertight seals in pipes, joints, and fittings.
- Electronics: Testing enclosures for moisture ingress protection.
- Aerospace: Ensuring airtight seals in critical components.
- Construction: Verifying the integrity of weatherproofing seals in windows, doors, and facades.
Technical Specifications
The RTV Leak Test is not a physical electronic component but rather a testing procedure. However, it often involves the use of electronic sensors, pressure gauges, or other diagnostic tools. Below are the typical specifications for tools used in RTV leak testing:
Key Technical Details
| Parameter | Description |
|---|---|
| Pressure Range | 0 to 10 PSI (typical for low-pressure tests) |
| Sensor Type | Pressure sensors, ultrasonic sensors, or flow meters |
| Detection Sensitivity | Can detect leaks as small as 0.01 mm in diameter (depending on the method) |
| Power Supply | 5V DC or 12V DC (for electronic sensors) |
| Output | Analog or digital signal indicating leak presence |
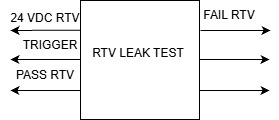
Pin Configuration and Descriptions (for electronic sensors used in RTV Leak Tests)
| Pin Number | Pin Name | Description |
|---|---|---|
| 1 | VCC | Power supply input (e.g., 5V or 12V DC) |
| 2 | GND | Ground connection |
| 3 | Signal Out | Analog or digital output signal indicating the presence of a leak |
| 4 | Calibration | Optional pin for sensor calibration (if applicable) |
Usage Instructions
How to Use the RTV Leak Test in a Circuit
Prepare the Test Setup:
- Ensure the RTV sealant has fully cured as per the manufacturer's instructions.
- Connect the RTV Leak Test sensor to the system being tested.
- If using an electronic sensor, connect the pins as follows:
- Connect the VCC pin to the power supply (e.g., 5V or 12V DC).
- Connect the GND pin to the ground of the circuit.
- Connect the Signal Out pin to a microcontroller or monitoring device.
Perform the Test:
- Apply pressure or vacuum to the sealed system.
- Monitor the sensor output for any indication of a leak (e.g., a change in pressure or flow rate).
Analyze the Results:
- If the sensor output remains stable, the seal is intact.
- If the sensor detects a drop in pressure or an increase in flow, a leak is present.
Important Considerations and Best Practices
- Ensure the RTV sealant is applied evenly and allowed to cure completely before testing.
- Avoid over-pressurizing the system, as this could damage the seal or the sensor.
- Calibrate the sensor before use to ensure accurate readings.
- Use appropriate safety measures when working with pressurized systems.
Example Code for Arduino UNO
If using an electronic pressure sensor for the RTV Leak Test, the following Arduino code can be used to monitor the sensor output:
// Define the analog pin connected to the sensor's Signal Out pin
const int sensorPin = A0;

// Variable to store the sensor reading
int sensorValue = 0;

void setup() {
  // Initialize serial communication for debugging
  Serial.begin(9600);
}

void loop() {
  // Read the analog value from the sensor
  sensorValue = analogRead(sensorPin);

  // Convert the analog value to a voltage (assuming 5V reference)
  float voltage = sensorValue * (5.0 / 1023.0);

  // Print the voltage to the Serial Monitor
  Serial.print("Sensor Voltage: ");
  Serial.print(voltage);
  Serial.println(" V");

  // Check for a potential leak (example threshold: voltage < 2.5V)
  if (voltage < 2.5) {
    Serial.println("Leak Detected!");
  } else {
    Serial.println("No Leak Detected.");
  }

  // Wait for 1 second before the next reading
  delay(1000);
}
Troubleshooting and FAQs
Common Issues and Solutions
| Issue | Possible Cause | Solution |
|---|---|---|
| No output from the sensor | Incorrect wiring or loose connections | Verify all connections and wiring. |
| False leak detection | Sensor not calibrated or environmental noise | Calibrate the sensor and reduce interference. |
| Sensor damage | Over-pressurization of the system | Ensure pressure stays within sensor limits. |
| Inconsistent readings | Fluctuating power supply | Use a stable power source or add a capacitor. |
FAQs
How long should I wait before testing the RTV sealant?
Wait for the sealant to cure completely, as per the manufacturer's instructions (typically 24-48 hours).Can I use this test for high-pressure systems?
Yes, but ensure the sensor and sealant are rated for the pressure range of your application.What is the smallest leak this test can detect?
The detection sensitivity depends on the sensor used. Some sensors can detect leaks as small as 0.01 mm in diameter.Do I need special equipment for this test?
While basic tests can be performed manually, electronic sensors provide more accurate and reliable results.
By following this documentation, users can effectively perform RTV Leak Tests to ensure the integrity of their sealed systems.