
How to Use Stromverteiler 12 A (2x4): Examples, Pinouts, and Specs
 Design with Stromverteiler 12 A (2x4) in Cirkit Designer
Introduction
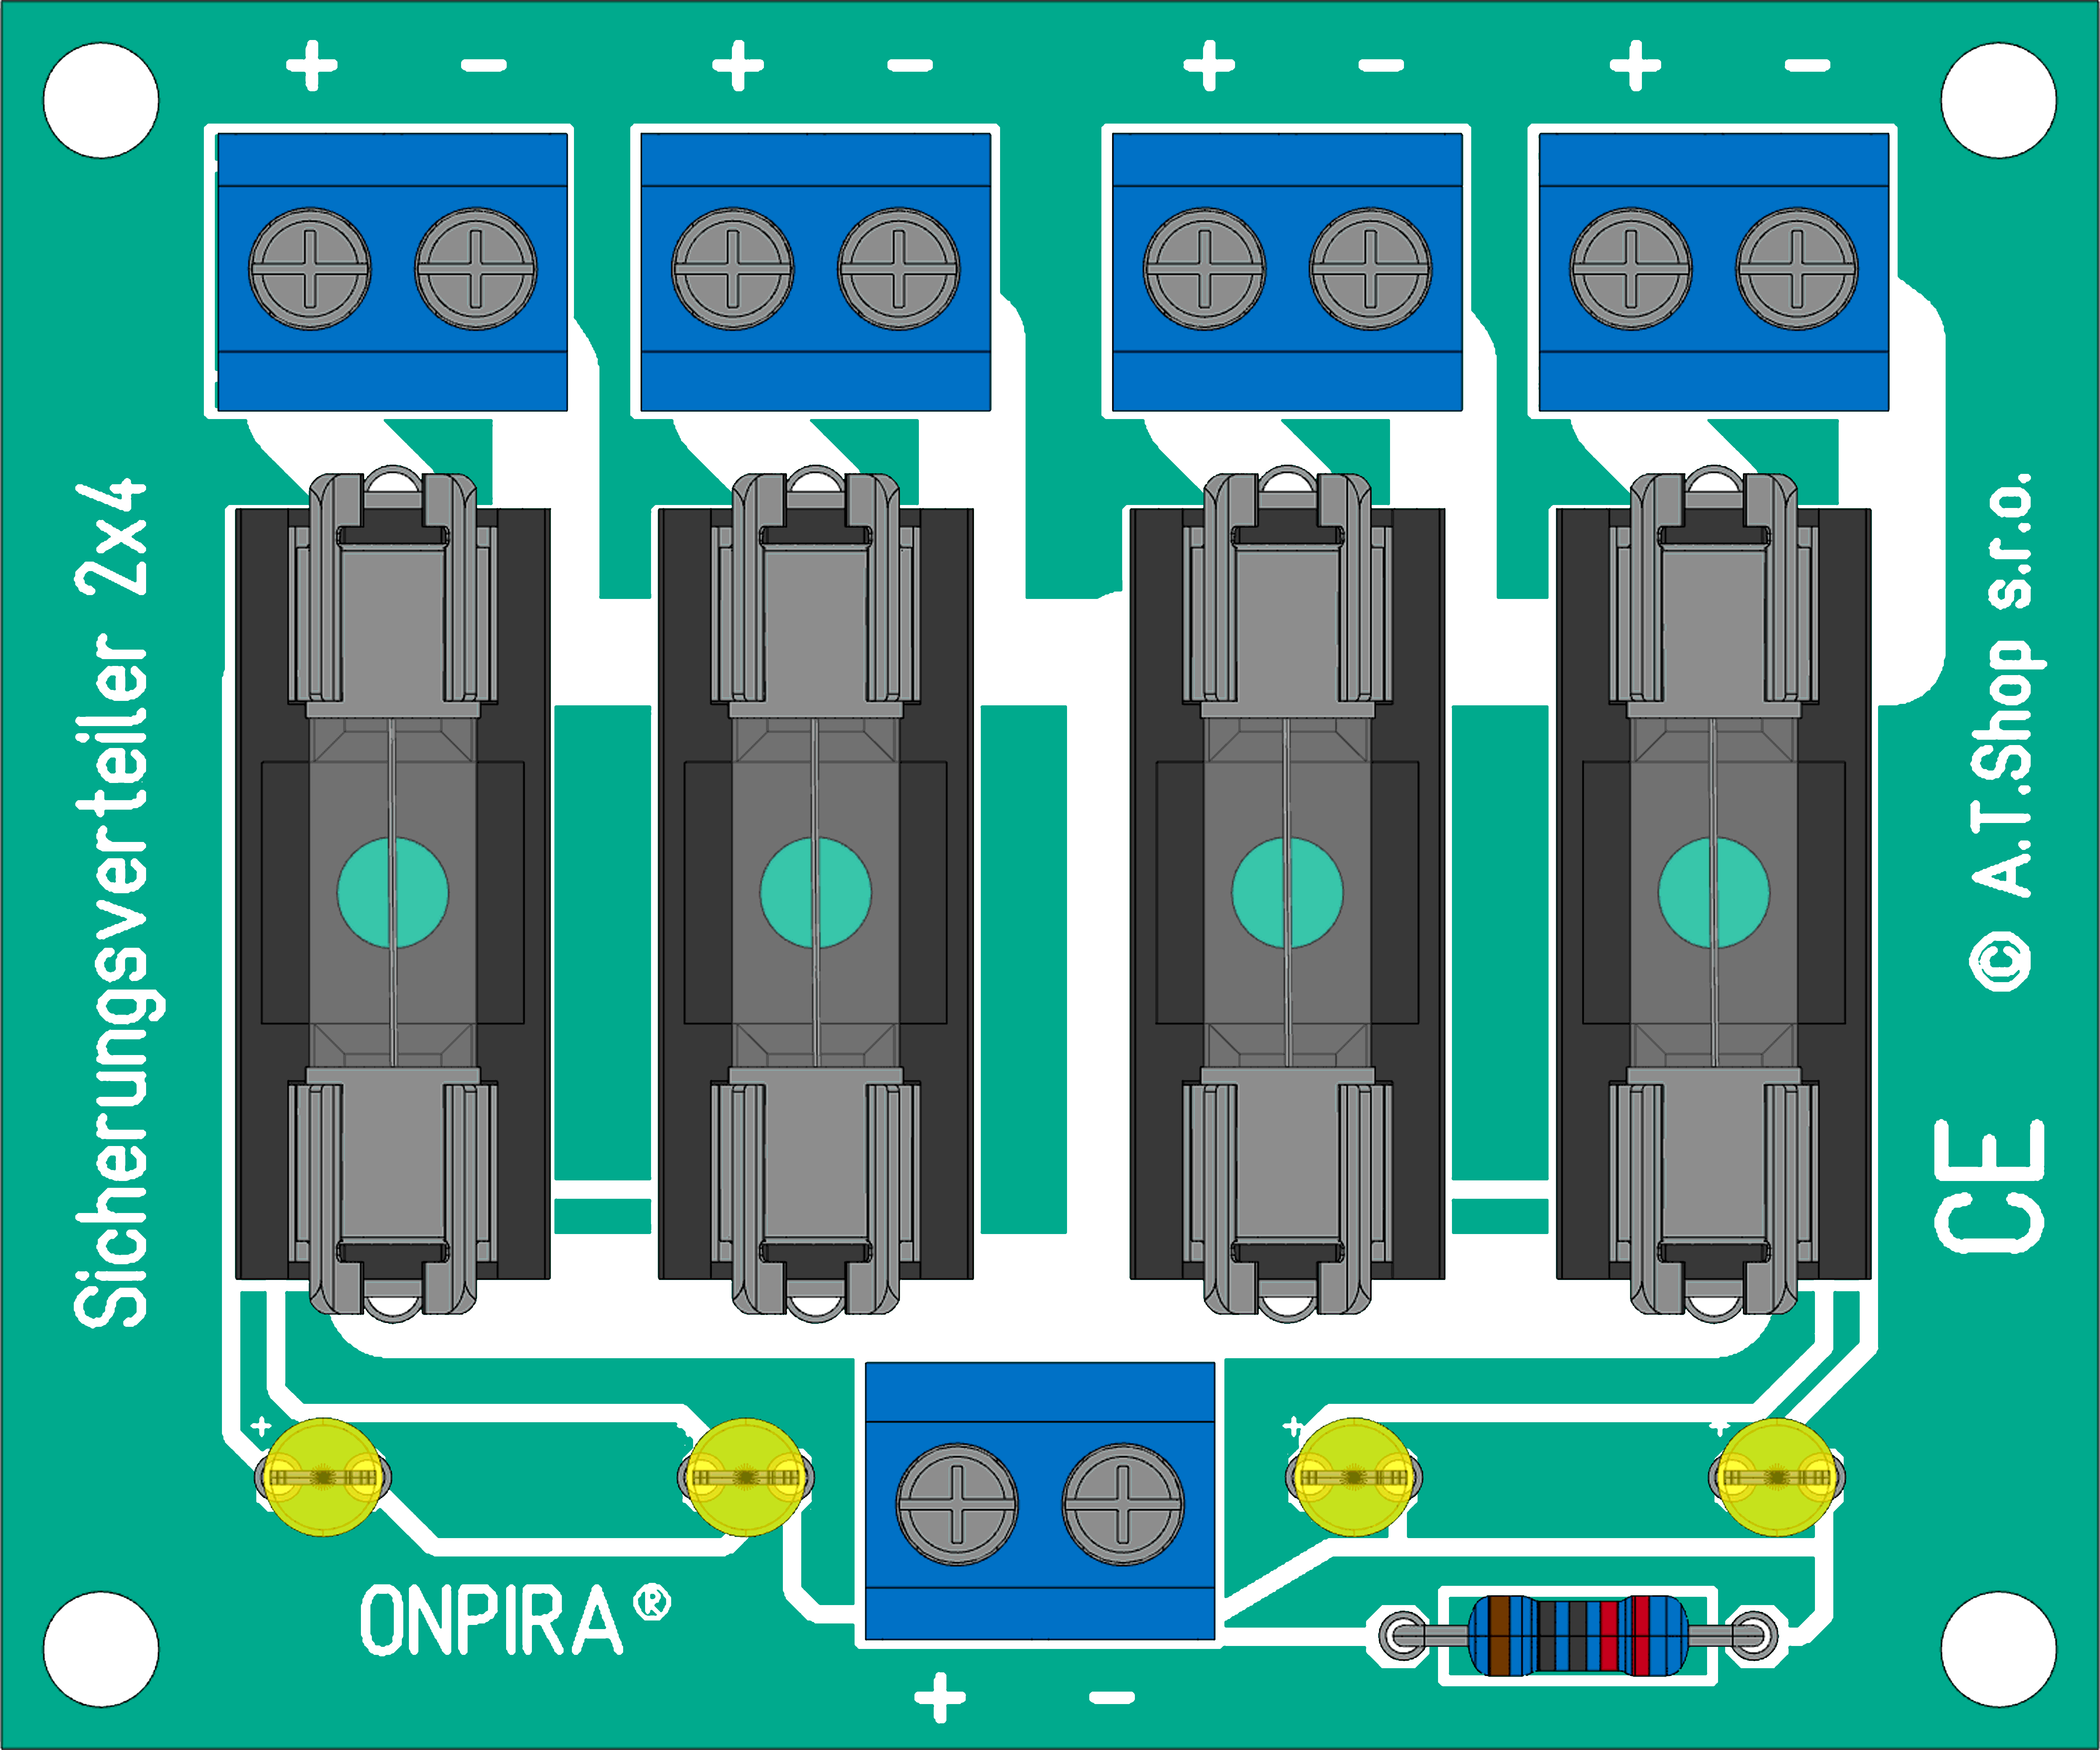
The Stromverteiler 12 A (2x4), manufactured by A.T. Shop s.r.o. - Onpira (Part ID: EAN 722699192599), is a compact and efficient power distribution block designed for distributing electrical power to multiple circuits or devices. It features two sets of four terminals, allowing for easy and organized power distribution in various applications.
This component is ideal for use in:
- Automotive electrical systems
- Industrial control panels
- DIY electronics projects
- Renewable energy systems (e.g., solar panel setups)
- Home automation and smart devices
Its robust design and 12 A current rating make it suitable for low- to medium-power applications, ensuring reliable performance in demanding environments.
Explore Projects Built with Stromverteiler 12 A (2x4)
 Open Project in Cirkit Designer
 Open Project in Cirkit Designer
 Open Project in Cirkit Designer
 Open Project in Cirkit Designer
Explore Projects Built with Stromverteiler 12 A (2x4)
Open Project in Cirkit DesignerOpen Project in Cirkit DesignerOpen Project in Cirkit DesignerOpen Project in Cirkit DesignerTechnical Specifications
Key Technical Details
| Parameter | Specification |
|---|---|
| Manufacturer | A.T. Shop s.r.o. - Onpira |
| Part ID | EAN 722699192599 |
| Current Rating | 12 A |
| Voltage Rating | Up to 48 V DC / 250 V AC |
| Terminal Configuration | 2 sets of 4 terminals (2x4) |
| Terminal Type | Screw terminals |
| Material | High-quality plastic and metal |
| Dimensions | 80 mm x 40 mm x 25 mm (approx.) |
| Mounting | Screw-mountable base |
| Operating Temperature | -20°C to +70°C |
Pin Configuration and Descriptions
The Stromverteiler 12 A (2x4) features two sets of four screw terminals. Each set is electrically isolated, allowing for flexible power distribution.
| Terminal Group | Terminal Number | Description |
|---|---|---|
| Group 1 | 1 | Positive input/output terminal |
| 2 | Positive input/output terminal | |
| 3 | Positive input/output terminal | |
| 4 | Positive input/output terminal | |
| Group 2 | 5 | Negative input/output terminal |
| 6 | Negative input/output terminal | |
| 7 | Negative input/output terminal | |
| 8 | Negative input/output terminal |
Usage Instructions
How to Use the Component in a Circuit
- Mounting the Component: Secure the Stromverteiler 12 A (2x4) to a stable surface using screws through the mounting holes on its base.
- Connecting Power Input:
- Connect the positive power source to one of the terminals in Group 1.
- Connect the negative power source to one of the terminals in Group 2.
- Distributing Power:
- Use the remaining terminals in Group 1 and Group 2 to connect multiple devices or circuits.
- Ensure that the total current drawn by all connected devices does not exceed 12 A.
- Tightening Connections:
- Use a screwdriver to securely tighten the screws on each terminal.
- Avoid overtightening to prevent damage to the terminals.
Important Considerations and Best Practices
- Current Limit: Ensure that the total current drawn does not exceed the 12 A rating to avoid overheating or damage.
- Wire Gauge: Use appropriate wire gauges for the current being carried. For 12 A, a wire gauge of 16 AWG or thicker is recommended.
- Polarity: Double-check the polarity of connections to prevent short circuits or damage to connected devices.
- Insulation: Ensure that all wires are properly insulated to prevent accidental short circuits.
- Environment: Avoid exposing the component to moisture, dust, or extreme temperatures beyond its operating range.
Example: Connecting to an Arduino UNO
The Stromverteiler 12 A (2x4) can be used to power an Arduino UNO and other peripherals. Below is an example setup:
- Connect a 12 V DC power supply to the Stromverteiler.
- Use one terminal in Group 1 to supply 12 V to a voltage regulator (e.g., LM7805) to step down the voltage to 5 V for the Arduino UNO.
- Use another terminal in Group 1 to power additional devices, such as motors or sensors.
Here is an example Arduino code snippet for controlling a motor connected to the Stromverteiler:
// Example Arduino code for controlling a motor
const int motorPin = 9; // PWM pin connected to motor driver

void setup() {
  pinMode(motorPin, OUTPUT); // Set motor pin as output
}

void loop() {
  analogWrite(motorPin, 128); // Set motor speed to 50% (PWM value: 128)
  delay(5000); // Run motor for 5 seconds
  analogWrite(motorPin, 0); // Stop motor
  delay(2000); // Wait for 2 seconds before restarting
}
Troubleshooting and FAQs
Common Issues and Solutions
| Issue | Possible Cause | Solution |
|---|---|---|
| Overheating of terminals | Exceeding the 12 A current limit | Reduce the load or use a higher-rated distribution block. |
| Loose connections | Screws not tightened properly | Ensure all screws are securely tightened. |
| Devices not receiving power | Incorrect wiring or polarity | Double-check all connections and ensure correct polarity. |
| Short circuit | Exposed wires or incorrect connections | Insulate all wires and verify connections. |
FAQs
Q1: Can this component be used with AC power?
A1: Yes, the Stromverteiler 12 A (2x4) supports AC power up to 250 V, but ensure proper insulation and safety precautions.
Q2: What is the maximum wire size that fits the terminals?
A2: The terminals can accommodate wires up to 12 AWG in size.
Q3: Can I use this component outdoors?
A3: The Stromverteiler is not weatherproof. Use it in a dry, indoor environment or within a weatherproof enclosure.
Q4: Is it safe to connect multiple power sources to this component?
A4: No, connecting multiple power sources to the same terminal group can cause conflicts or damage. Use a single power source per group.
This concludes the documentation for the Stromverteiler 12 A (2x4). For further assistance, refer to the manufacturer's guidelines or contact technical support.