How to Use MAX1968 TEC Controller: Examples, Pinouts, and Specs
Introduction
The MAX1968 TEC Controller, manufactured by Analog Devices Inc., is a high-performance temperature controller designed specifically for thermoelectric cooling (TEC) applications. It provides precise temperature regulation and control, making it ideal for maintaining stable operating temperatures in sensitive electronic devices. The MAX1968 is widely used in applications such as laser diodes, optical components, and other temperature-sensitive systems.
Explore Projects Built with MAX1968 TEC Controller

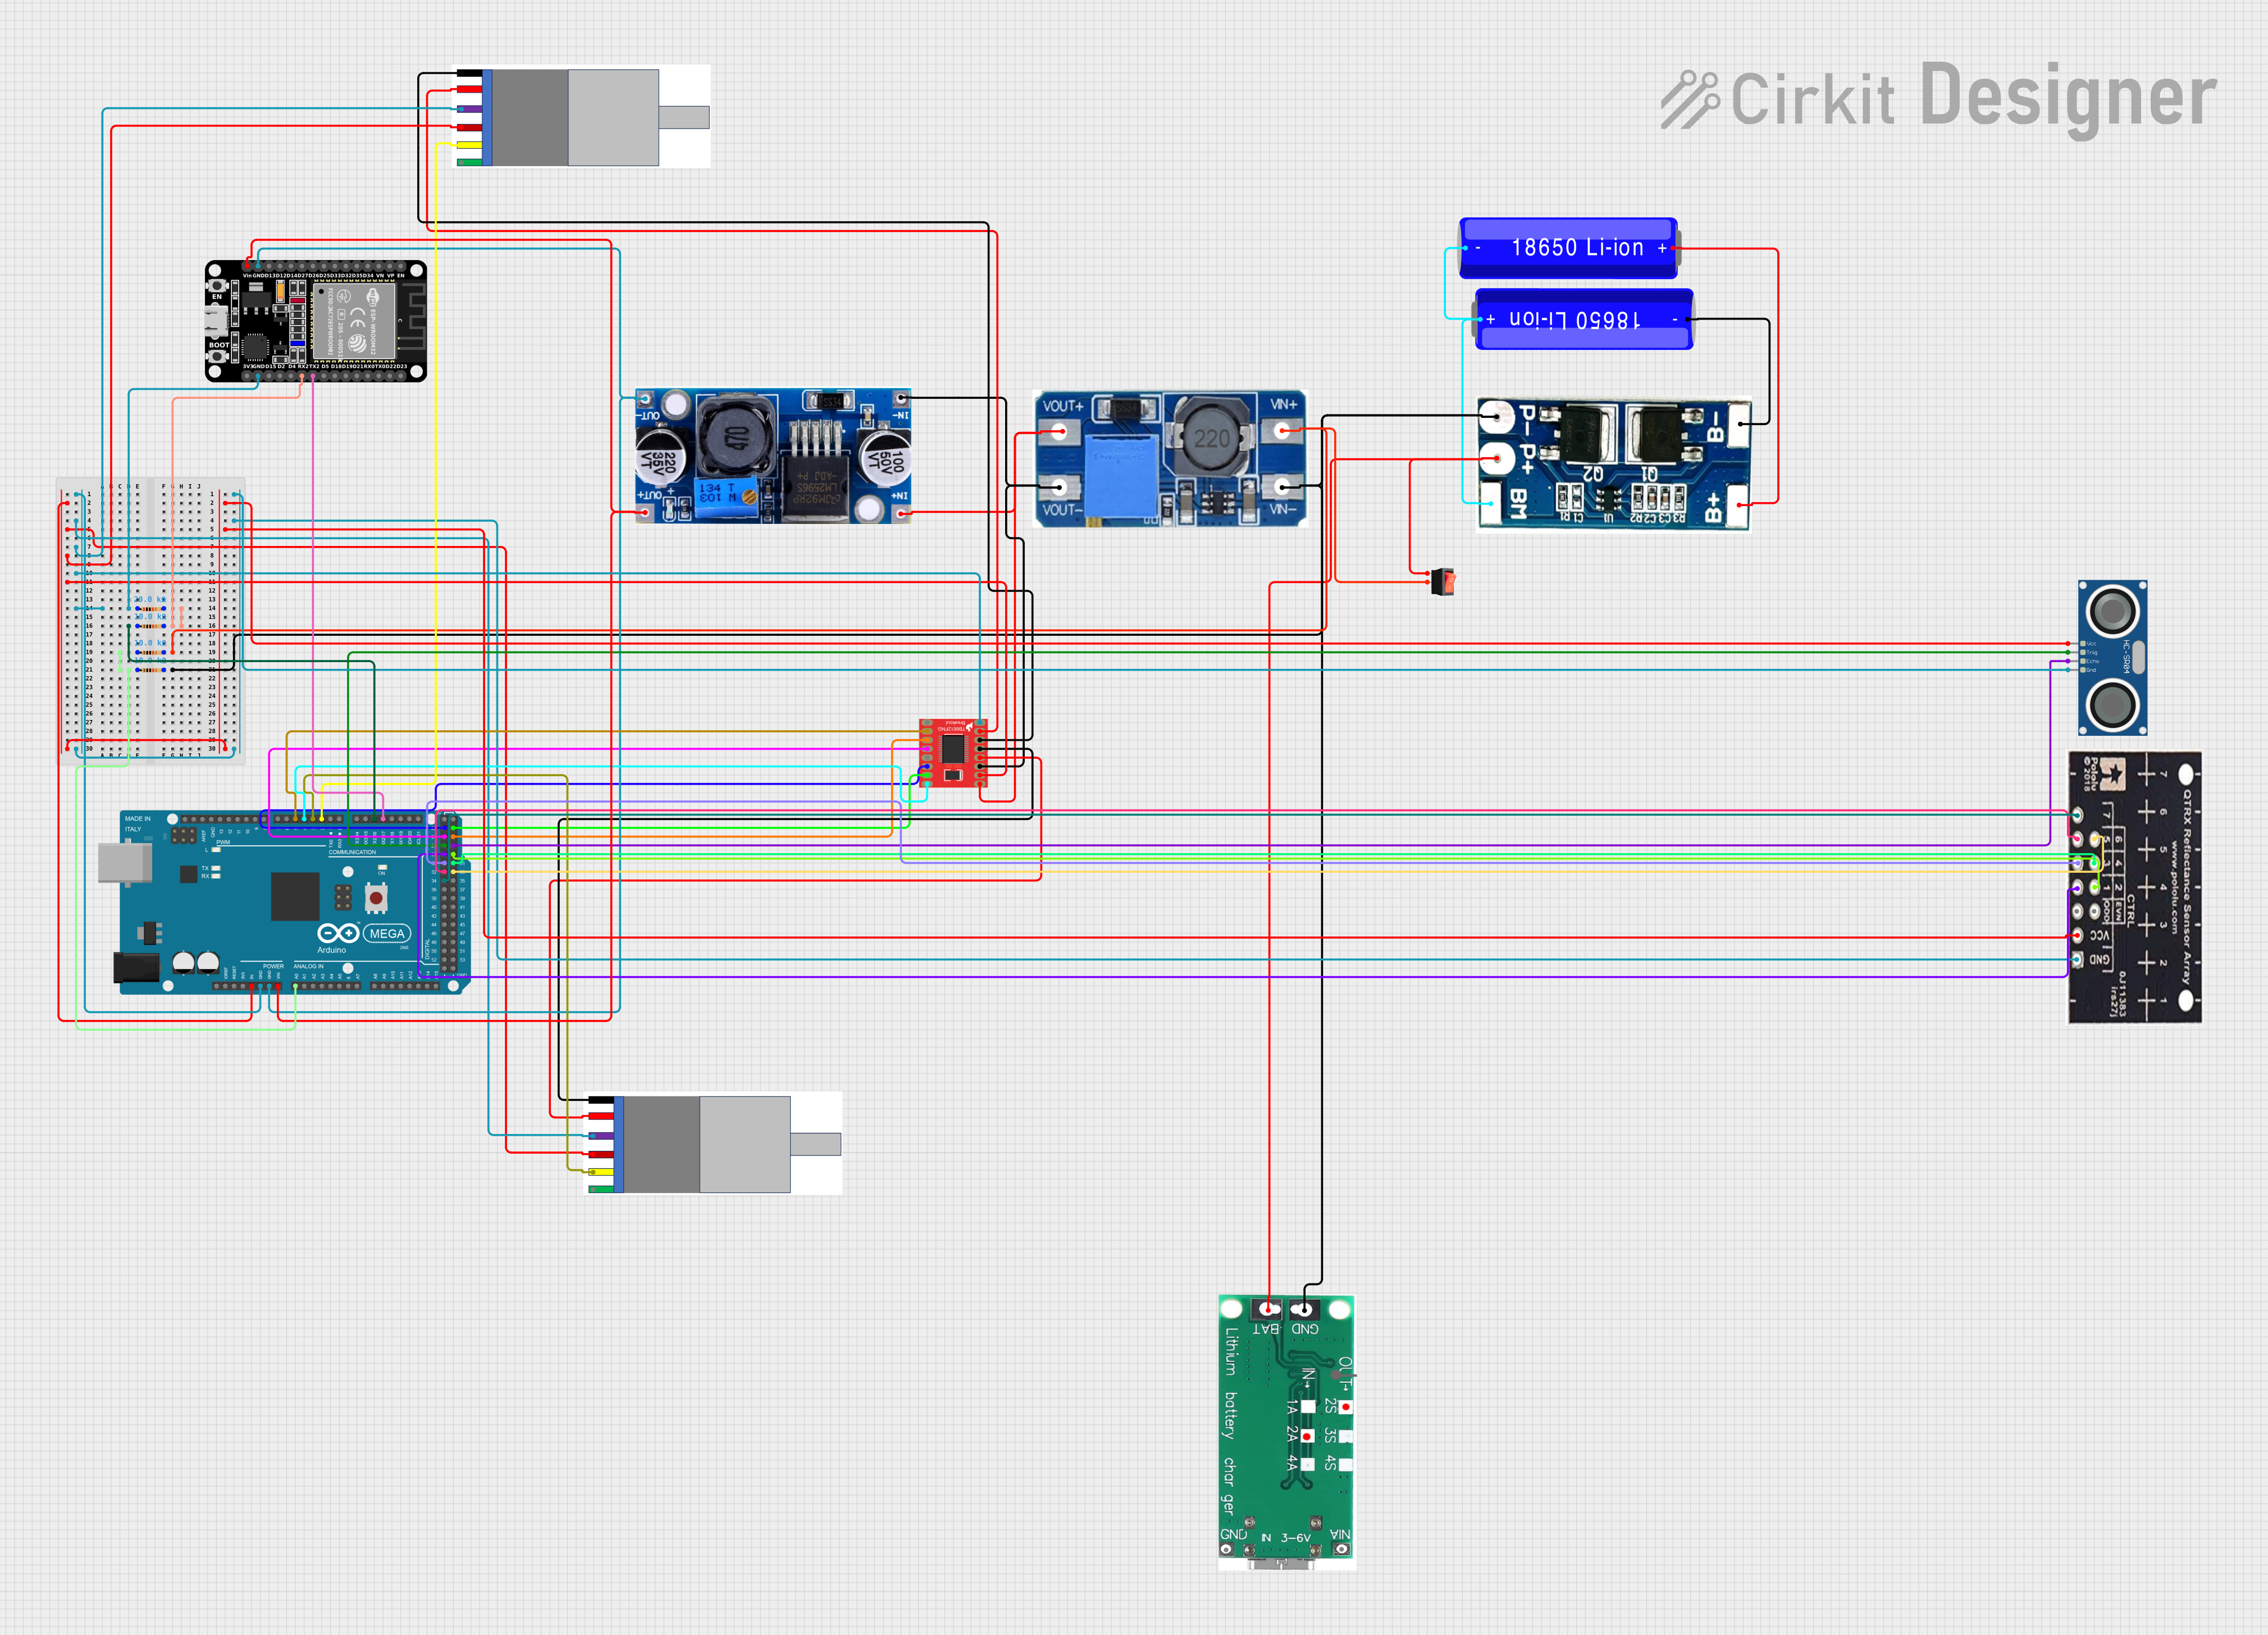
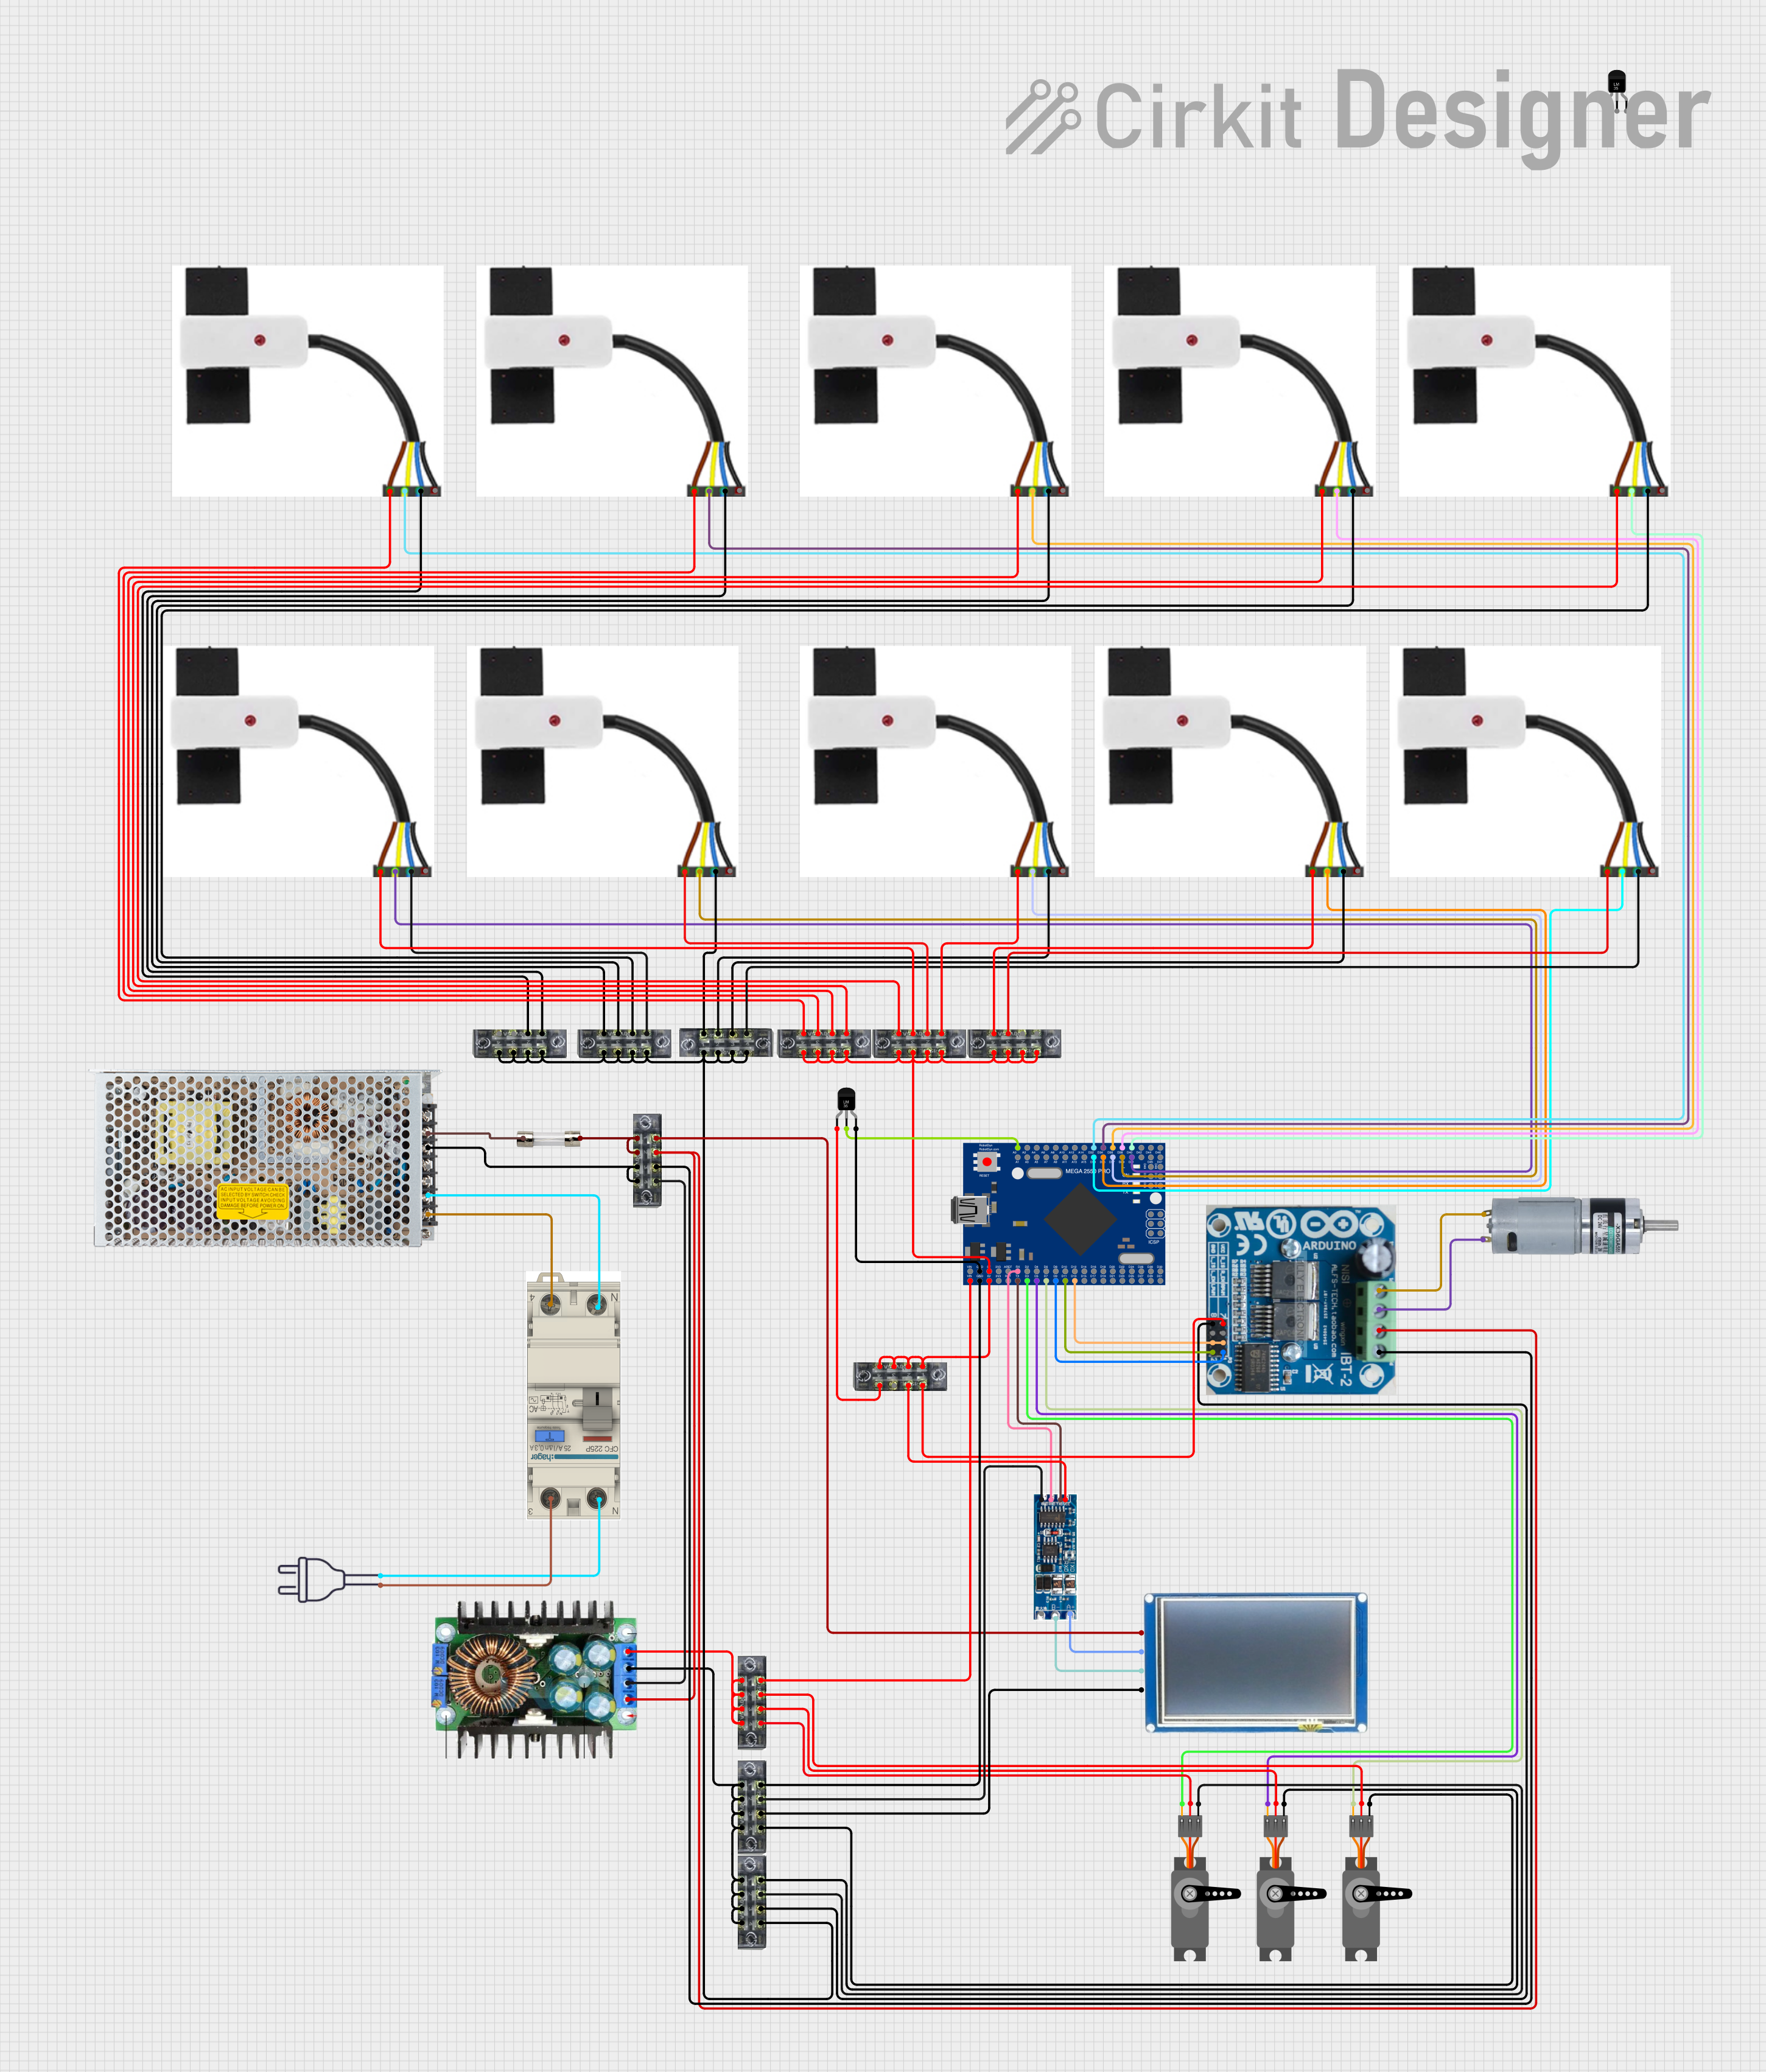
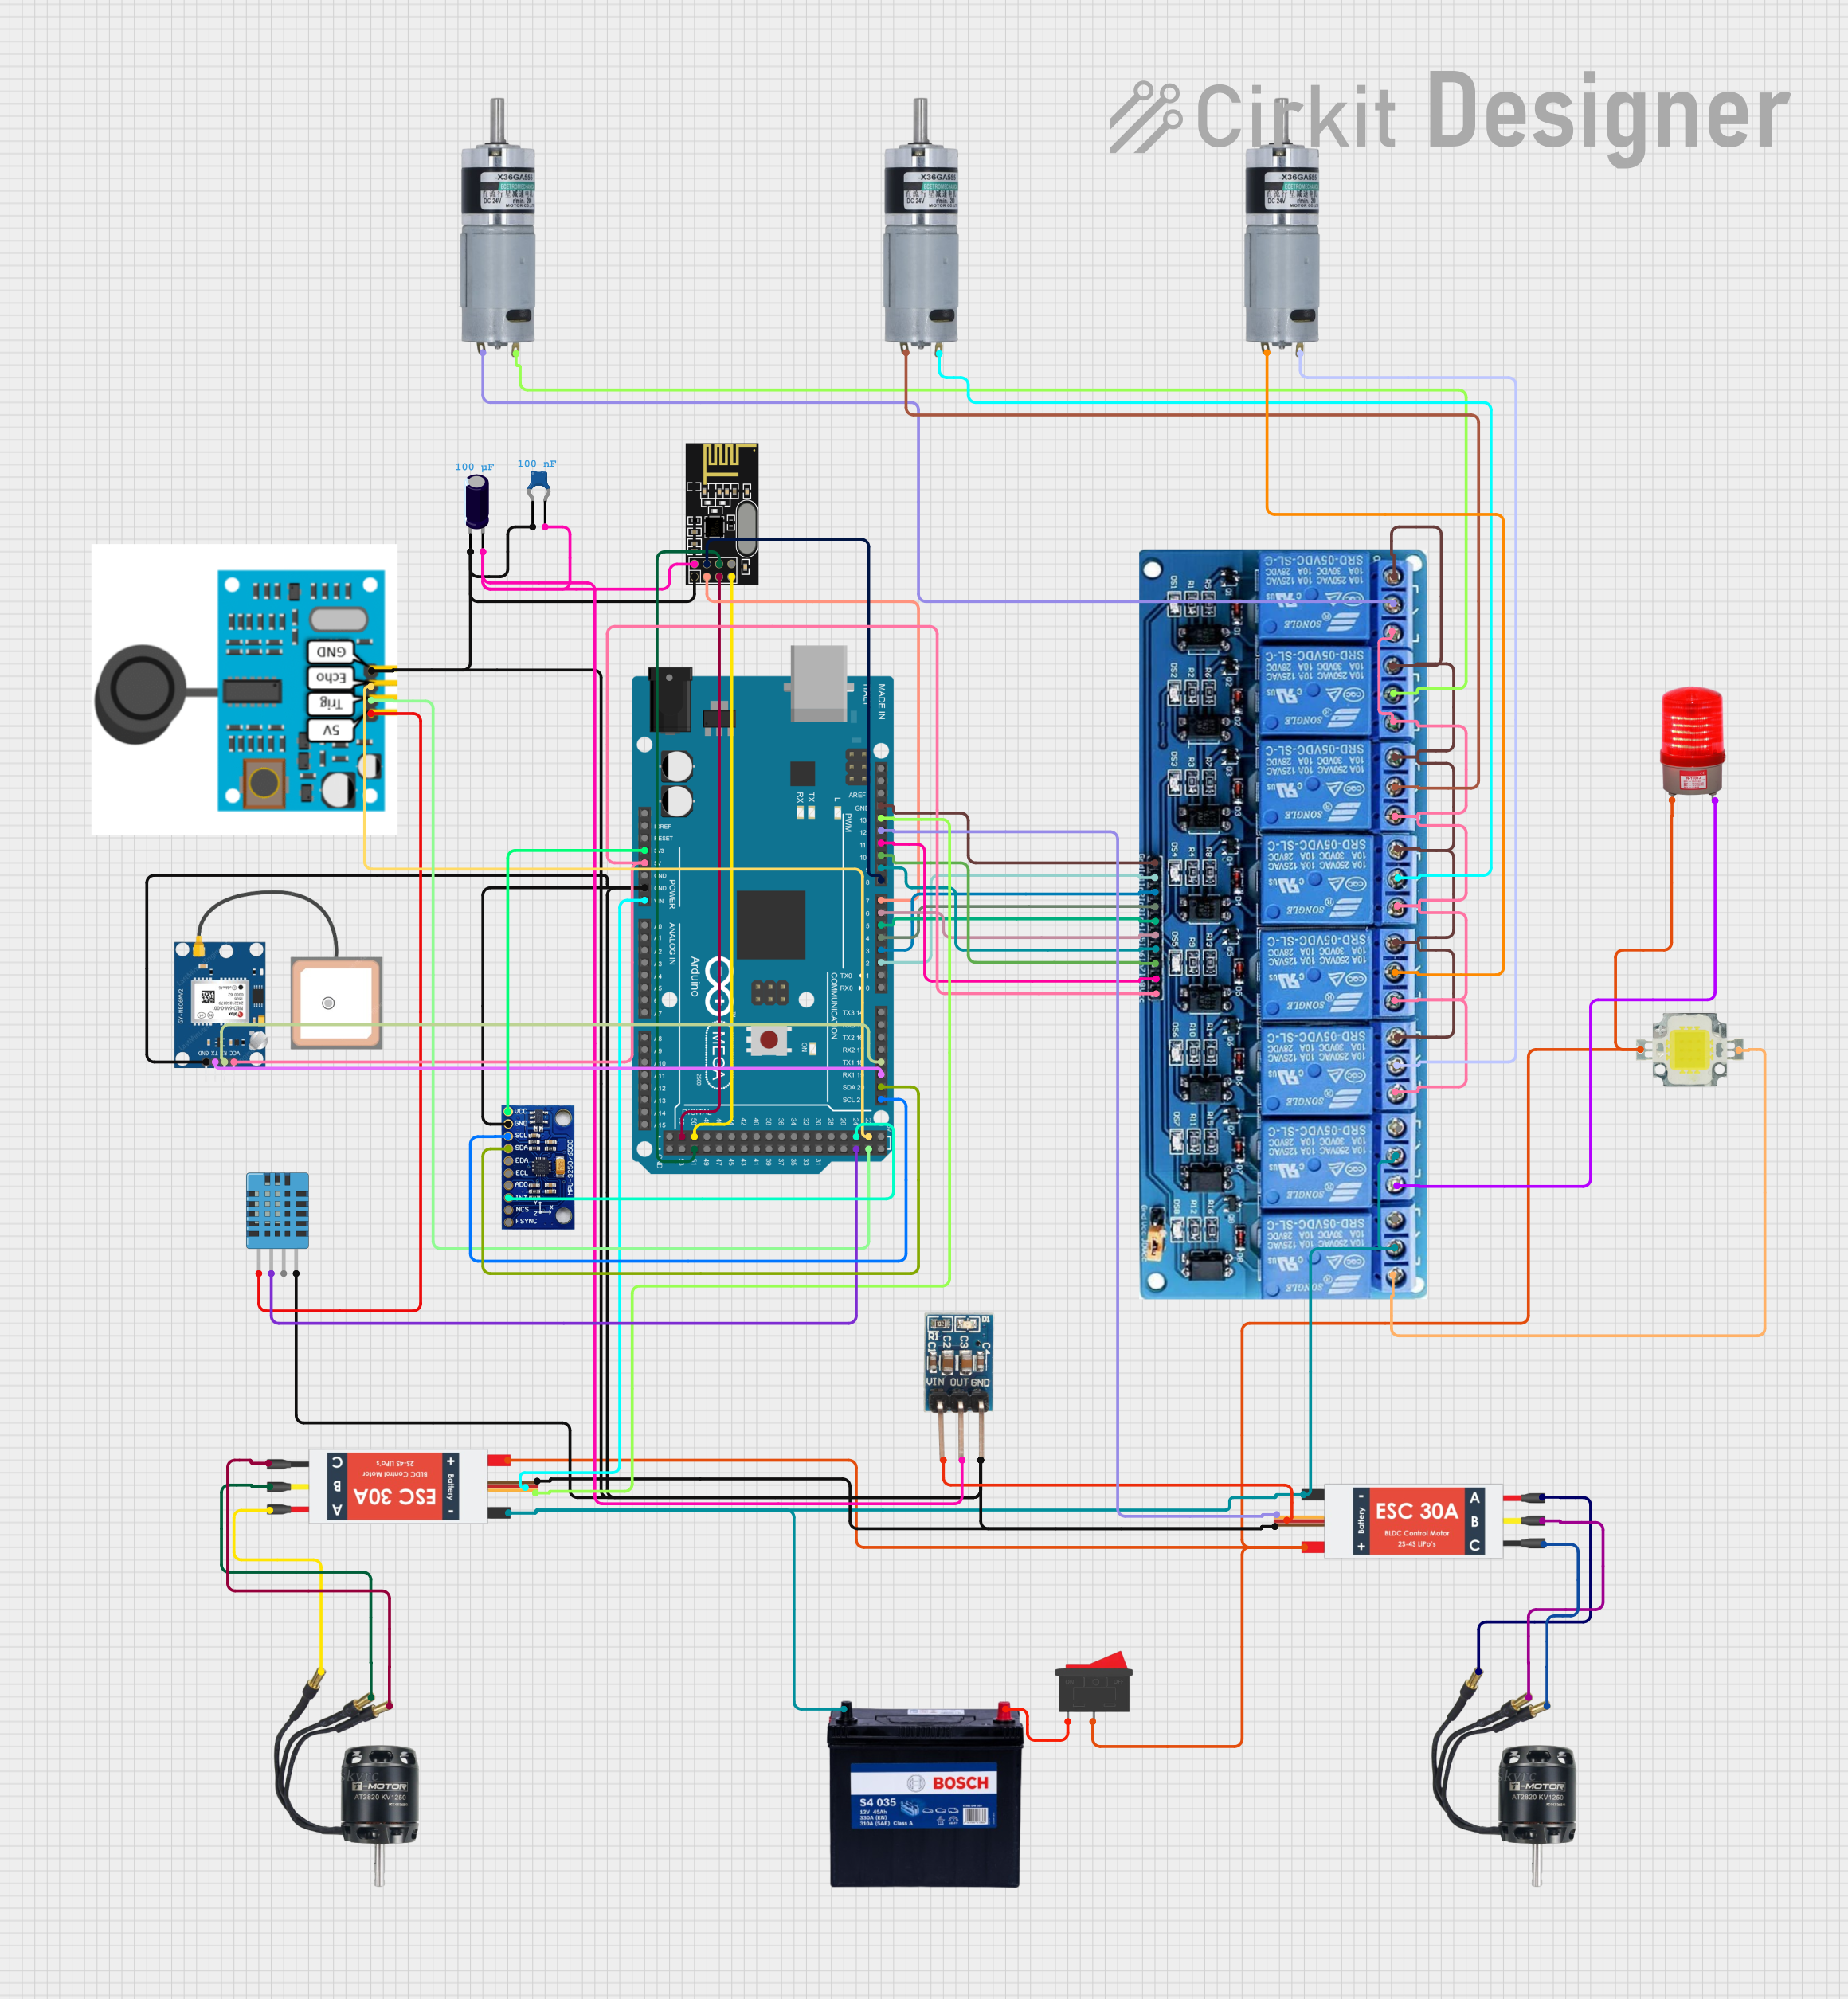
Explore Projects Built with MAX1968 TEC Controller
Common Applications and Use Cases
- Laser diode temperature stabilization
- Optical transceivers and communication modules
- Medical instrumentation requiring precise temperature control
- Industrial and scientific equipment with thermoelectric cooling systems
Technical Specifications
The MAX1968 TEC Controller is a highly integrated device with the following key specifications:
| Parameter | Value |
|---|---|
| Input Voltage Range | 2.7V to 5.5V |
| Output Current | Up to 1.5A |
| Temperature Control Range | -40°C to +85°C |
| Control Method | Proportional-Integral-Derivative (PID) |
| Efficiency | Up to 90% |
| Package Type | 28-pin TSSOP |
| Operating Temperature Range | -40°C to +85°C |
Pin Configuration and Descriptions
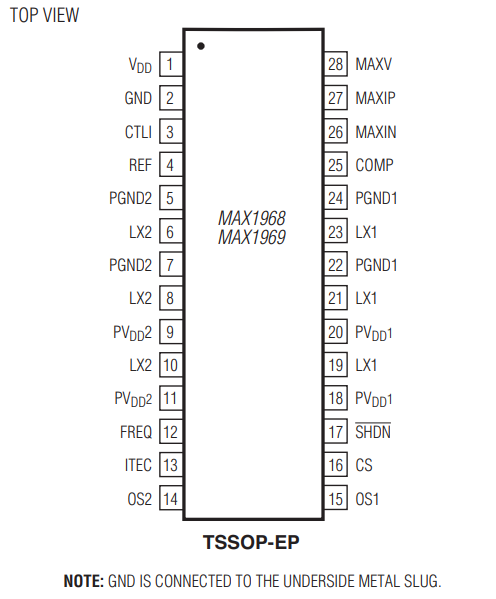
The MAX1968 is housed in a 28-pin TSSOP package. Below is the pin configuration and description:
| Pin Number | Pin Name | Description |
|---|---|---|
| 1 | VDD | Power supply input (2.7V to 5.5V). |
| 2 | GND | Ground connection. |
| 3 | TEC+ | Positive terminal of the thermoelectric cooler (TEC). |
| 4 | TEC- | Negative terminal of the thermoelectric cooler (TEC). |
| 5 | TEMP_IN | Temperature sensor input (e.g., thermistor or RTD). |
| 6 | COMP | Compensation pin for external PID tuning components. |
| 7 | FB | Feedback input for temperature regulation. |
| 8 | SHDN | Shutdown input. Pull low to disable the device. |
| 9-28 | NC | No connection. Leave these pins unconnected or grounded as per the datasheet. |
Usage Instructions
How to Use the MAX1968 in a Circuit
- Power Supply: Connect a stable power supply (2.7V to 5.5V) to the VDD pin. Ensure proper decoupling capacitors are placed close to the pin to minimize noise.
- Thermoelectric Cooler (TEC): Connect the TEC's positive and negative terminals to the TEC+ and TEC- pins, respectively.
- Temperature Sensor: Attach a compatible temperature sensor (e.g., thermistor or RTD) to the TEMP_IN pin. This sensor provides feedback for temperature regulation.
- PID Tuning: Use external components (resistors and capacitors) connected to the COMP pin to fine-tune the PID control loop for optimal performance.
- Feedback: Connect the FB pin to the appropriate point in the circuit to monitor and regulate the temperature.
- Shutdown Control: Use the SHDN pin to enable or disable the device. Pull the pin low to shut down the controller.
Important Considerations and Best Practices
- Thermal Management: Ensure proper heat dissipation for the TEC and the MAX1968 to prevent overheating.
- Sensor Placement: Place the temperature sensor as close as possible to the target device for accurate temperature readings.
- PID Tuning: Adjust the PID loop components carefully to avoid oscillations or slow response times.
- Power Supply: Use a low-noise power supply to ensure stable operation and minimize interference.
Example: Using MAX1968 with Arduino UNO
The MAX1968 can be controlled using an Arduino UNO to monitor and adjust the temperature. Below is an example code snippet for interfacing a thermistor with the MAX1968:
// Example: Reading temperature from a thermistor and controlling MAX1968
// Ensure the thermistor is connected to TEMP_IN and the Arduino analog pin A0

const int tempPin = A0;  // Analog pin connected to the thermistor
const int shdnPin = 7;   // Digital pin connected to SHDN pin of MAX1968

void setup() {
  pinMode(shdnPin, OUTPUT);
  digitalWrite(shdnPin, HIGH);  // Enable the MAX1968
  Serial.begin(9600);           // Initialize serial communication
}

void loop() {
  int rawValue = analogRead(tempPin);  // Read the thermistor value
  float voltage = (rawValue / 1023.0) * 5.0;  // Convert to voltage
  float temperature = (voltage - 0.5) * 100.0;  // Convert to temperature (°C)

  Serial.print("Temperature: ");
  Serial.print(temperature);
  Serial.println(" °C");

  delay(1000);  // Wait for 1 second before the next reading
}
Troubleshooting and FAQs
Common Issues and Solutions
Device Overheating
- Cause: Insufficient heat dissipation for the TEC or MAX1968.
- Solution: Use a heatsink or active cooling to manage heat effectively.
Temperature Oscillations
- Cause: Improper PID tuning.
- Solution: Adjust the external components connected to the COMP pin to stabilize the control loop.
No Output Current
- Cause: SHDN pin is pulled low or not connected.
- Solution: Ensure the SHDN pin is pulled high to enable the device.
Inaccurate Temperature Readings
- Cause: Poor sensor placement or incorrect sensor type.
- Solution: Verify the sensor type and place it close to the target device for accurate readings.
FAQs
Q: Can the MAX1968 be used with a 12V TEC?
A: No, the MAX1968 operates with a supply voltage range of 2.7V to 5.5V. Ensure the TEC is compatible with this voltage range.
Q: What type of temperature sensors are supported?
A: The MAX1968 supports thermistors, RTDs, and other resistive temperature sensors.
Q: How do I disable the MAX1968?
A: Pull the SHDN pin low to disable the device and reduce power consumption.
Q: Can I use the MAX1968 for heating applications?
A: Yes, the MAX1968 can control both heating and cooling by reversing the current through the TEC.