How to Use LA4600: Examples, Pinouts, and Specs

 Design with LA4600 in Cirkit Designer
Introduction
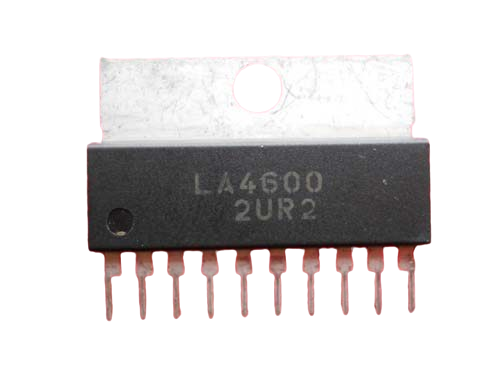
The LA4600, manufactured by Sanyo, is a low-power audio amplifier integrated circuit (IC) designed for driving speakers in portable and compact devices. It features a built-in volume control, high output power, and low distortion, making it an ideal choice for consumer electronics such as radios, portable audio players, and small speaker systems. Its efficient design ensures minimal power consumption, making it suitable for battery-operated devices.
Explore Projects Built with LA4600

 Open Project in Cirkit Designer
 Open Project in Cirkit Designer
 Open Project in Cirkit Designer
 Open Project in Cirkit Designer
Explore Projects Built with LA4600

 Open Project in Cirkit Designer
 Open Project in Cirkit Designer
 Open Project in Cirkit Designer
 Open Project in Cirkit Designer
Common Applications
- Portable audio players
- Radios and small speaker systems
- Consumer electronics requiring low-power audio amplification
- Battery-operated devices
Technical Specifications
Key Technical Details
| Parameter | Value |
|---|---|
| Manufacturer | Sanyo |
| Part ID | LA4600 |
| Supply Voltage (Vcc) | 3V to 12V |
| Output Power | 1.5W (at 9V, 8Ω load) |
| Total Harmonic Distortion | 0.1% (typical) |
| Input Impedance | 30kΩ |
| Operating Temperature | -20°C to +75°C |
| Package Type | SIP-9 (Single Inline Package) |
Pin Configuration and Descriptions
The LA4600 is housed in a SIP-9 package with the following pin configuration:
| Pin Number | Pin Name | Description |
|---|---|---|
| 1 | Input | Audio signal input |
| 2 | GND | Ground (common reference) |
| 3 | Ripple Filter | Connects to a capacitor for power supply filtering |
| 4 | Vcc | Positive power supply |
| 5 | Output | Audio signal output to the speaker |
| 6 | Feedback | Feedback pin for stability |
| 7 | Volume Control | Connects to a potentiometer for volume adjustment |
| 8 | NC (No Connect) | Not connected internally |
| 9 | GND | Ground (common reference) |
Usage Instructions
How to Use the LA4600 in a Circuit
- Power Supply: Connect the Vcc pin (Pin 4) to a DC power supply within the range of 3V to 12V. Ensure the power supply is stable and filtered to avoid noise.
- Grounding: Connect both GND pins (Pins 2 and 9) to the circuit's ground.
- Input Signal: Feed the audio signal to the Input pin (Pin 1). Use a coupling capacitor to block any DC offset in the input signal.
- Output Connection: Connect the Output pin (Pin 5) to the speaker. Ensure the speaker impedance matches the IC's specifications (e.g., 8Ω).
- Ripple Filter: Attach a capacitor (e.g., 100µF) to the Ripple Filter pin (Pin 3) to reduce power supply noise.
- Volume Control: Connect a potentiometer to the Volume Control pin (Pin 7) to adjust the output volume.
- Feedback: Use a resistor or capacitor on the Feedback pin (Pin 6) to stabilize the amplifier and reduce distortion.
Example Circuit
Below is a basic circuit diagram for using the LA4600 to drive an 8Ω speaker:
   +Vcc (3V-12V)
       |
       +----[100µF]---- Pin 3 (Ripple Filter)
       |
      Pin 4 (Vcc)
       |
      Pin 5 (Output) ---- Speaker ---- GND
       |
      Pin 6 (Feedback) --[Resistor]-- GND
       |
      Pin 7 (Volume Control) --[Potentiometer]-- GND
       |
      Pin 1 (Input) --[Coupling Capacitor]-- Audio Signal
       |
      Pin 2, Pin 9 (GND) -------------------- GND
Arduino UNO Example
The LA4600 can be used with an Arduino UNO to amplify audio signals. Below is an example code snippet to generate a simple tone:
// Arduino code to generate a tone for the LA4600 audio amplifier
// Connect the Arduino PWM pin (e.g., Pin 9) to the LA4600 Input pin (Pin 1)

int speakerPin = 9; // PWM pin connected to LA4600 Input pin

void setup() {
  pinMode(speakerPin, OUTPUT); // Set the pin as output
}

void loop() {
  // Generate a 1kHz tone
  tone(speakerPin, 1000); // Output a 1kHz square wave
  delay(1000);            // Play the tone for 1 second
  noTone(speakerPin);     // Stop the tone
  delay(1000);            // Wait for 1 second
}
Important Considerations
- Use decoupling capacitors near the power supply pins to reduce noise.
- Ensure the speaker impedance matches the IC's specifications to avoid damage.
- Avoid exceeding the maximum supply voltage (12V) to prevent permanent damage to the IC.
- Use a heatsink if the IC operates at high power levels for extended periods.
Troubleshooting and FAQs
Common Issues and Solutions
No Output Sound:
- Verify the power supply voltage is within the specified range (3V to 12V).
- Check all connections, especially the Input and Output pins.
- Ensure the speaker is functional and properly connected.
Distorted Audio:
- Check the Feedback pin (Pin 6) for proper resistor or capacitor connections.
- Ensure the input signal is not too high; use a coupling capacitor to block DC offset.
- Verify the speaker impedance matches the IC's specifications.
Excessive Heat:
- Ensure the IC is not overloaded by using a speaker with the correct impedance.
- Add a heatsink if the IC operates at high power levels.
Noise or Humming:
- Use a capacitor on the Ripple Filter pin (Pin 3) to reduce power supply noise.
- Ensure proper grounding to avoid ground loops.
FAQs
Q: Can the LA4600 drive a 4Ω speaker?
A: The LA4600 is optimized for 8Ω speakers. Using a 4Ω speaker may cause excessive current draw and overheating. It is recommended to use an 8Ω speaker for optimal performance.
Q: What is the maximum output power of the LA4600?
A: The LA4600 can deliver up to 1.5W of output power when powered at 9V with an 8Ω load.
Q: Can I use the LA4600 with a 5V power supply?
A: Yes, the LA4600 operates within a supply voltage range of 3V to 12V. A 5V power supply is suitable for low-power applications.
Q: How do I adjust the volume?
A: Connect a potentiometer to the Volume Control pin (Pin 7) to adjust the output volume.
By following this documentation, users can effectively integrate the LA4600 into their audio amplification projects.