Cirkit Designer Logo
Cirkit Designer
Your all-in-one circuit design IDE
Home / 
Component Documentation

How to Use Adafruit HTS221: Examples, Pinouts, and Specs

Image of Adafruit HTS221
Cirkit Designer LogoDesign with Adafruit HTS221 in Cirkit Designer

Introduction

The Adafruit HTS221 is a high-precision sensor module designed for acquiring environmental data by measuring both temperature and humidity. Its compact form factor and low power consumption make it an ideal choice for a variety of applications, including weather stations, home automation systems, and IoT devices. The sensor communicates over the I2C interface, allowing for easy integration with microcontrollers such as the Arduino UNO.

Explore Projects Built with Adafruit HTS221

Use Cirkit Designer to design, explore, and prototype these projects online. Some projects support real-time simulation. Click "Open Project" to start designing instantly!
ESP32-Based NTP Clock with DHT22 Temperature Sensor and WS2812 LED Matrix Display
Image of date time and temperature display : A project utilizing Adafruit HTS221 in a practical application
This circuit features an ESP32 Devkit V1 microcontroller connected to a DHT22 temperature and humidity sensor and an 8x8 WS2812 RGB LED matrix. The ESP32 reads temperature data from the DHT22 sensor and displays the current date, time, and temperature on the LED matrix, with date and time synchronized via NTP (Network Time Protocol). The ESP32 provides power to both the DHT22 and the LED matrix and communicates with the DHT22 via GPIO 4 and with the LED matrix via GPIO 5.
Cirkit Designer LogoOpen Project in Cirkit Designer
Arduino UNO with HTU21D-F Sensor for Temperature and Humidity Monitoring
Image of Interfacing HTU21D Temperature and Humidity Sensor with Arduino UNO: A project utilizing Adafruit HTS221 in a practical application
This circuit connects an Arduino UNO microcontroller to an Adafruit HTU21D-F Temperature & Humidity Sensor. The Arduino is programmed to read temperature and humidity data from the sensor and output the readings to the Serial Monitor at half-second intervals. The sensor is powered by the Arduino's 5V output and communicates with the microcontroller via the I2C protocol using the SCL and SDA lines.
Cirkit Designer LogoOpen Project in Cirkit Designer
Raspberry Pi Pico-Based Temperature and Humidity Monitoring System
Image of rpi pico with aht20: A project utilizing Adafruit HTS221 in a practical application
This circuit connects an Adafruit AHT20 Temperature and Humidity Sensor to a Raspberry Pi Pico microcontroller. The AHT20 sensor communicates with the Raspberry Pi Pico via I2C protocol, using SCL and SDA lines for clock and data respectively. The sensor is powered by the Pico, with connections for VCC and GND to provide the necessary power supply.
Cirkit Designer LogoOpen Project in Cirkit Designer
Arduino Mega 2560-Based Multi-Sensor Weather Station with TFT Display and IR Control
Image of aqua2: A project utilizing Adafruit HTS221 in a practical application
This circuit uses an Arduino Mega 2560 to read temperature data from multiple DS18B20 sensors, display the data on an ILI9341 TFT display, and maintain time using an Adafruit DS1307 RTC module. It also receives IR signals using a VS1838B IR receiver and includes an Adafruit MS8607 PHT sensor for additional environmental monitoring.
Cirkit Designer LogoOpen Project in Cirkit Designer

Explore Projects Built with Adafruit HTS221

Use Cirkit Designer to design, explore, and prototype these projects online. Some projects support real-time simulation. Click "Open Project" to start designing instantly!
Image of date time and temperature display : A project utilizing Adafruit HTS221 in a practical application
ESP32-Based NTP Clock with DHT22 Temperature Sensor and WS2812 LED Matrix Display
This circuit features an ESP32 Devkit V1 microcontroller connected to a DHT22 temperature and humidity sensor and an 8x8 WS2812 RGB LED matrix. The ESP32 reads temperature data from the DHT22 sensor and displays the current date, time, and temperature on the LED matrix, with date and time synchronized via NTP (Network Time Protocol). The ESP32 provides power to both the DHT22 and the LED matrix and communicates with the DHT22 via GPIO 4 and with the LED matrix via GPIO 5.
Cirkit Designer LogoOpen Project in Cirkit Designer
Image of Interfacing HTU21D Temperature and Humidity Sensor with Arduino UNO: A project utilizing Adafruit HTS221 in a practical application
Arduino UNO with HTU21D-F Sensor for Temperature and Humidity Monitoring
This circuit connects an Arduino UNO microcontroller to an Adafruit HTU21D-F Temperature & Humidity Sensor. The Arduino is programmed to read temperature and humidity data from the sensor and output the readings to the Serial Monitor at half-second intervals. The sensor is powered by the Arduino's 5V output and communicates with the microcontroller via the I2C protocol using the SCL and SDA lines.
Cirkit Designer LogoOpen Project in Cirkit Designer
Image of rpi pico with aht20: A project utilizing Adafruit HTS221 in a practical application
Raspberry Pi Pico-Based Temperature and Humidity Monitoring System
This circuit connects an Adafruit AHT20 Temperature and Humidity Sensor to a Raspberry Pi Pico microcontroller. The AHT20 sensor communicates with the Raspberry Pi Pico via I2C protocol, using SCL and SDA lines for clock and data respectively. The sensor is powered by the Pico, with connections for VCC and GND to provide the necessary power supply.
Cirkit Designer LogoOpen Project in Cirkit Designer
Image of aqua2: A project utilizing Adafruit HTS221 in a practical application
Arduino Mega 2560-Based Multi-Sensor Weather Station with TFT Display and IR Control
This circuit uses an Arduino Mega 2560 to read temperature data from multiple DS18B20 sensors, display the data on an ILI9341 TFT display, and maintain time using an Adafruit DS1307 RTC module. It also receives IR signals using a VS1838B IR receiver and includes an Adafruit MS8607 PHT sensor for additional environmental monitoring.
Cirkit Designer LogoOpen Project in Cirkit Designer

Technical Specifications

Key Features

  • Relative Humidity Range: 0 to 100%
  • Temperature Range: -40°C to +120°C
  • Humidity Accuracy: ± 3.5% RH (20 to +80% RH)
  • Temperature Accuracy: ± 0.5°C (15 to +40°C)
  • Communication Interface: I2C
  • Supply Voltage: 1.7V to 3.6V
  • Average Current Consumption: 2µA (humidity and temperature in low-power mode)

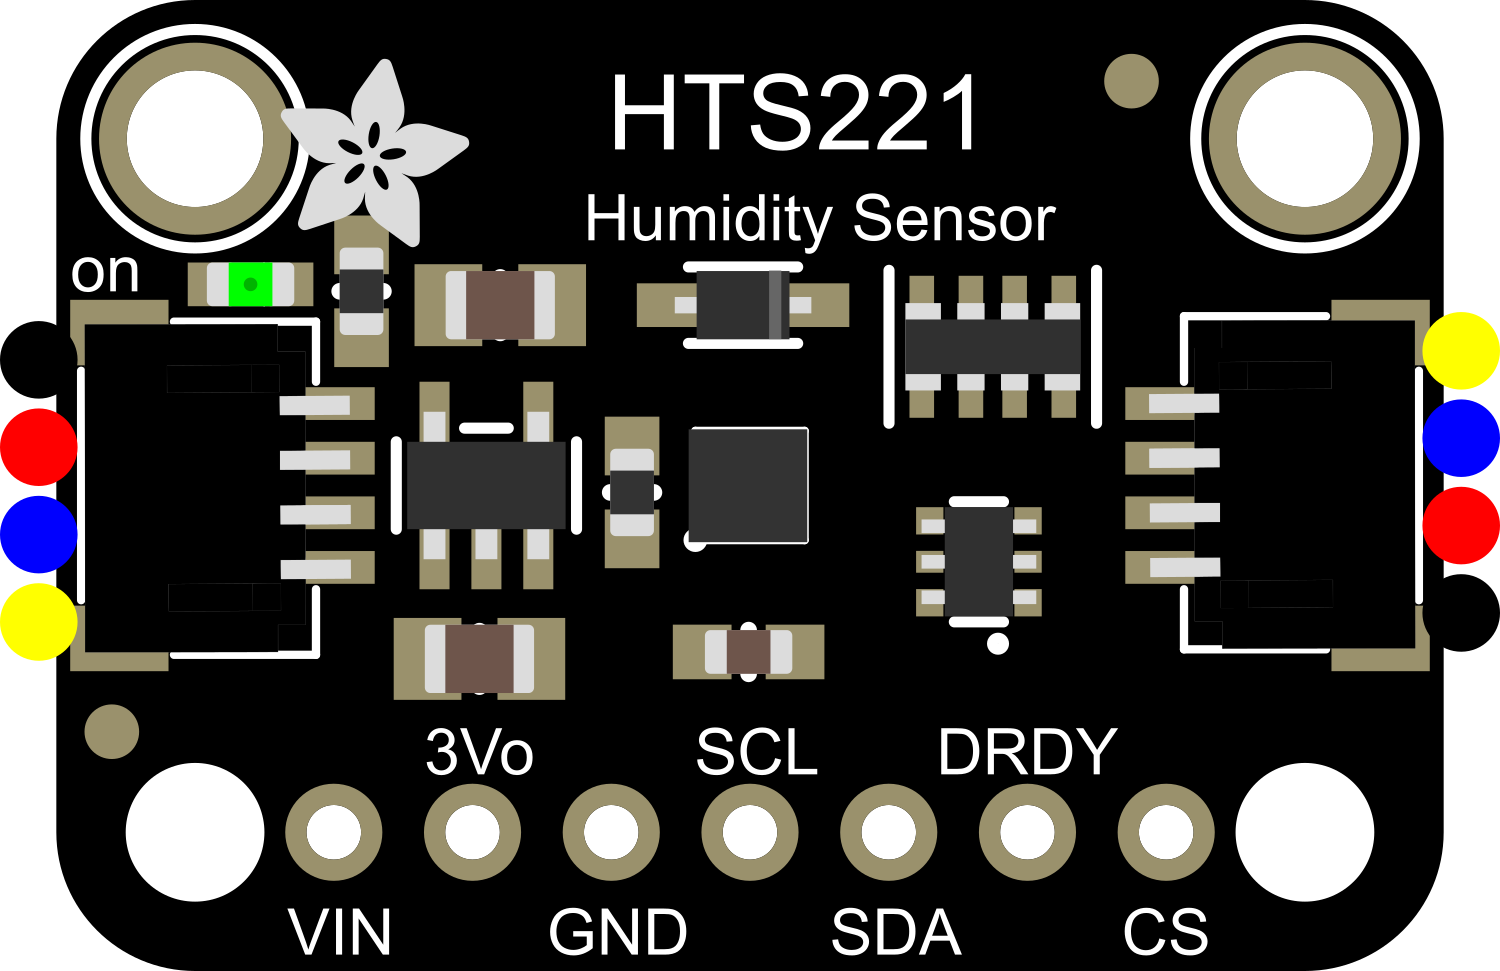
Pin Configuration and Descriptions

Pin Number Name Description
1 VDD Power supply (1.7V to 3.6V)
2 GND Ground reference for power supply
3 SDA I2C data line
4 SCL I2C clock line
5 DRDY Data Ready output (optional use)

Usage Instructions

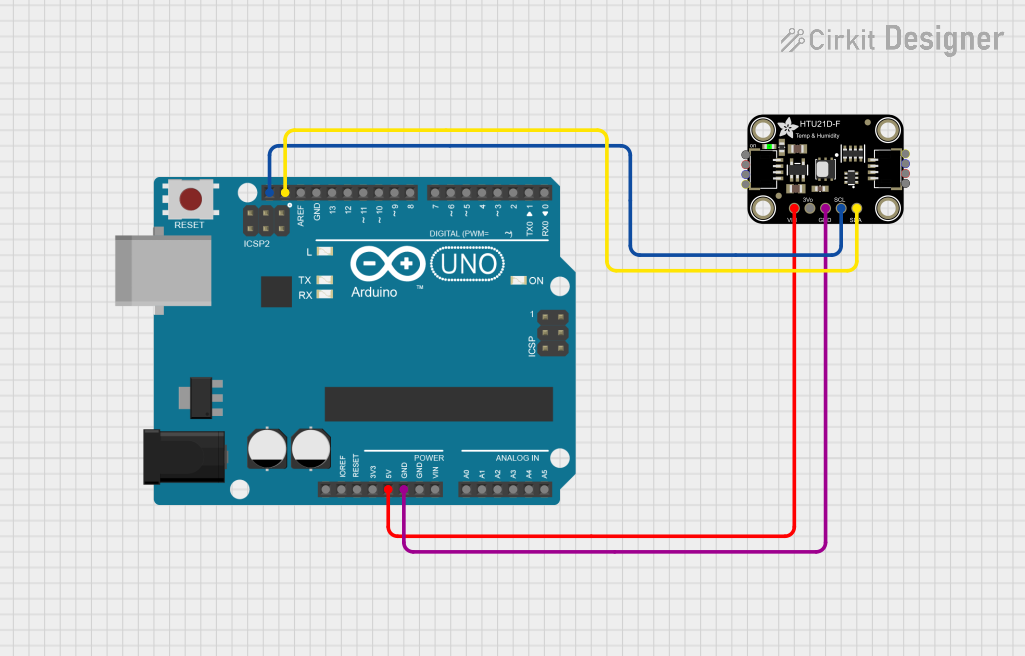
Integration with Arduino UNO

  1. Connecting the Sensor:

    • Connect VDD to the 3.3V output on the Arduino UNO.
    • Connect GND to one of the GND pins on the Arduino UNO.
    • Connect SDA to the A4 pin (SDA) on the Arduino UNO.
    • Connect SCL to the A5 pin (SCL) on the Arduino UNO.
    • The DRDY pin can be left unconnected if not used.
  2. Library Installation:

    • Install the Adafruit HTS221 library using the Arduino Library Manager or download it from the Adafruit GitHub repository.
  3. Sample Code:

    #include <Wire.h>
    #include <Adafruit_Sensor.h>
    #include <Adafruit_HTS221.h>
    
    Adafruit_HTS221 hts;
    
    void setup() {
      Serial.begin(9600);
      // Wait for serial monitor to open
      while (!Serial) { delay(10); }
    
      Serial.println("Adafruit HTS221 test!");
    
      if (!hts.begin()) {
        Serial.println("Failed to find HTS221 chip");
        while (1) { delay(10); }
      }
      Serial.println("HTS221 Found!");
    }
    
    void loop() {
      sensors_event_t humidity, temp;
      hts.getEvent(&humidity, &temp);// populate temp and humidity objects with fresh data
      Serial.print("Temperature: "); Serial.print(temp.temperature); Serial.println(" degrees C");
      Serial.print("Humidity: "); Serial.print(humidity.relative_humidity); Serial.println("% rH");
    
      delay(500);
    }
    
    • Ensure that the code comments do not exceed 80 characters per line.

Important Considerations and Best Practices

  • Always use a logic level converter if you are interfacing the HTS221 with a 5V microcontroller to avoid damaging the sensor.
  • Place the sensor away from heat-generating components to prevent false readings.
  • For accurate measurements, allow the sensor to acclimatize to the environment before taking readings.
  • Avoid touching the sensor element directly as it may affect the readings.

Troubleshooting and FAQs

Common Issues

  • Sensor Not Detected: Ensure that the wiring is correct and that the sensor is properly powered. Check the I2C address and connections.
  • Inaccurate Readings: Make sure the sensor is not placed near heat sources or in direct sunlight. Allow it to acclimatize to the environment.

FAQs

Q: Can the HTS221 be used with a 5V microcontroller? A: Yes, but a logic level converter is required to shift the I2C signals to 3.3V.

Q: How can I calibrate the sensor? A: The HTS221 comes factory-calibrated. If further calibration is needed, refer to the sensor's datasheet for calibration procedures.

Q: Is the HTS221 waterproof? A: No, the HTS221 is not waterproof. Protect it from moisture and condensation.

For further assistance, consult the Adafruit HTS221 datasheet and the Adafruit support forums.