Cirkit Designer Logo
Cirkit Designer
Your all-in-one circuit design IDE
Home / 
Component Documentation

How to Use Adafruit MONSTER M4SK: Examples, Pinouts, and Specs

Image of Adafruit MONSTER M4SK
Cirkit Designer LogoDesign with Adafruit MONSTER M4SK in Cirkit Designer

Introduction

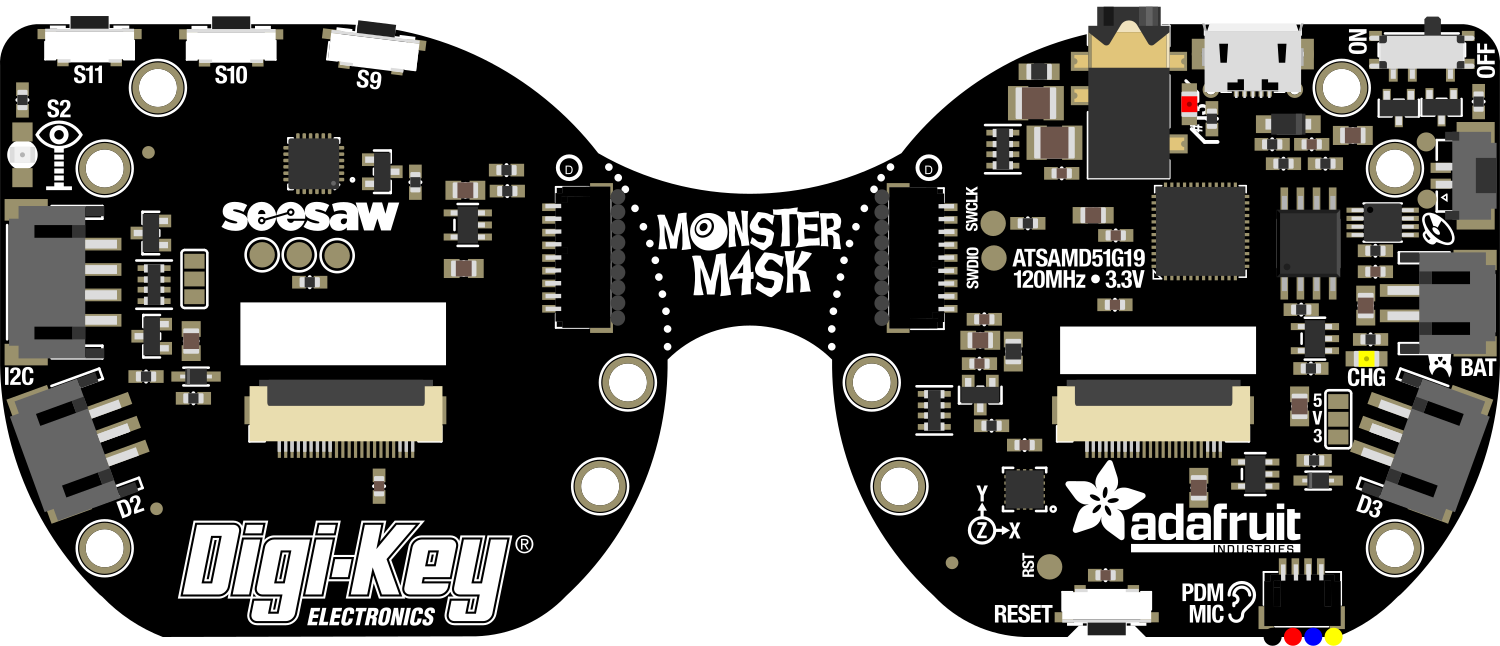
The Adafruit MONSTER M4SK is an innovative electronic board designed for creating digital eyewear and interactive projects. It features two TFT displays that can simulate eyes or display other graphics, and a camera module for image capture and video playback. This board is perfect for costume design, interactive art, and educational purposes where visual feedback is essential.

Explore Projects Built with Adafruit MONSTER M4SK

Use Cirkit Designer to design, explore, and prototype these projects online. Some projects support real-time simulation. Click "Open Project" to start designing instantly!
Adafruit ItsyBitsy M4 Dual GC9A01 Display Animated Eyes
Image of Eyes: A project utilizing Adafruit MONSTER M4SK in a practical application
This circuit features an Adafruit ItsyBitsy M4 microcontroller connected to two GC9A01 displays. The microcontroller drives the displays to render animated eyes, with the code handling eye movements, blinks, and iris scaling. The displays share common control signals, and the microcontroller coordinates their operation to create synchronized visual effects.
Cirkit Designer LogoOpen Project in Cirkit Designer
ATmega328P-Based Sensor Hub with OLED Display and LIDAR
Image of TILTPCB: A project utilizing Adafruit MONSTER M4SK in a practical application
This circuit features an Mtiny Uno ATmega328P microcontroller as its central processing unit, interfacing with a variety of sensors and peripherals. It includes a 0.96" OLED display and an MPU6050 accelerometer/gyroscope for user interface and motion sensing, respectively. The circuit also integrates a TF LUNA LIDAR for distance measurement, a DHT11 sensor for temperature and humidity readings, and uses a 9V battery with a 7805 voltage regulator for power management. Communication with a computer for programming and data exchange is facilitated by an Adafruit FTDI Friend module.
Cirkit Designer LogoOpen Project in Cirkit Designer
Battery-Powered Gas Sensor and Servo Control with Adafruit Trinket M0
Image of Canary: A project utilizing Adafruit MONSTER M4SK in a practical application
This circuit is a sensor-based system that uses an Adafruit Trinket M0 microcontroller to read data from a MiCS-5524 gas sensor and control a Tower Pro SG90 servo motor. Additionally, it includes an Adafruit Audio FX Mini Sound Board connected to a STEMMA speaker for audio output, all powered by a 4xAA battery pack.
Cirkit Designer LogoOpen Project in Cirkit Designer
I2C-Controlled OLED Display with External EEPROM and Interactive Pushbuttons
Image of godmode: A project utilizing Adafruit MONSTER M4SK in a practical application
This is a microcontroller-based interactive device featuring a Wemos D1 Mini, an OLED display, external EEPROM, and an I/O expander. It includes user input buttons and status LEDs, with potential MIDI interface capabilities.
Cirkit Designer LogoOpen Project in Cirkit Designer

Explore Projects Built with Adafruit MONSTER M4SK

Use Cirkit Designer to design, explore, and prototype these projects online. Some projects support real-time simulation. Click "Open Project" to start designing instantly!
Image of Eyes: A project utilizing Adafruit MONSTER M4SK in a practical application
Adafruit ItsyBitsy M4 Dual GC9A01 Display Animated Eyes
This circuit features an Adafruit ItsyBitsy M4 microcontroller connected to two GC9A01 displays. The microcontroller drives the displays to render animated eyes, with the code handling eye movements, blinks, and iris scaling. The displays share common control signals, and the microcontroller coordinates their operation to create synchronized visual effects.
Cirkit Designer LogoOpen Project in Cirkit Designer
Image of TILTPCB: A project utilizing Adafruit MONSTER M4SK in a practical application
ATmega328P-Based Sensor Hub with OLED Display and LIDAR
This circuit features an Mtiny Uno ATmega328P microcontroller as its central processing unit, interfacing with a variety of sensors and peripherals. It includes a 0.96" OLED display and an MPU6050 accelerometer/gyroscope for user interface and motion sensing, respectively. The circuit also integrates a TF LUNA LIDAR for distance measurement, a DHT11 sensor for temperature and humidity readings, and uses a 9V battery with a 7805 voltage regulator for power management. Communication with a computer for programming and data exchange is facilitated by an Adafruit FTDI Friend module.
Cirkit Designer LogoOpen Project in Cirkit Designer
Image of Canary: A project utilizing Adafruit MONSTER M4SK in a practical application
Battery-Powered Gas Sensor and Servo Control with Adafruit Trinket M0
This circuit is a sensor-based system that uses an Adafruit Trinket M0 microcontroller to read data from a MiCS-5524 gas sensor and control a Tower Pro SG90 servo motor. Additionally, it includes an Adafruit Audio FX Mini Sound Board connected to a STEMMA speaker for audio output, all powered by a 4xAA battery pack.
Cirkit Designer LogoOpen Project in Cirkit Designer
Image of godmode: A project utilizing Adafruit MONSTER M4SK in a practical application
I2C-Controlled OLED Display with External EEPROM and Interactive Pushbuttons
This is a microcontroller-based interactive device featuring a Wemos D1 Mini, an OLED display, external EEPROM, and an I/O expander. It includes user input buttons and status LEDs, with potential MIDI interface capabilities.
Cirkit Designer LogoOpen Project in Cirkit Designer

Common Applications and Use Cases

  • Digital costumes and cosplay
  • Interactive art installations
  • Educational tools for teaching electronics and programming
  • Robotics with visual feedback systems
  • DIY projects requiring user interfaces with visual output

Technical Specifications

Key Technical Details

  • Processor: ATSAMD51J19 @ 120MHz with 3.3V logic/power
  • Memory: 8 MB of QSPI Flash, 512 KB of RAM
  • Display: Two 240x240 1.54" TFT displays with lens
  • Camera: 0.3MP OV7670 camera module
  • Interfaces: I2C, UART, 8x Digital I/O pins, Analog inputs
  • Power Ratings: 3.7V LiPoly battery or USB power

Pin Configuration and Descriptions

Pin Number Name Description
1 GND Ground pin
2 VBAT Battery input for LiPoly battery
3 USB USB input for power and data
4 3V3 3.3V output from the regulator
5 SDA I2C data line
6 SCL I2C clock line
7 TX UART transmit
8 RX UART receive
9-16 D0-D7 Digital I/O pins
A1-A4 Analog input pins

Usage Instructions

How to Use the Component in a Circuit

  1. Powering the M4SK: Connect a 3.7V LiPoly battery to the VBAT pin or power the board via the USB port.
  2. Programming the M4SK: Use the USB connection to program the board with the Arduino IDE or CircuitPython.
  3. Connecting the Displays: The TFT displays are pre-connected; no additional wiring is necessary.
  4. Using the Camera: Connect the camera module to the board using the included connector.

Important Considerations and Best Practices

  • Always disconnect the battery before making changes to the circuit.
  • Ensure that the power supply is sufficient and stable to prevent damage.
  • Use ESD precautions when handling the board to avoid static damage to the electronics.
  • Keep the firmware updated to the latest version for optimal performance.

Troubleshooting and FAQs

Common Issues

  • Display not working: Check the connections and ensure that the board is properly powered.
  • Camera not functioning: Verify that the camera module is correctly connected and that the software is configured to use the camera.
  • Unresponsive board: Reset the board and check the USB cable and power supply.

Solutions and Tips for Troubleshooting

  • If the displays are not working, try uploading a simple test sketch to check functionality.
  • For camera issues, ensure that the camera is enabled in your code and that the correct pins are being used.
  • If the board is unresponsive, attempt to reflash the bootloader using a double-tap on the reset button.

FAQs

Q: Can I power the M4SK with a different voltage? A: The M4SK is designed to be powered by a 3.7V LiPoly battery or USB power. Using other voltages may damage the board.

Q: How do I update the firmware? A: Firmware updates can be done through the USB connection using the Arduino IDE or CircuitPython.

Q: What programming languages can I use with the M4SK? A: The M4SK supports programming with Arduino (C/C++) and CircuitPython.

Q: Can I connect additional sensors to the M4SK? A: Yes, the board includes I2C, UART, digital I/O, and analog inputs for connecting various sensors and peripherals.

Example Code for Arduino UNO

Below is an example code snippet for initializing the TFT displays on the Adafruit MONSTER M4SK using an Arduino UNO. This code assumes the use of the Adafruit GFX library for display control.

#include <Adafruit_GFX.h>    // Core graphics library
#include <Adafruit_ST7789.h>  // Hardware-specific library for ST7789

// Pin definitions for the Arduino UNO
#define TFT_CS         10
#define TFT_RST        9
#define TFT_DC         8

// Initialize the ST7789 TFT displays
Adafruit_ST7789 tft = Adafruit_ST7789(TFT_CS, TFT_DC, TFT_RST);

void setup() {
  Serial.begin(9600);
  tft.init(240, 240);           // Initialize display with its resolution
  tft.fillScreen(ST77XX_BLACK); // Clear the display
}

void loop() {
  // Your code to update the display goes here
}

Remember to install the Adafruit GFX and Adafruit ST7789 libraries before uploading this code to your Arduino UNO. This example is for demonstration purposes; additional setup may be required for full functionality with the M4SK.

Note: The Adafruit MONSTER M4SK is not directly compatible with the Arduino UNO without modification, as it is designed to be used as a standalone board. The example provided is a general guide for initializing TFT displays similar to those on the M4SK using an Arduino UNO.