Cirkit Designer Logo
Cirkit Designer
Your all-in-one circuit design IDE
Home / 
Component Documentation

How to Use AirValve: Examples, Pinouts, and Specs

Image of AirValve
Cirkit Designer LogoDesign with AirValve in Cirkit Designer

Introduction

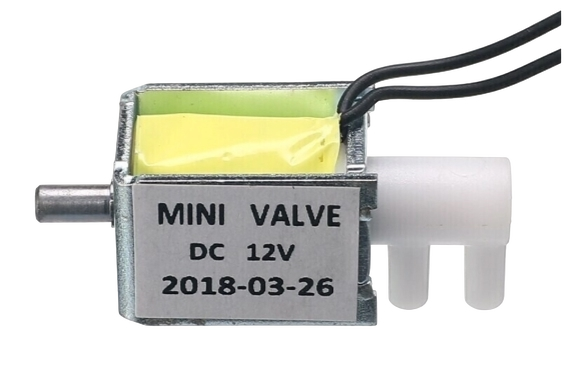
The 12V AirValve is an electronic device designed to control the flow of air in a system. It is commonly used in pneumatic applications to regulate pressure and airflow. This component is ideal for systems requiring precise air control, such as automation equipment, HVAC systems, and laboratory instruments. Its compact design and 12V operation make it suitable for integration into a wide range of projects.

Explore Projects Built with AirValve

Use Cirkit Designer to design, explore, and prototype these projects online. Some projects support real-time simulation. Click "Open Project" to start designing instantly!
Arduino-Controlled Environmental Monitoring System with OLED Display and Sonar Level Sensing
Image of waterstoragecontroller: A project utilizing AirValve in a practical application
This circuit is a microcontroller-based control system designed to monitor environmental parameters and control a 3-way ball valve. It uses an Arduino UNO to process inputs from a temperature sensor, a real-time clock, and a sonar sensor, and outputs control signals to solid-state relays for valve actuation. The system is capable of interfacing with high-voltage components and provides user interaction through toggle switches and an OLED display.
Cirkit Designer LogoOpen Project in Cirkit Designer
Arduino-Controlled Water Pressure Monitoring and Solenoid Valve System
Image of water leak detection r: A project utilizing AirValve in a practical application
This circuit features an Arduino UNO connected to a Gravity: Analog Water Pressure Sensor and a valve solenoid. The water pressure sensor's signal pin is connected to the Arduino's A0 analog input for pressure measurement, while the solenoid valve is controlled by the Arduino's Vin pin, likely for on/off operation based on the sensor input. The provided code for the Arduino UNO is a template with empty setup and loop functions, indicating that the specific control logic has not been implemented yet.
Cirkit Designer LogoOpen Project in Cirkit Designer
Arduino-Based Automatic Tyre Inflator with LCD Display and Pressure Sensor
Image of Arduino based automatic Tire inflator: A project utilizing AirValve in a practical application
This circuit is an automated tire inflator system controlled by an Arduino Uno. It uses multiple pushbuttons for user input, an industrial pressure sensor to monitor tire pressure, and a 4-channel relay module to control solenoid valves for inflating and purging air. The system also includes an LCD display for user interface and feedback.
Cirkit Designer LogoOpen Project in Cirkit Designer
Arduino and ESP32 Controlled Pneumatic Solenoid Valve with Relay and Voltmeter
Image of uji aktuator co2: A project utilizing AirValve in a practical application
This circuit uses an Arduino Mega 2560 to control a 12V pneumatic solenoid valve via a 1-channel 5V relay, with the relay being powered by a 12V power supply. An ESP32 is connected to the Arduino for additional control or communication capabilities, and a voltmeter is included to monitor the voltage across the solenoid valve.
Cirkit Designer LogoOpen Project in Cirkit Designer

Explore Projects Built with AirValve

Use Cirkit Designer to design, explore, and prototype these projects online. Some projects support real-time simulation. Click "Open Project" to start designing instantly!
Image of waterstoragecontroller: A project utilizing AirValve in a practical application
Arduino-Controlled Environmental Monitoring System with OLED Display and Sonar Level Sensing
This circuit is a microcontroller-based control system designed to monitor environmental parameters and control a 3-way ball valve. It uses an Arduino UNO to process inputs from a temperature sensor, a real-time clock, and a sonar sensor, and outputs control signals to solid-state relays for valve actuation. The system is capable of interfacing with high-voltage components and provides user interaction through toggle switches and an OLED display.
Cirkit Designer LogoOpen Project in Cirkit Designer
Image of water leak detection r: A project utilizing AirValve in a practical application
Arduino-Controlled Water Pressure Monitoring and Solenoid Valve System
This circuit features an Arduino UNO connected to a Gravity: Analog Water Pressure Sensor and a valve solenoid. The water pressure sensor's signal pin is connected to the Arduino's A0 analog input for pressure measurement, while the solenoid valve is controlled by the Arduino's Vin pin, likely for on/off operation based on the sensor input. The provided code for the Arduino UNO is a template with empty setup and loop functions, indicating that the specific control logic has not been implemented yet.
Cirkit Designer LogoOpen Project in Cirkit Designer
Image of Arduino based automatic Tire inflator: A project utilizing AirValve in a practical application
Arduino-Based Automatic Tyre Inflator with LCD Display and Pressure Sensor
This circuit is an automated tire inflator system controlled by an Arduino Uno. It uses multiple pushbuttons for user input, an industrial pressure sensor to monitor tire pressure, and a 4-channel relay module to control solenoid valves for inflating and purging air. The system also includes an LCD display for user interface and feedback.
Cirkit Designer LogoOpen Project in Cirkit Designer
Image of uji aktuator co2: A project utilizing AirValve in a practical application
Arduino and ESP32 Controlled Pneumatic Solenoid Valve with Relay and Voltmeter
This circuit uses an Arduino Mega 2560 to control a 12V pneumatic solenoid valve via a 1-channel 5V relay, with the relay being powered by a 12V power supply. An ESP32 is connected to the Arduino for additional control or communication capabilities, and a voltmeter is included to monitor the voltage across the solenoid valve.
Cirkit Designer LogoOpen Project in Cirkit Designer

Common Applications

  • Pneumatic systems for industrial automation
  • Airflow regulation in HVAC systems
  • Laboratory equipment requiring controlled air pressure
  • DIY projects involving air pumps or compressors
  • Robotics and mechatronics systems

Technical Specifications

The following table outlines the key technical details of the 12V AirValve:

Parameter Value
Operating Voltage 12V DC
Operating Current 200 mA (typical)
Maximum Pressure 100 PSI
Response Time < 50 ms
Port Size 1/8" NPT (National Pipe Thread)
Material Brass and plastic
Operating Temperature -10°C to 50°C
Weight 150 grams

Pin Configuration

The 12V AirValve typically has two electrical connections for operation. The pin configuration is as follows:

Pin Description
+ Positive terminal (12V)
- Negative terminal (GND)

Usage Instructions

How to Use the AirValve in a Circuit

  1. Power Supply: Connect the positive terminal (+) of the AirValve to a 12V DC power source. Connect the negative terminal (-) to the ground (GND).
  2. Control Signal: Use a relay, transistor, or MOSFET to control the AirValve if it needs to be switched on/off by a microcontroller or other logic circuit.
  3. Airflow Connection: Attach the air input and output to the respective ports using 1/8" NPT fittings. Ensure the connections are airtight to prevent leaks.
  4. Testing: Apply 12V to the AirValve and verify that it opens and closes properly, allowing or blocking airflow as required.

Important Considerations

  • Voltage Compatibility: Ensure the power supply provides a stable 12V DC. Overvoltage can damage the AirValve.
  • Current Handling: If controlling the AirValve with a microcontroller, use a relay or transistor to handle the 200 mA current draw.
  • Air Pressure: Do not exceed the maximum pressure rating of 100 PSI to avoid damaging the valve.
  • Orientation: Install the AirValve in the correct orientation as indicated by the airflow direction markings on the body.

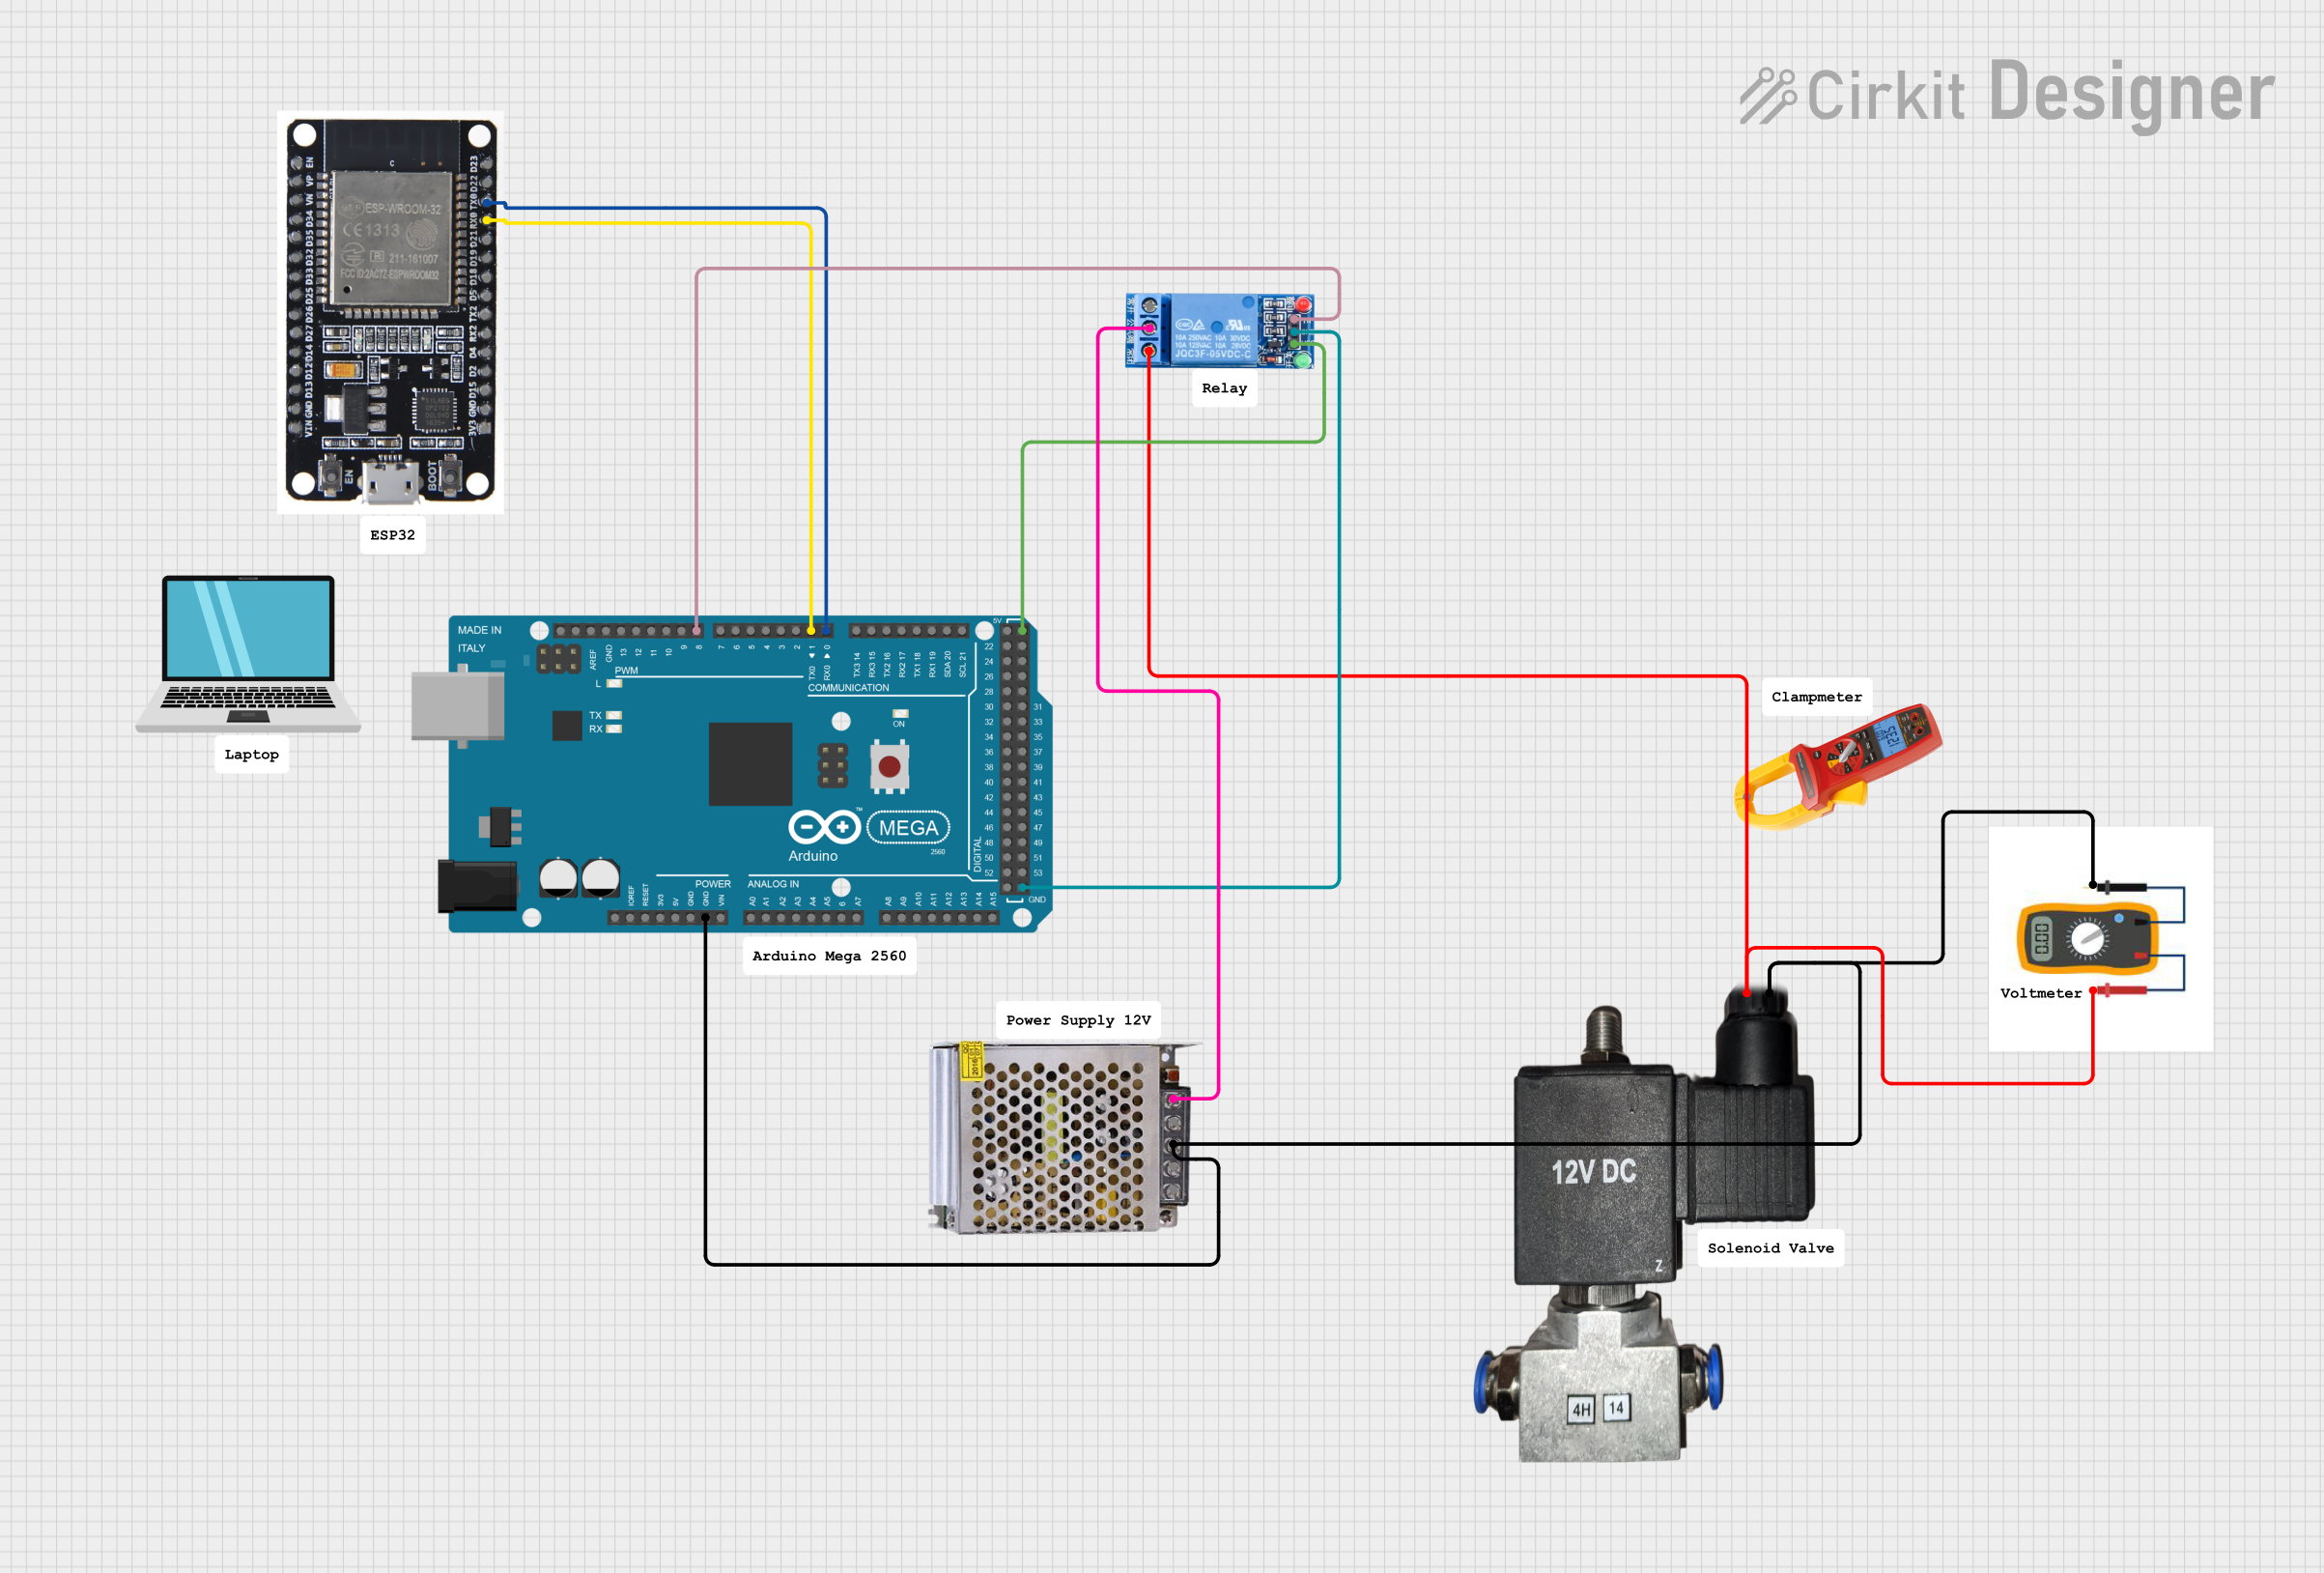
Example: Controlling the AirValve with an Arduino UNO

Below is an example of how to control the 12V AirValve using an Arduino UNO and a relay module:

// Example code to control a 12V AirValve using an Arduino UNO
// and a relay module. Ensure the relay module is rated for 12V operation.

const int relayPin = 7; // Pin connected to the relay module

void setup() {
  pinMode(relayPin, OUTPUT); // Set the relay pin as an output
  digitalWrite(relayPin, LOW); // Ensure the relay is off initially
}

void loop() {
  // Turn the AirValve ON
  digitalWrite(relayPin, HIGH); // Activate the relay
  delay(5000); // Keep the valve open for 5 seconds

  // Turn the AirValve OFF
  digitalWrite(relayPin, LOW); // Deactivate the relay
  delay(5000); // Keep the valve closed for 5 seconds
}

Notes:

  • Use a flyback diode across the relay coil to protect the circuit from voltage spikes.
  • Ensure the relay module is capable of handling the 12V AirValve's current requirements.

Troubleshooting and FAQs

Common Issues and Solutions

  1. AirValve Not Activating

    • Cause: Insufficient voltage or current.
    • Solution: Verify the power supply provides 12V DC and at least 200 mA.
  2. Air Leaks

    • Cause: Loose or improperly sealed connections.
    • Solution: Check all fittings and ensure they are tightened securely. Use Teflon tape if necessary.
  3. Valve Stuck in Open or Closed Position

    • Cause: Debris or mechanical failure.
    • Solution: Inspect the valve for blockages and clean it if necessary. If the issue persists, consider replacing the valve.
  4. Microcontroller Not Controlling the Valve

    • Cause: Incorrect wiring or insufficient current handling.
    • Solution: Verify the relay or transistor is correctly connected and rated for the AirValve's current.

FAQs

Q: Can I use a 9V battery to power the AirValve?
A: No, the AirValve requires a stable 12V DC supply. A 9V battery will not provide sufficient voltage for proper operation.

Q: Is the AirValve suitable for liquid flow control?
A: No, the AirValve is designed specifically for air and should not be used with liquids.

Q: Can I control the AirValve directly with an Arduino pin?
A: No, the Arduino pin cannot supply the required current. Use a relay, transistor, or MOSFET to control the AirValve.

Q: What is the expected lifespan of the AirValve?
A: The lifespan depends on usage conditions but is typically rated for millions of cycles under normal operating conditions.