Cirkit Designer Logo
Cirkit Designer
Your all-in-one circuit design IDE
Home / 
Component Documentation

How to Use ky-034 Modulo led 7 colores: Examples, Pinouts, and Specs
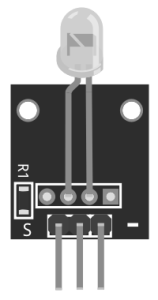

Image of ky-034 Modulo led  7 colores
Cirkit Designer LogoDesign with ky-034 Modulo led 7 colores in Cirkit Designer

Introduction

The KY-034 Módulo LED 7 Colores is a versatile electronic component featuring a color-changing LED capable of displaying seven different colors. This module is commonly used in decorative lighting, visual indicators, and educational projects. Its compact design and ease of use make it an excellent choice for hobbyists and professionals alike.

Explore Projects Built with ky-034 Modulo led 7 colores
Use Cirkit Designer to design, explore, and prototype these projects online. Some projects support real-time simulation. Click "Open Project" to start designing instantly!
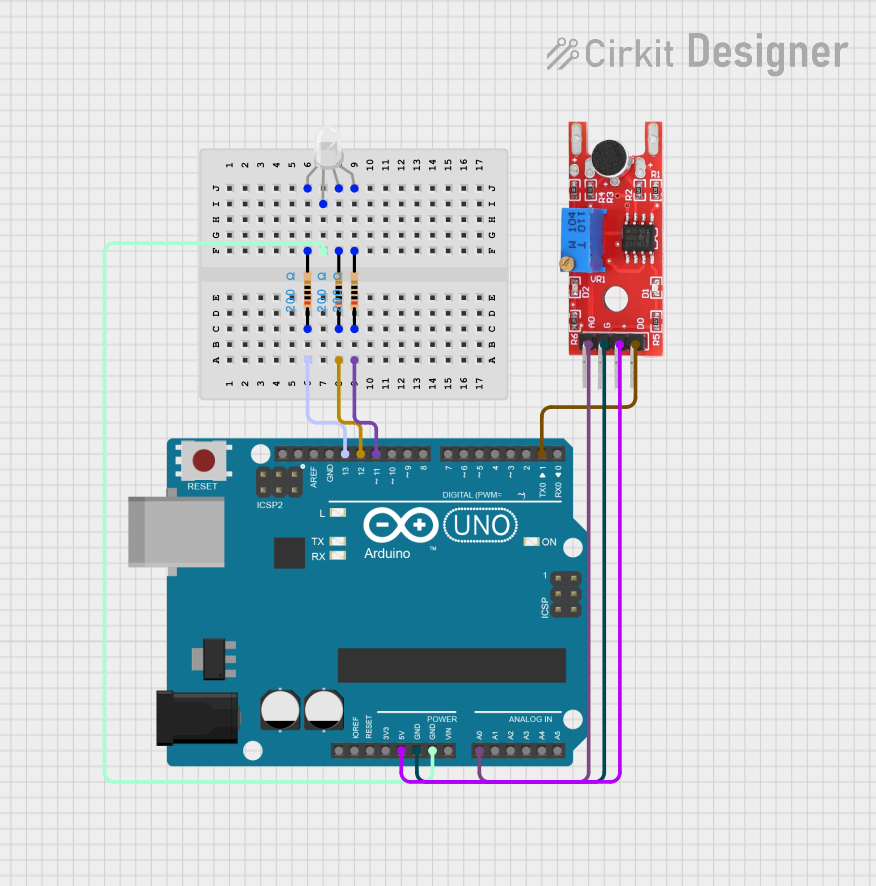
Arduino UNO Controlled RGB LED Light Show with Sound Detection
Image of Voice Sensor with RGB: A project utilizing ky-034 Modulo led  7 colores in a practical application
This circuit features an Arduino UNO microcontroller connected to a KY-038 sound sensor module and an RGB LED with individual resistors on each color channel. The Arduino is programmed to sequentially turn on the red, green, and blue channels of the RGB LED, each for a duration of 2 seconds. The sound sensor is powered by the Arduino and its analog and digital outputs are connected to the Arduino's analog and digital pins, respectively, for sound detection and processing.
Cirkit Designer LogoOpen Project in Cirkit Designer
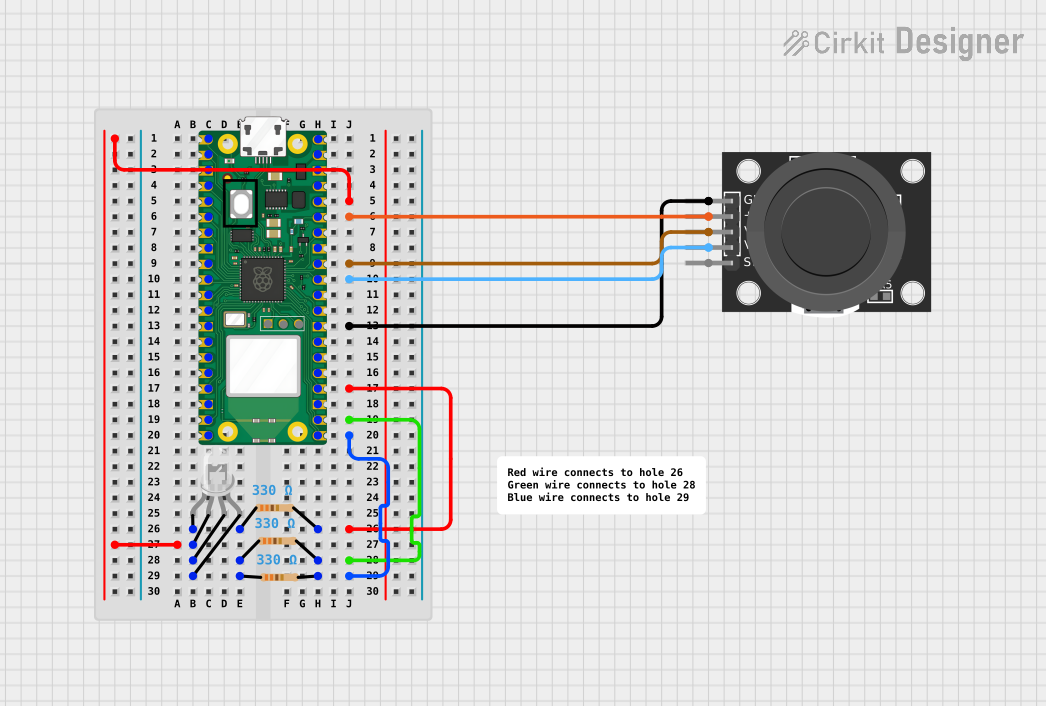
Raspberry Pi Pico W Controlled RGB LED with Joystick Interaction
Image of Snap Project #2: A project utilizing ky-034 Modulo led  7 colores in a practical application
This circuit features a Raspberry Pi Pico W microcontroller connected to a KY-023 Dual Axis Joystick Module and an RGB LED with individual resistors on each color channel. The joystick's analog outputs (VRx and VRy) are read by the microcontroller to control the color and brightness of the RGB LED in a dynamic fashion, as defined by the embedded Python code. The code implements a color-changing sequence that responds to the joystick's position, creating an interactive lighting system.
Cirkit Designer LogoOpen Project in Cirkit Designer
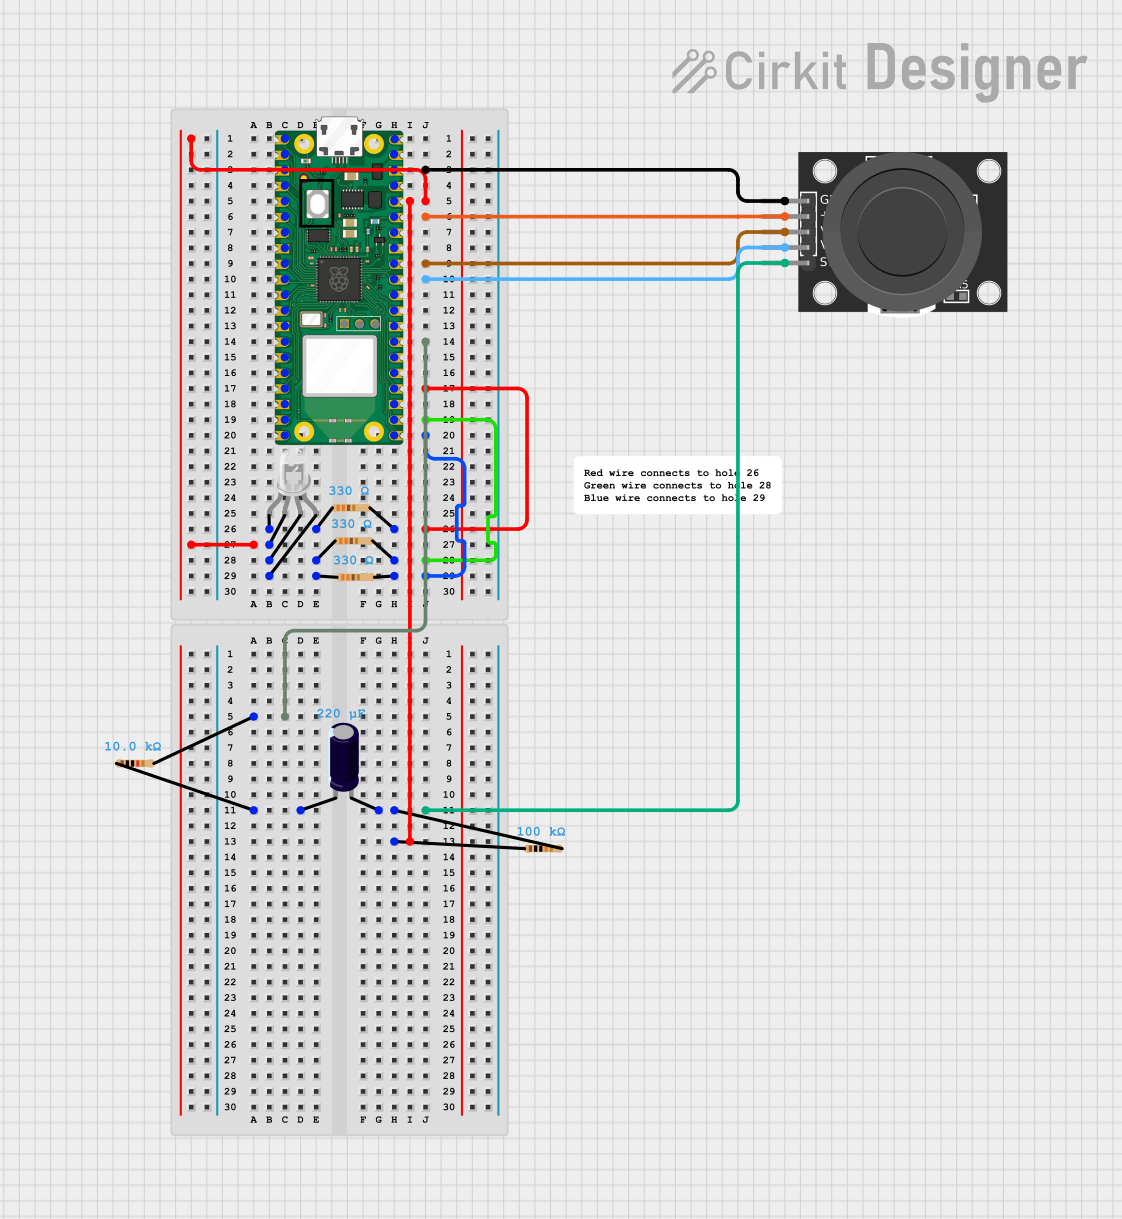
Raspberry Pi Pico W Controlled RGB LED with Joystick Interaction
Image of Snap Project #5: A project utilizing ky-034 Modulo led  7 colores in a practical application
This circuit features a Raspberry Pi Pico W microcontroller interfaced with a KY-023 Dual Axis Joystick Module and a four-pin RGB LED. The joystick's position controls the color of the RGB LED through PWM signals, with resistors limiting current to the LED's cathodes and a capacitor potentially used for debouncing the joystick's switch. The embedded code cycles through color sequences based on the joystick's Y-axis position, creating a dynamic lighting effect.
Cirkit Designer LogoOpen Project in Cirkit Designer
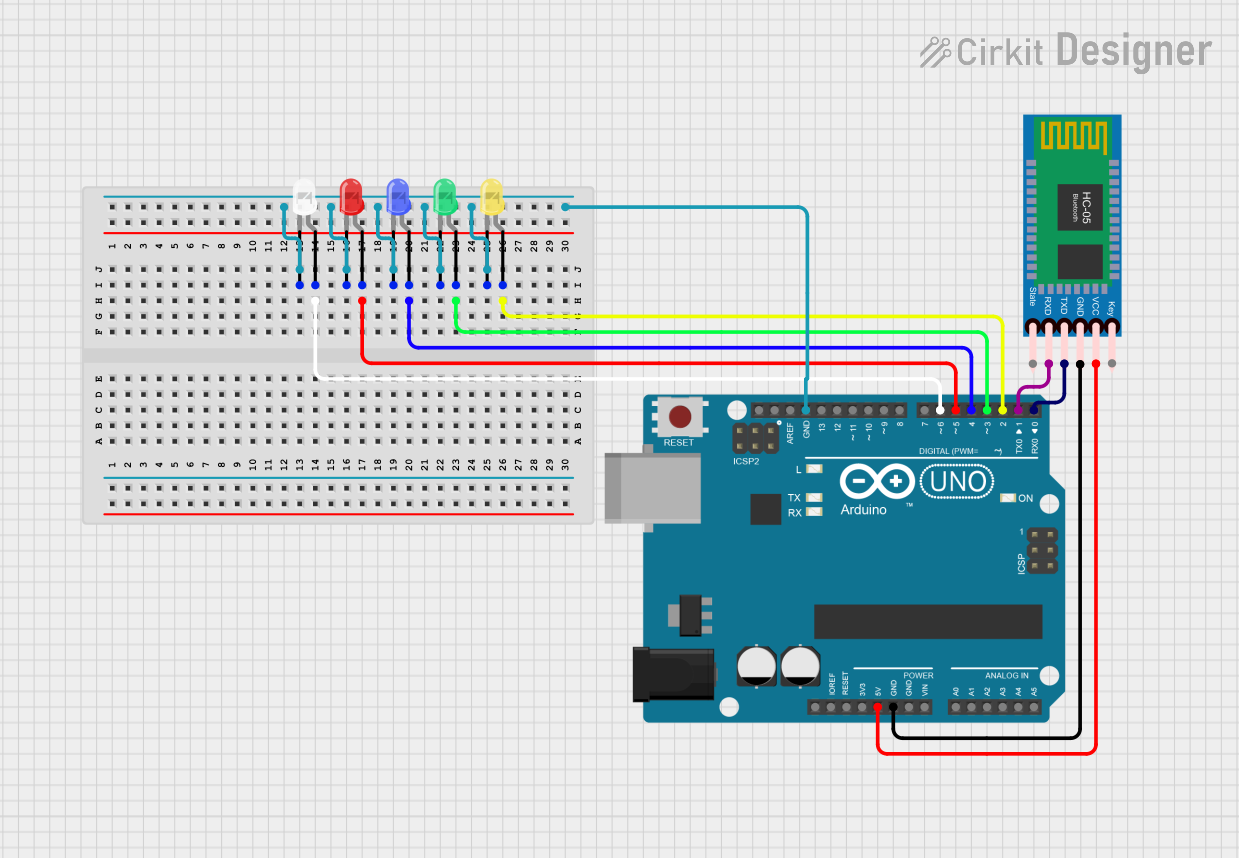
Arduino UNO Bluetooth-Controlled Multi-Color LED Display
Image of EXP. 15 E: A project utilizing ky-034 Modulo led  7 colores in a practical application
This circuit uses an Arduino UNO to control five different colored LEDs (red, green, blue, yellow, and white) and interfaces with an HC-05 Bluetooth module. The Arduino can turn each LED on or off through its digital pins, and the Bluetooth module allows for wireless communication with the Arduino.
Cirkit Designer LogoOpen Project in Cirkit Designer

Explore Projects Built with ky-034 Modulo led 7 colores

Use Cirkit Designer to design, explore, and prototype these projects online. Some projects support real-time simulation. Click "Open Project" to start designing instantly!
Image of Voice Sensor with RGB: A project utilizing ky-034 Modulo led  7 colores in a practical application
Arduino UNO Controlled RGB LED Light Show with Sound Detection
This circuit features an Arduino UNO microcontroller connected to a KY-038 sound sensor module and an RGB LED with individual resistors on each color channel. The Arduino is programmed to sequentially turn on the red, green, and blue channels of the RGB LED, each for a duration of 2 seconds. The sound sensor is powered by the Arduino and its analog and digital outputs are connected to the Arduino's analog and digital pins, respectively, for sound detection and processing.
Cirkit Designer LogoOpen Project in Cirkit Designer
Image of Snap Project #2: A project utilizing ky-034 Modulo led  7 colores in a practical application
Raspberry Pi Pico W Controlled RGB LED with Joystick Interaction
This circuit features a Raspberry Pi Pico W microcontroller connected to a KY-023 Dual Axis Joystick Module and an RGB LED with individual resistors on each color channel. The joystick's analog outputs (VRx and VRy) are read by the microcontroller to control the color and brightness of the RGB LED in a dynamic fashion, as defined by the embedded Python code. The code implements a color-changing sequence that responds to the joystick's position, creating an interactive lighting system.
Cirkit Designer LogoOpen Project in Cirkit Designer
Image of Snap Project #5: A project utilizing ky-034 Modulo led  7 colores in a practical application
Raspberry Pi Pico W Controlled RGB LED with Joystick Interaction
This circuit features a Raspberry Pi Pico W microcontroller interfaced with a KY-023 Dual Axis Joystick Module and a four-pin RGB LED. The joystick's position controls the color of the RGB LED through PWM signals, with resistors limiting current to the LED's cathodes and a capacitor potentially used for debouncing the joystick's switch. The embedded code cycles through color sequences based on the joystick's Y-axis position, creating a dynamic lighting effect.
Cirkit Designer LogoOpen Project in Cirkit Designer
Image of EXP. 15 E: A project utilizing ky-034 Modulo led  7 colores in a practical application
Arduino UNO Bluetooth-Controlled Multi-Color LED Display
This circuit uses an Arduino UNO to control five different colored LEDs (red, green, blue, yellow, and white) and interfaces with an HC-05 Bluetooth module. The Arduino can turn each LED on or off through its digital pins, and the Bluetooth module allows for wireless communication with the Arduino.
Cirkit Designer LogoOpen Project in Cirkit Designer

Common Applications

  • Decorative lighting in DIY projects
  • Visual indicators for status or alerts
  • Educational demonstrations of LED functionality
  • Integration into Arduino or microcontroller-based projects

Technical Specifications

Below are the key technical details and pin configuration for the KY-034 Módulo LED 7 Colores:

Key Technical Details

Parameter Value
Operating Voltage 3.3V - 5V
LED Type RGB LED with built-in IC
Number of Colors 7
Current Consumption ~20mA (varies with color)
Dimensions 18mm x 15mm x 10mm
Manufacturer Ninguno
Part ID KY-034 Módulo LED 7 Colores

Pin Configuration

The KY-034 module has three pins, as described in the table below:

Pin Name Description
S Signal pin (controls LED colors)
+ Positive power supply (VCC)
- Ground (GND)

Usage Instructions

The KY-034 Módulo LED 7 Colores is simple to use and can be connected directly to a microcontroller, such as an Arduino UNO. Below are the steps to use the module effectively:

Connecting the Module

  1. Power Supply: Connect the + pin to the 5V pin on the Arduino and the - pin to the GND pin.
  2. Signal Control: Connect the S pin to a digital output pin on the Arduino (e.g., pin 9).

Arduino Code Example

The following example demonstrates how to control the KY-034 module using an Arduino UNO. The code cycles through the seven colors of the LED.

// KY-034 Módulo LED 7 Colores Example Code
// This code cycles through the 7 colors of the LED module.

int ledPin = 9; // Signal pin connected to digital pin 9

void setup() {
  pinMode(ledPin, OUTPUT); // Set the signal pin as an output
}

void loop() {
  // Cycle through the 7 colors by sending PWM signals
  for (int brightness = 0; brightness <= 255; brightness += 51) {
    analogWrite(ledPin, brightness); // Adjust brightness to change color
    delay(500); // Wait 500ms before changing to the next color
  }
}

Important Considerations

  • Voltage Compatibility: Ensure the module is powered within its operating voltage range (3.3V - 5V).
  • Signal Pin: Use a PWM-capable pin on the Arduino for smooth color transitions.
  • Current Limiting: If using multiple modules, ensure the total current does not exceed the power supply's capacity.

Troubleshooting and FAQs

Common Issues

  1. LED Not Lighting Up:

    • Check the power connections (+ to 5V and - to GND).
    • Verify that the signal pin is properly connected to the Arduino.
  2. Incorrect Colors Displayed:

    • Ensure the signal pin is connected to a PWM-capable pin.
    • Check the Arduino code for proper PWM signal generation.
  3. Flickering or Unstable Colors:

    • Verify that the power supply provides a stable voltage.
    • Check for loose or faulty connections.

FAQs

Q: Can I use the KY-034 module with a 3.3V microcontroller?
A: Yes, the module is compatible with both 3.3V and 5V systems. Ensure the signal pin voltage matches the microcontroller's logic level.

Q: How do I achieve specific colors?
A: The module cycles through predefined colors based on the PWM signal. Fine-tuning the PWM values can help achieve specific shades.

Q: Can I use multiple KY-034 modules in one project?
A: Yes, but ensure the total current draw does not exceed the power supply's capacity. Use separate signal pins for individual control.

By following this documentation, you can effectively integrate the KY-034 Módulo LED 7 Colores into your projects and troubleshoot common issues with ease.