How to Use WaveShare 2.13inch E-Ink Display for Raspberry Pi Pico: Examples, Pinouts, and Specs
Introduction
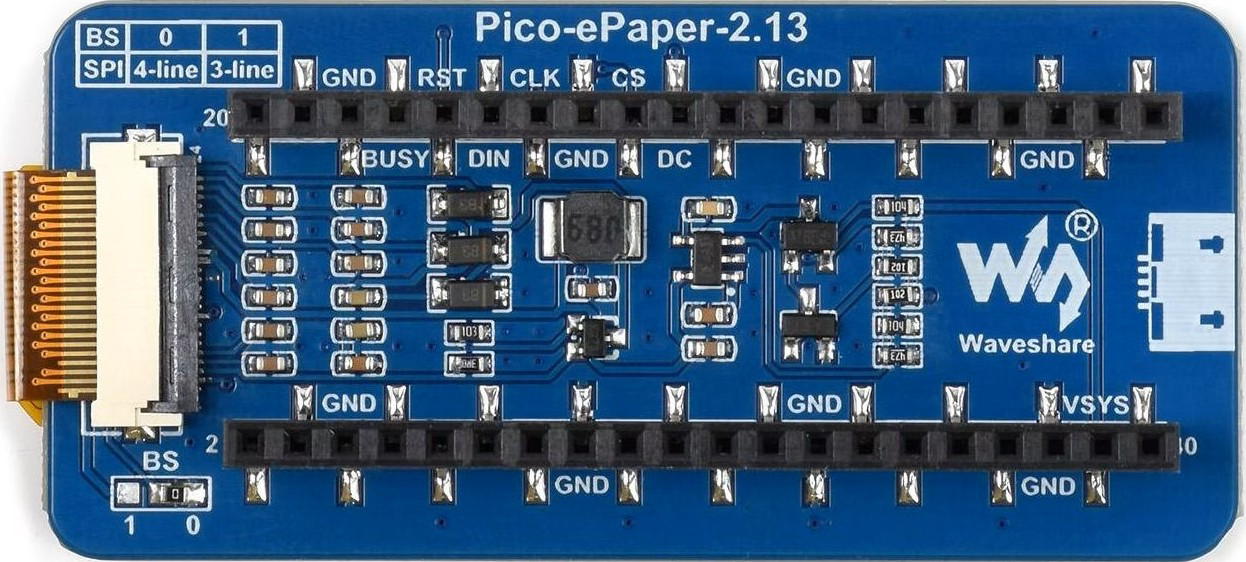
The WaveShare 2.13inch E-Ink Display (Pico-ePaper-2.13) is a low-power display module that utilizes E-Ink technology to deliver crisp and sharp visual output. This display is specifically designed for the Raspberry Pi Pico, making it an excellent choice for projects requiring static images or text. Its 2.13-inch screen size and energy-efficient design make it ideal for applications such as IoT dashboards, e-readers, and low-power information displays.
Explore Projects Built with WaveShare 2.13inch E-Ink Display for Raspberry Pi Pico

Explore Projects Built with WaveShare 2.13inch E-Ink Display for Raspberry Pi Pico
Common Applications
- IoT devices and dashboards
- Digital price tags
- E-readers and portable displays
- Low-power signage
- Embedded systems requiring static or semi-static content
Technical Specifications
Below are the key technical details of the WaveShare 2.13inch E-Ink Display:
| Specification | Details |
|---|---|
| Manufacturer | WaveShare |
| Part Number | Pico-ePaper-2.13 |
| Display Technology | E-Ink (Electronic Paper Display) |
| Screen Size | 2.13 inches |
| Resolution | 250 × 122 pixels |
| Display Colors | Black, White, and Red (Tri-color) |
| Interface | SPI (Serial Peripheral Interface) |
| Operating Voltage | 3.3V (compatible with Raspberry Pi Pico GPIO) |
| Power Consumption | Ultra-low power (only consumes power during updates) |
| Refresh Time | ~2 seconds (full refresh) |
| Dimensions | 65mm × 30.2mm |
| Weight | ~20g |
Pin Configuration
The module connects to the Raspberry Pi Pico via GPIO pins. Below is the pin configuration:
| Pin | Name | Description |
|---|---|---|
| 1 | VCC | Power supply (3.3V) |
| 2 | GND | Ground |
| 3 | DIN | SPI data input (connect to Pico's SPI MOSI) |
| 4 | CLK | SPI clock input (connect to Pico's SPI SCK) |
| 5 | CS | Chip select (active low, connect to a GPIO pin) |
| 6 | DC | Data/Command control pin (connect to a GPIO pin) |
| 7 | RST | Reset pin (active low, connect to a GPIO pin) |
| 8 | BUSY | Busy status output (indicates when the display is updating, connect to a GPIO) |
Usage Instructions
Connecting the Display to Raspberry Pi Pico
- Wiring: Connect the display module to the Raspberry Pi Pico as per the pin configuration table:
- Use jumper wires or a breadboard for prototyping.
- Ensure the VCC and GND pins are correctly connected to the Pico's 3.3V and GND pins.
- Install Required Libraries:
- Download and install the WaveShare E-Ink library for MicroPython from the official WaveShare GitHub repository.
- Copy the library files to the Raspberry Pi Pico using a tool like Thonny IDE.
- Write and Upload Code:
- Use the example code provided below to initialize and display content on the screen.
Example Code
The following MicroPython code demonstrates how to display text and an image on the WaveShare 2.13inch E-Ink Display:
Import necessary libraries for the E-Ink display
from machine import Pin, SPI import framebuf import epd2in13 # Import the WaveShare E-Ink library
Initialize SPI and GPIO pins for the display
spi = SPI(1, baudrate=2000000, polarity=0, phase=0) # SPI configuration cs = Pin(5, Pin.OUT) # Chip select pin dc = Pin(4, Pin.OUT) # Data/Command pin rst = Pin(3, Pin.OUT) # Reset pin busy = Pin(2, Pin.IN) # Busy pin
Initialize the E-Ink display
epd = epd2in13.EPD(spi, cs, dc, rst, busy) epd.init() # Initialize the display
Clear the display
epd.clear()
Create a frame buffer for drawing
buffer = bytearray(epd.width * epd.height // 8) fb = framebuf.FrameBuffer(buffer, epd.width, epd.height, framebuf.MONO_HLSB)
Draw text on the frame buffer
fb.fill(0) # Clear the frame buffer fb.text('Hello, E-Ink!', 10, 10, 1) # Display text at (10, 10)
Display the frame buffer on the E-Ink screen
epd.display_frame(buffer)
Put the display to sleep to save power
epd.sleep()
Important Considerations
- Power Supply: Ensure the Raspberry Pi Pico is powered via USB or a stable 3.3V source.
- Refresh Rate: The display has a refresh time of approximately 2 seconds. Avoid frequent updates to preserve the display's lifespan.
- Static Content: E-Ink displays are best suited for static or semi-static content due to their slow refresh rate.
- Library Compatibility: Use the official WaveShare library for optimal performance and compatibility.
Troubleshooting and FAQs
Common Issues
Display Not Turning On:
- Verify the wiring connections, especially the VCC and GND pins.
- Ensure the Raspberry Pi Pico is powered and running the correct code.
No Output on the Screen:
- Check the SPI connections (DIN, CLK, CS, DC).
- Ensure the
epd2in13library is correctly installed and imported.
Busy Pin Stuck High:
- The display may be in the middle of an update. Wait for the BUSY pin to go low before sending new commands.
Text or Image Not Displaying Properly:
- Ensure the frame buffer is correctly initialized and updated.
- Verify the resolution of the image matches the display's resolution (250 × 122 pixels).
FAQs
Q: Can I use this display with other microcontrollers?
A: Yes, the display can be used with other microcontrollers that support SPI communication, but you may need to adapt the library or write your own driver.
Q: How do I display images?
A: Convert the image to a monochrome bitmap (250 × 122 pixels) and load it into the frame buffer. Use the epd.display_frame() function to display it.
Q: Is the display sunlight-readable?
A: Yes, E-Ink displays are highly readable in direct sunlight, making them ideal for outdoor applications.
Q: How do I reduce power consumption?
A: Put the display into sleep mode using the epd.sleep() function when not in use.