How to Use KY-018 LDR Photo Resistor: Examples, Pinouts, and Specs
Introduction
The KY-018 LDR Photo Resistor, manufactured by AZ-Delivery, is a light-dependent resistor (LDR) that changes its resistance based on the intensity of light falling on it. This component is widely used in light sensing applications, such as automatic lighting systems, light meters, and DIY electronics projects. Its simplicity and versatility make it an excellent choice for both beginners and experienced users.
Explore Projects Built with KY-018 LDR Photo Resistor

Explore Projects Built with KY-018 LDR Photo Resistor
Common Applications
- Automatic streetlights and night lamps
- Light intensity measurement systems
- DIY projects involving light detection
- Solar tracking systems
- Security systems (e.g., detecting light changes in a room)
Technical Specifications
The following table outlines the key technical details of the KY-018 LDR Photo Resistor:
| Parameter | Value |
|---|---|
| Manufacturer | AZ-Delivery |
| Part ID | KY-018 |
| Operating Voltage | 3.3V to 5V |
| Resistance Range | ~10 kΩ (bright light) to ~1 MΩ (dark) |
| Maximum Power Rating | 100 mW |
| Response Time | Rise: ~20 ms, Fall: ~30 ms |
| Operating Temperature | -30°C to +70°C |
| Dimensions | 18 mm x 10 mm x 2 mm |
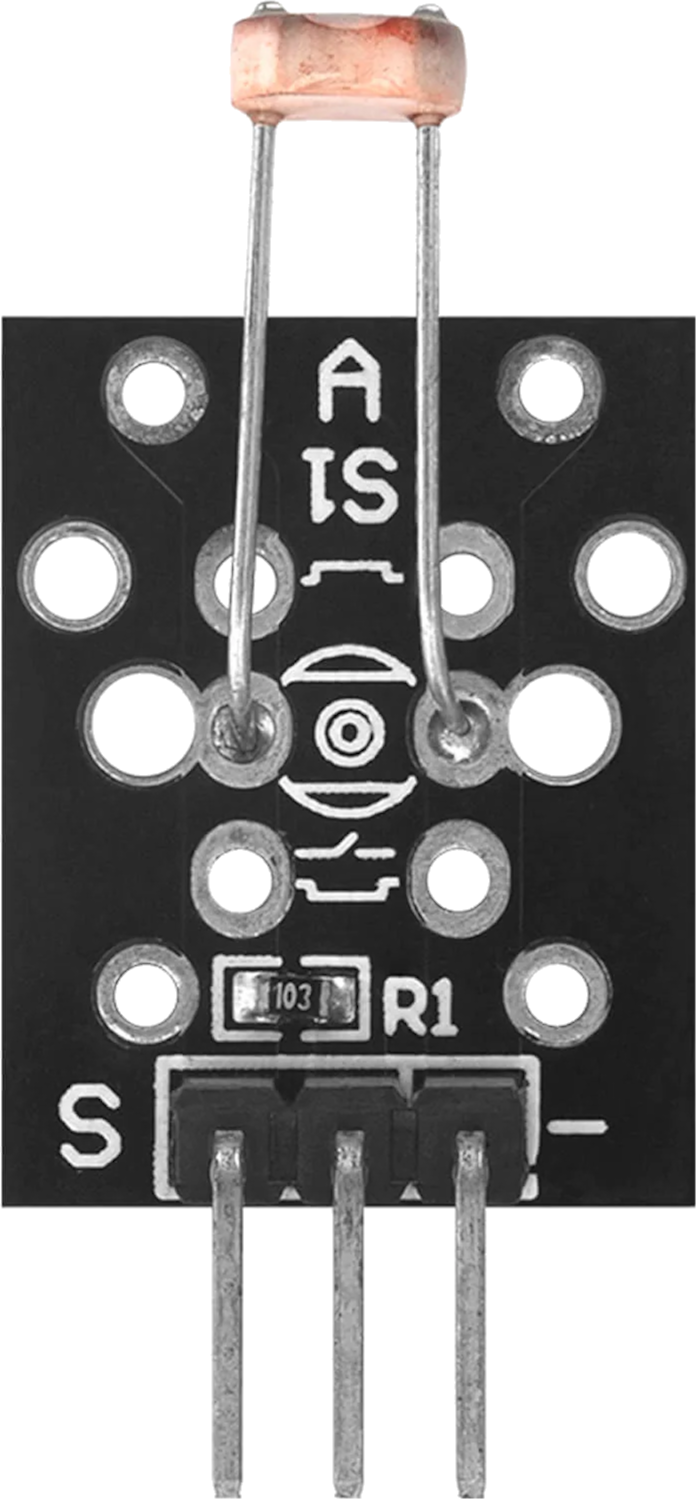
Pin Configuration
The KY-018 module consists of three pins. The table below describes each pin:
| Pin | Name | Description |
|---|---|---|
| 1 | Signal (S) | Outputs an analog voltage proportional to light intensity. |
| 2 | VCC | Power supply pin (3.3V to 5V). |
| 3 | GND | Ground connection. |
Usage Instructions
How to Use the KY-018 in a Circuit
- Power the Module: Connect the VCC pin to a 3.3V or 5V power source and the GND pin to the ground.
- Read the Signal: Connect the Signal (S) pin to an analog input pin of a microcontroller (e.g., Arduino UNO) to measure the voltage output.
- Light Sensitivity: The output voltage decreases as the light intensity increases. Use this behavior to detect changes in light levels.
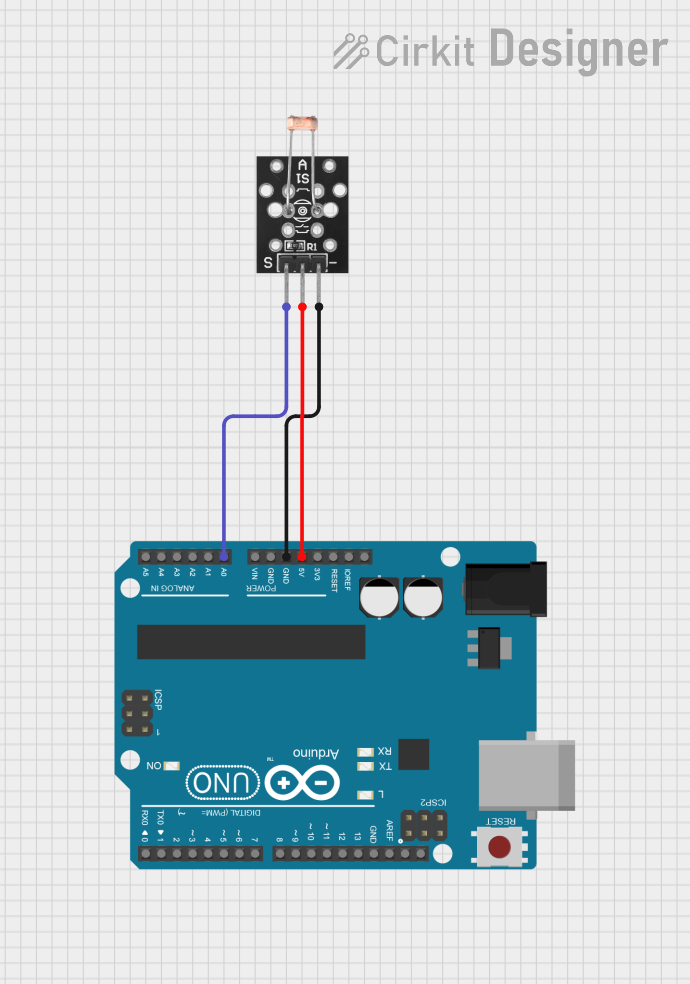
Example Circuit with Arduino UNO
Below is an example of how to connect the KY-018 to an Arduino UNO and read light intensity:
Circuit Connections
- KY-018 VCC → Arduino 5V
- KY-018 GND → Arduino GND
- KY-018 Signal (S) → Arduino A0 (Analog Pin)
Arduino Code Example
// KY-018 LDR Photo Resistor Example with Arduino UNO
// Reads light intensity and prints the value to the Serial Monitor

const int ldrPin = A0; // KY-018 Signal pin connected to Arduino A0

void setup() {
  Serial.begin(9600); // Initialize serial communication at 9600 baud
  pinMode(ldrPin, INPUT); // Set the LDR pin as input
}

void loop() {
  int lightValue = analogRead(ldrPin); // Read the analog value from the LDR
  Serial.print("Light Intensity: ");
  Serial.println(lightValue); // Print the light intensity value
  delay(500); // Wait for 500ms before the next reading
}
Important Considerations
- Voltage Levels: Ensure the module is powered within its operating voltage range (3.3V to 5V).
- Ambient Light: The LDR's resistance is affected by ambient light. Test the module in the intended environment for accurate results.
- Analog-to-Digital Conversion: When using a microcontroller, ensure the analog-to-digital resolution (e.g., 10-bit on Arduino) is sufficient for your application.
Troubleshooting and FAQs
Common Issues and Solutions
No Output or Incorrect Readings
- Cause: Incorrect wiring or loose connections.
- Solution: Double-check the connections, ensuring VCC, GND, and Signal pins are correctly connected.
Output Does Not Change with Light
- Cause: Insufficient light intensity or a damaged LDR.
- Solution: Test the module with a flashlight or in a brighter environment. Replace the module if necessary.
Fluctuating Readings
- Cause: Electrical noise or unstable power supply.
- Solution: Use a decoupling capacitor (e.g., 0.1 µF) between VCC and GND to stabilize the power supply.
FAQs
Q: Can the KY-018 detect very low light levels?
A: Yes, the KY-018 is sensitive to low light levels, but its response time may increase in darker conditions.
Q: Can I use the KY-018 with a 3.3V microcontroller like the ESP32?
A: Yes, the KY-018 operates within a voltage range of 3.3V to 5V, making it compatible with 3.3V microcontrollers.
Q: How do I calibrate the KY-018 for my application?
A: You can calibrate the module by mapping the analog readings to specific light intensity levels using a reference light source and adjusting your code accordingly.
Q: Is the KY-018 suitable for outdoor use?
A: The KY-018 is not weatherproof. If used outdoors, ensure it is enclosed in a protective casing to prevent damage from moisture and dust.