Cirkit Designer Logo
Cirkit Designer
Your all-in-one circuit design IDE
Home / 
Component Documentation

How to Use SparkFun_CSS811_Breakout: Examples, Pinouts, and Specs

Image of SparkFun_CSS811_Breakout
Cirkit Designer LogoDesign with SparkFun_CSS811_Breakout in Cirkit Designer

Introduction

The SparkFun CCS811 Breakout is an advanced sensor board designed to detect Volatile Organic Compounds (VOCs) in the air. Utilizing the CCS811 sensor, this breakout board is capable of providing detailed information about the air quality in an environment. It is commonly used in indoor air quality monitoring systems, smart home automation, and environmental sensing projects.

Explore Projects Built with SparkFun_CSS811_Breakout

Use Cirkit Designer to design, explore, and prototype these projects online. Some projects support real-time simulation. Click "Open Project" to start designing instantly!
ESP32-Powered NTP Clock with Multiple GC9A01 Displays
Image of InfoOrbsFork: A project utilizing SparkFun_CSS811_Breakout in a practical application
This circuit features an ESP32 microcontroller connected to multiple GC9A01 displays and a USB Type C breakout for power. The ESP32 runs a sketch to retrieve the current time from an NTP server over WiFi and displays the hours and minutes across the GC9A01 displays, with each display showing a single digit or colon separator. Pushbuttons are connected to GPIOs on the ESP32, potentially for user input to control display functions or settings.
Cirkit Designer LogoOpen Project in Cirkit Designer
Battery-Powered Environmental Monitoring System with ESP32, BNO055, and MS5803-14BA
Image of bencana banjir: A project utilizing SparkFun_CSS811_Breakout in a practical application
This circuit is a sensor network powered by a LiPo battery through a step-down buck converter, which supplies power to multiple ESP32 microcontrollers, a BNO055 IMU, an ultrasonic sensor, and a pressure sensor. The ESP32 microcontrollers handle data acquisition from the sensors and are programmed to process and transmit this data. The sensors are connected to the ESP32s via I2C and GPIO pins for communication and data collection.
Cirkit Designer LogoOpen Project in Cirkit Designer
Arduino UNO WiFi with Heart Pulse and Temperature Monitoring
Image of BioTrackers: A project utilizing SparkFun_CSS811_Breakout in a practical application
This circuit features an Arduino UNO R4 WiFi microcontroller connected to a Heart Pulse Sensor and an SHT1x-Breakout sensor. The Arduino is configured to read heart pulse signals from the Heart Pulse Sensor on analog pin A0 and temperature/humidity data from the SHT1x-Breakout sensor via the I2C interface on pins A4 (DATA) and A5 (SCK). Both sensors are powered by the Arduino's 5V output, and their ground pins are connected to the Arduino's ground.
Cirkit Designer LogoOpen Project in Cirkit Designer
ESP32-CAM and IR Sensor Interface with USB UART Communication
Image of esp32cam parking: A project utilizing SparkFun_CSS811_Breakout in a practical application
This circuit features an ESP32 CAM module interfaced with an IR sensor and a SparkFun USB UART Breakout board. The ESP32 CAM provides power to the IR sensor and receives its output signal, likely for processing or triggering camera actions based on IR detection. The USB UART Breakout board is connected to the ESP32 CAM for serial communication, enabling programming, debugging, or data exchange with a computer.
Cirkit Designer LogoOpen Project in Cirkit Designer

Explore Projects Built with SparkFun_CSS811_Breakout

Use Cirkit Designer to design, explore, and prototype these projects online. Some projects support real-time simulation. Click "Open Project" to start designing instantly!
Image of InfoOrbsFork: A project utilizing SparkFun_CSS811_Breakout in a practical application
ESP32-Powered NTP Clock with Multiple GC9A01 Displays
This circuit features an ESP32 microcontroller connected to multiple GC9A01 displays and a USB Type C breakout for power. The ESP32 runs a sketch to retrieve the current time from an NTP server over WiFi and displays the hours and minutes across the GC9A01 displays, with each display showing a single digit or colon separator. Pushbuttons are connected to GPIOs on the ESP32, potentially for user input to control display functions or settings.
Cirkit Designer LogoOpen Project in Cirkit Designer
Image of bencana banjir: A project utilizing SparkFun_CSS811_Breakout in a practical application
Battery-Powered Environmental Monitoring System with ESP32, BNO055, and MS5803-14BA
This circuit is a sensor network powered by a LiPo battery through a step-down buck converter, which supplies power to multiple ESP32 microcontrollers, a BNO055 IMU, an ultrasonic sensor, and a pressure sensor. The ESP32 microcontrollers handle data acquisition from the sensors and are programmed to process and transmit this data. The sensors are connected to the ESP32s via I2C and GPIO pins for communication and data collection.
Cirkit Designer LogoOpen Project in Cirkit Designer
Image of BioTrackers: A project utilizing SparkFun_CSS811_Breakout in a practical application
Arduino UNO WiFi with Heart Pulse and Temperature Monitoring
This circuit features an Arduino UNO R4 WiFi microcontroller connected to a Heart Pulse Sensor and an SHT1x-Breakout sensor. The Arduino is configured to read heart pulse signals from the Heart Pulse Sensor on analog pin A0 and temperature/humidity data from the SHT1x-Breakout sensor via the I2C interface on pins A4 (DATA) and A5 (SCK). Both sensors are powered by the Arduino's 5V output, and their ground pins are connected to the Arduino's ground.
Cirkit Designer LogoOpen Project in Cirkit Designer
Image of esp32cam parking: A project utilizing SparkFun_CSS811_Breakout in a practical application
ESP32-CAM and IR Sensor Interface with USB UART Communication
This circuit features an ESP32 CAM module interfaced with an IR sensor and a SparkFun USB UART Breakout board. The ESP32 CAM provides power to the IR sensor and receives its output signal, likely for processing or triggering camera actions based on IR detection. The USB UART Breakout board is connected to the ESP32 CAM for serial communication, enabling programming, debugging, or data exchange with a computer.
Cirkit Designer LogoOpen Project in Cirkit Designer

Common Applications and Use Cases

  • Indoor air quality monitoring
  • Smart home devices
  • HVAC systems
  • Environmental monitoring

Technical Specifications

Key Technical Details

  • Sensor Type: Metal oxide (MOX) based gas sensor
  • Measurement Range: 400 to 29206 parts per billion (ppb)
  • Supply Voltage: 3.3V to 5V
  • Average Current Consumption: 30mA (measurement mode), 60μA (idle mode)
  • Communication Interface: I2C
  • Operating Temperature Range: -40°C to 85°C

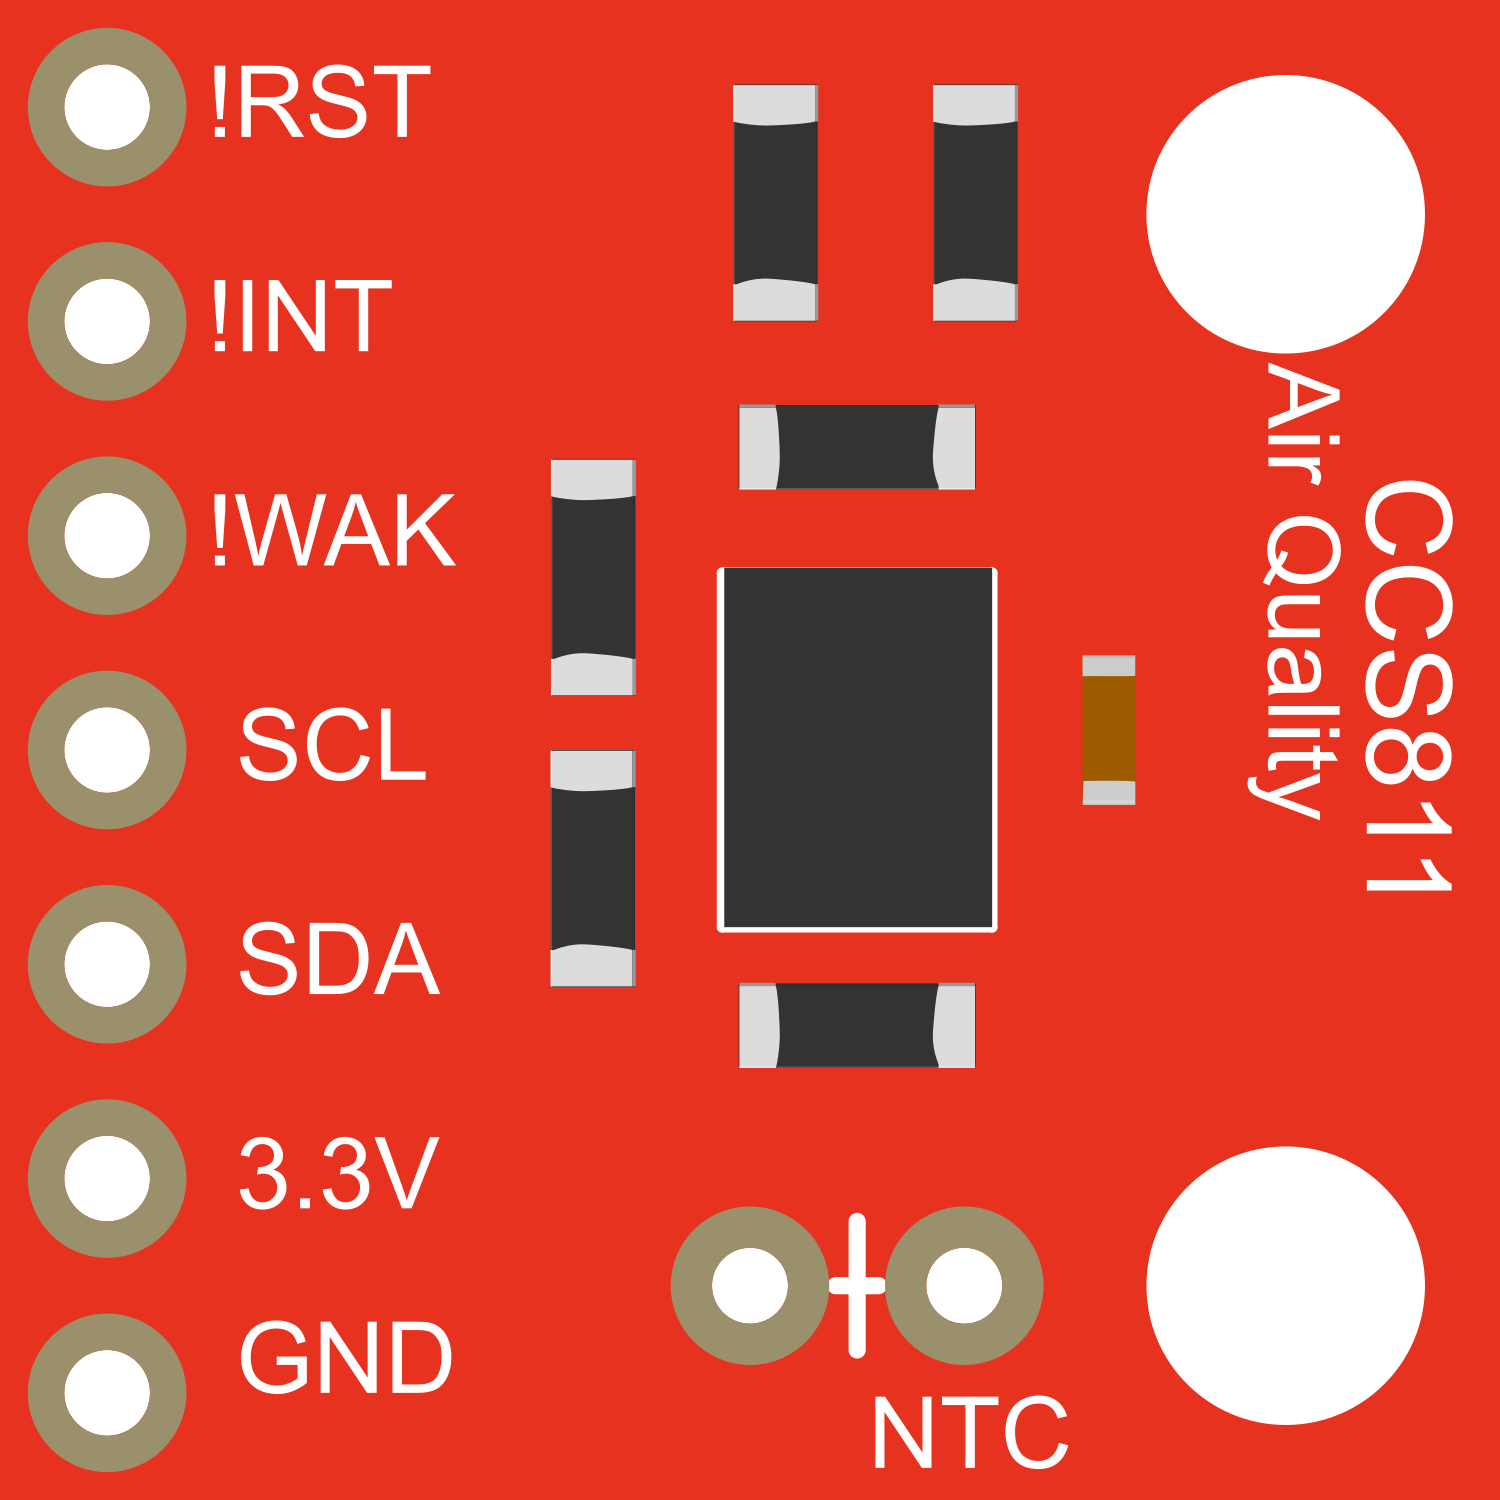
Pin Configuration and Descriptions

Pin Number Pin Name Description
1 WAKE Wake pin, active low
2 GND Ground
3 SDA I2C Data
4 SCL I2C Clock
5 nINT Active low interrupt
6 RST Reset pin, active low
7 3V3 3.3V power supply input
8 ADDR I2C address selection (floating or GND)

Usage Instructions

How to Use the Component in a Circuit

  1. Power Supply: Connect the 3V3 pin to a 3.3V source and GND to the ground in your circuit.
  2. I2C Communication: Connect SDA and SCL to your microcontroller's I2C data and clock lines, respectively.
  3. Interrupts (Optional): Connect the nINT pin to an interrupt-capable GPIO pin on your microcontroller if you wish to use interrupt-driven measurements.
  4. Wake and Reset (Optional): Connect the WAKE pin to a GPIO pin if you need to control the sensor's wake state. Connect the RST pin to a GPIO pin for hardware reset functionality.

Important Considerations and Best Practices

  • Ensure that the power supply is stable and within the specified voltage range.
  • Use pull-up resistors on the I2C lines if they are not already present on your microcontroller board.
  • Avoid placing the sensor near sources of VOCs like paint, glue, or chemical cleaners to prevent false readings during calibration.
  • Allow the sensor to preheat for at least 48 hours before using it for accurate readings.
  • The sensor's readings can be affected by humidity and temperature, so consider using additional sensors to compensate for these factors.

Example Code for Arduino UNO

#include <Wire.h>
#include "SparkFunCCS811.h"  // Include the CCS811 library

#define CCS811_ADDR 0x5B  // Default I2C Address

CCS811 mySensor(CCS811_ADDR);

void setup() {
  Serial.begin(9600);
  Wire.begin();

  if (mySensor.begin() == false) {
    Serial.println("CCS811 sensor not found. Please check wiring.");
    while (1);
  }
}

void loop() {
  // Check if data is available to read
  if (mySensor.dataAvailable()) {
    mySensor.readAlgorithmResults();  // Read sensor data
    Serial.print("CO2: ");
    Serial.print(mySensor.getCO2());
    Serial.print(" ppm, TVOC: ");
    Serial.print(mySensor.getTVOC());
    Serial.println(" ppb");
  }
  delay(500);  // Delay between readings
}

Troubleshooting and FAQs

Common Issues Users Might Face

  • Sensor Not Responding: Ensure that the I2C connections are correct and that the sensor is properly powered.
  • Inaccurate Readings: Make sure the sensor has been preheated and calibrated correctly. Avoid exposing the sensor to sudden changes in VOC concentration.
  • I2C Communication Errors: Check for proper pull-up resistors on the SDA and SCL lines and ensure there are no shorts or open circuits.

Solutions and Tips for Troubleshooting

  • Preheating: Run the sensor for at least 48 hours before expecting accurate readings.
  • Calibration: Follow the manufacturer's guidelines for calibration, which may include exposing the sensor to clean air for a certain period.
  • Check Connections: Revisit all connections, including power supply and I2C, for any loose wires or incorrect connections.

FAQs

Q: Can the CCS811 sensor measure CO2 directly? A: No, the CCS811 sensor measures the total VOC level, which can be used to estimate CO2 levels, but it does not measure CO2 directly.

Q: How long does the sensor last? A: The CCS811 sensor has a typical lifespan of five years when operated within its specified conditions.

Q: Is the sensor sensitive to humidity and temperature? A: Yes, the sensor's readings can be affected by humidity and temperature. It is recommended to use additional sensors to compensate for these factors.

Q: Can I use the sensor with a 5V microcontroller? A: Yes, the sensor can be interfaced with a 5V microcontroller, but ensure that the I2C lines are level-shifted to 3.3V to avoid damaging the sensor.