Introduction
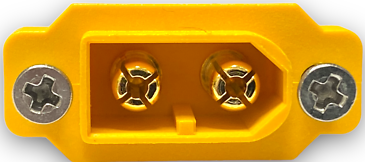
The XT60 Male Panel Mount (Manufacturer Part ID: XT60 M-PNL) by Amass is a high-current connector designed for secure and efficient electrical connections. Its robust design ensures reliability, making it ideal for applications requiring high power transfer. This connector is commonly used in RC vehicles, drones, battery packs, and other electronic projects where a durable and stable connection is essential.
Common Applications
- RC vehicles (cars, boats, planes, and drones)
- Lithium polymer (LiPo) battery connections
- High-current power distribution systems
- DIY electronics and robotics projects
- Solar power systems
Technical Specifications
The XT60 Male Panel Mount is engineered to handle high currents while maintaining a secure and stable connection. Below are its key technical details:
General Specifications
Pin Configuration and Descriptions
The XT60 Male Panel Mount has two primary pins for electrical connections:
Mechanical Dimensions
- Panel cutout diameter: 16mm
- Connector dimensions: 21.6mm x 15.6mm x 8.5mm
- Mounting hole spacing: 19mm (center-to-center)
Usage Instructions
The XT60 Male Panel Mount is straightforward to use and install. Follow the steps below to integrate it into your project:
Installation
- Prepare the Panel: Drill a 16mm hole in the panel where the connector will be mounted.
- Insert the Connector: Place the XT60 Male Panel Mount into the hole, ensuring the positive and negative terminals are oriented correctly.
- Secure the Connector: Use the included screws or nuts to fasten the connector to the panel securely.
- Wire Connections:
- Solder the positive wire to the positive terminal.
- Solder the negative wire to the negative terminal.
- Ensure proper insulation to prevent short circuits.
Important Considerations
- Wire Gauge: Use wires with an appropriate gauge to handle the current (e.g., 12 AWG for 60A).
- Soldering: Use a high-quality soldering iron and lead-free solder for reliable connections.
- Polarity: Double-check the polarity before connecting the power source to avoid damage to your components.
- Heat Management: Avoid prolonged exposure to high currents near the maximum rating to prevent overheating.
Example: Connecting to an Arduino UNO
While the XT60 Male Panel Mount is not directly connected to an Arduino UNO, it can be used to supply power to the Arduino via a battery. Below is an example of how to use the XT60 connector with a LiPo battery to power an Arduino UNO:
Circuit Diagram
- Connect the XT60 Male Panel Mount to a LiPo battery.
- Use a DC-DC step-down converter to regulate the voltage to 5V.
- Connect the output of the step-down converter to the Arduino UNO's 5V and GND pins.
Sample Code
// Example code to blink an LED on Arduino UNO
// Ensure the Arduino is powered via the XT60 connector and a regulated 5V supply

void setup() {
  pinMode(13, OUTPUT); // Set pin 13 as an output for the onboard LED
}

void loop() {
  digitalWrite(13, HIGH); // Turn the LED on
  delay(1000);            // Wait for 1 second
  digitalWrite(13, LOW);  // Turn the LED off
  delay(1000);            // Wait for 1 second
}
Troubleshooting and FAQs
Common Issues
Loose Connection:
- Cause: Improper mounting or insufficient soldering.
- Solution: Ensure the connector is securely fastened to the panel and solder joints are solid.
Overheating:
- Cause: Exceeding the current rating or poor ventilation.
- Solution: Use appropriate wire gauge and ensure adequate airflow around the connector.
Polarity Reversal:
- Cause: Incorrect wiring of the positive and negative terminals.
- Solution: Double-check the polarity before connecting the power source.
High Contact Resistance:
- Cause: Dirty or oxidized contacts.
- Solution: Clean the contacts with isopropyl alcohol and ensure a tight connection.
FAQs
Q1: Can the XT60 Male Panel Mount handle AC power?
A1: While the connector is rated for DC power, it can handle AC power within its voltage and current limits. However, it is primarily designed for DC applications.
Q2: Is the XT60 Male Panel Mount waterproof?
A2: No, the connector is not waterproof. For outdoor or wet environments, additional sealing or waterproof enclosures are recommended.
Q3: Can I use the XT60 Male Panel Mount for charging batteries?
A3: Yes, it is commonly used for charging LiPo batteries. Ensure the charger and battery are compatible and observe proper polarity.
Q4: What is the maximum wire size supported?
A4: The connector can accommodate wires up to 10 AWG, but 12 AWG is typically sufficient for most applications.
By following this documentation, you can effectively integrate the XT60 Male Panel Mount into your projects for reliable and high-current connections.

 Open Project in Cirkit Designer