How to Use FT232RL Module (Back): Examples, Pinouts, and Specs
Introduction
The FT232RL Module is a USB to serial converter designed to facilitate seamless communication between a USB port and serial devices. It integrates a built-in USB controller and supports a wide range of baud rates, making it a versatile and reliable solution for interfacing with microcontrollers, sensors, and other serial communication devices. This module is widely used in prototyping, debugging, and data transfer applications.
Explore Projects Built with FT232RL Module (Back)


Explore Projects Built with FT232RL Module (Back)
Common Applications and Use Cases
- Programming and debugging microcontrollers (e.g., Arduino, ESP8266, ESP32)
- Serial communication with sensors and modules
- USB-to-TTL conversion for legacy devices
- Data logging and monitoring systems
- Prototyping and testing serial communication protocols
Technical Specifications
Below are the key technical details of the FT232RL Module:
| Parameter | Specification |
|---|---|
| USB Standard | USB 2.0 Full Speed |
| Baud Rate | 300 bps to 3 Mbps |
| Voltage Levels | 3.3V and 5V (selectable via jumper) |
| Operating Voltage | 5V (via USB) |
| Current Consumption | ~15 mA (idle) |
| Communication Protocol | UART (TTL) |
| Driver Support | Windows, macOS, Linux |
| Dimensions | ~36mm x 17mm x 5mm |
Pin Configuration and Descriptions
The FT232RL Module features a 6-pin header for serial communication and power connections. Below is the pinout:
| Pin | Name | Description |
|---|---|---|
| 1 | GND | Ground connection |
| 2 | CTS | Clear to Send (input, used for hardware flow control) |
| 3 | VCC | Power supply output (3.3V or 5V, selectable via jumper) |
| 4 | TXD | Transmit Data (output, sends serial data to the connected device) |
| 5 | RXD | Receive Data (input, receives serial data from the connected device) |
| 6 | DTR | Data Terminal Ready (output, used for resetting microcontrollers like Arduino) |
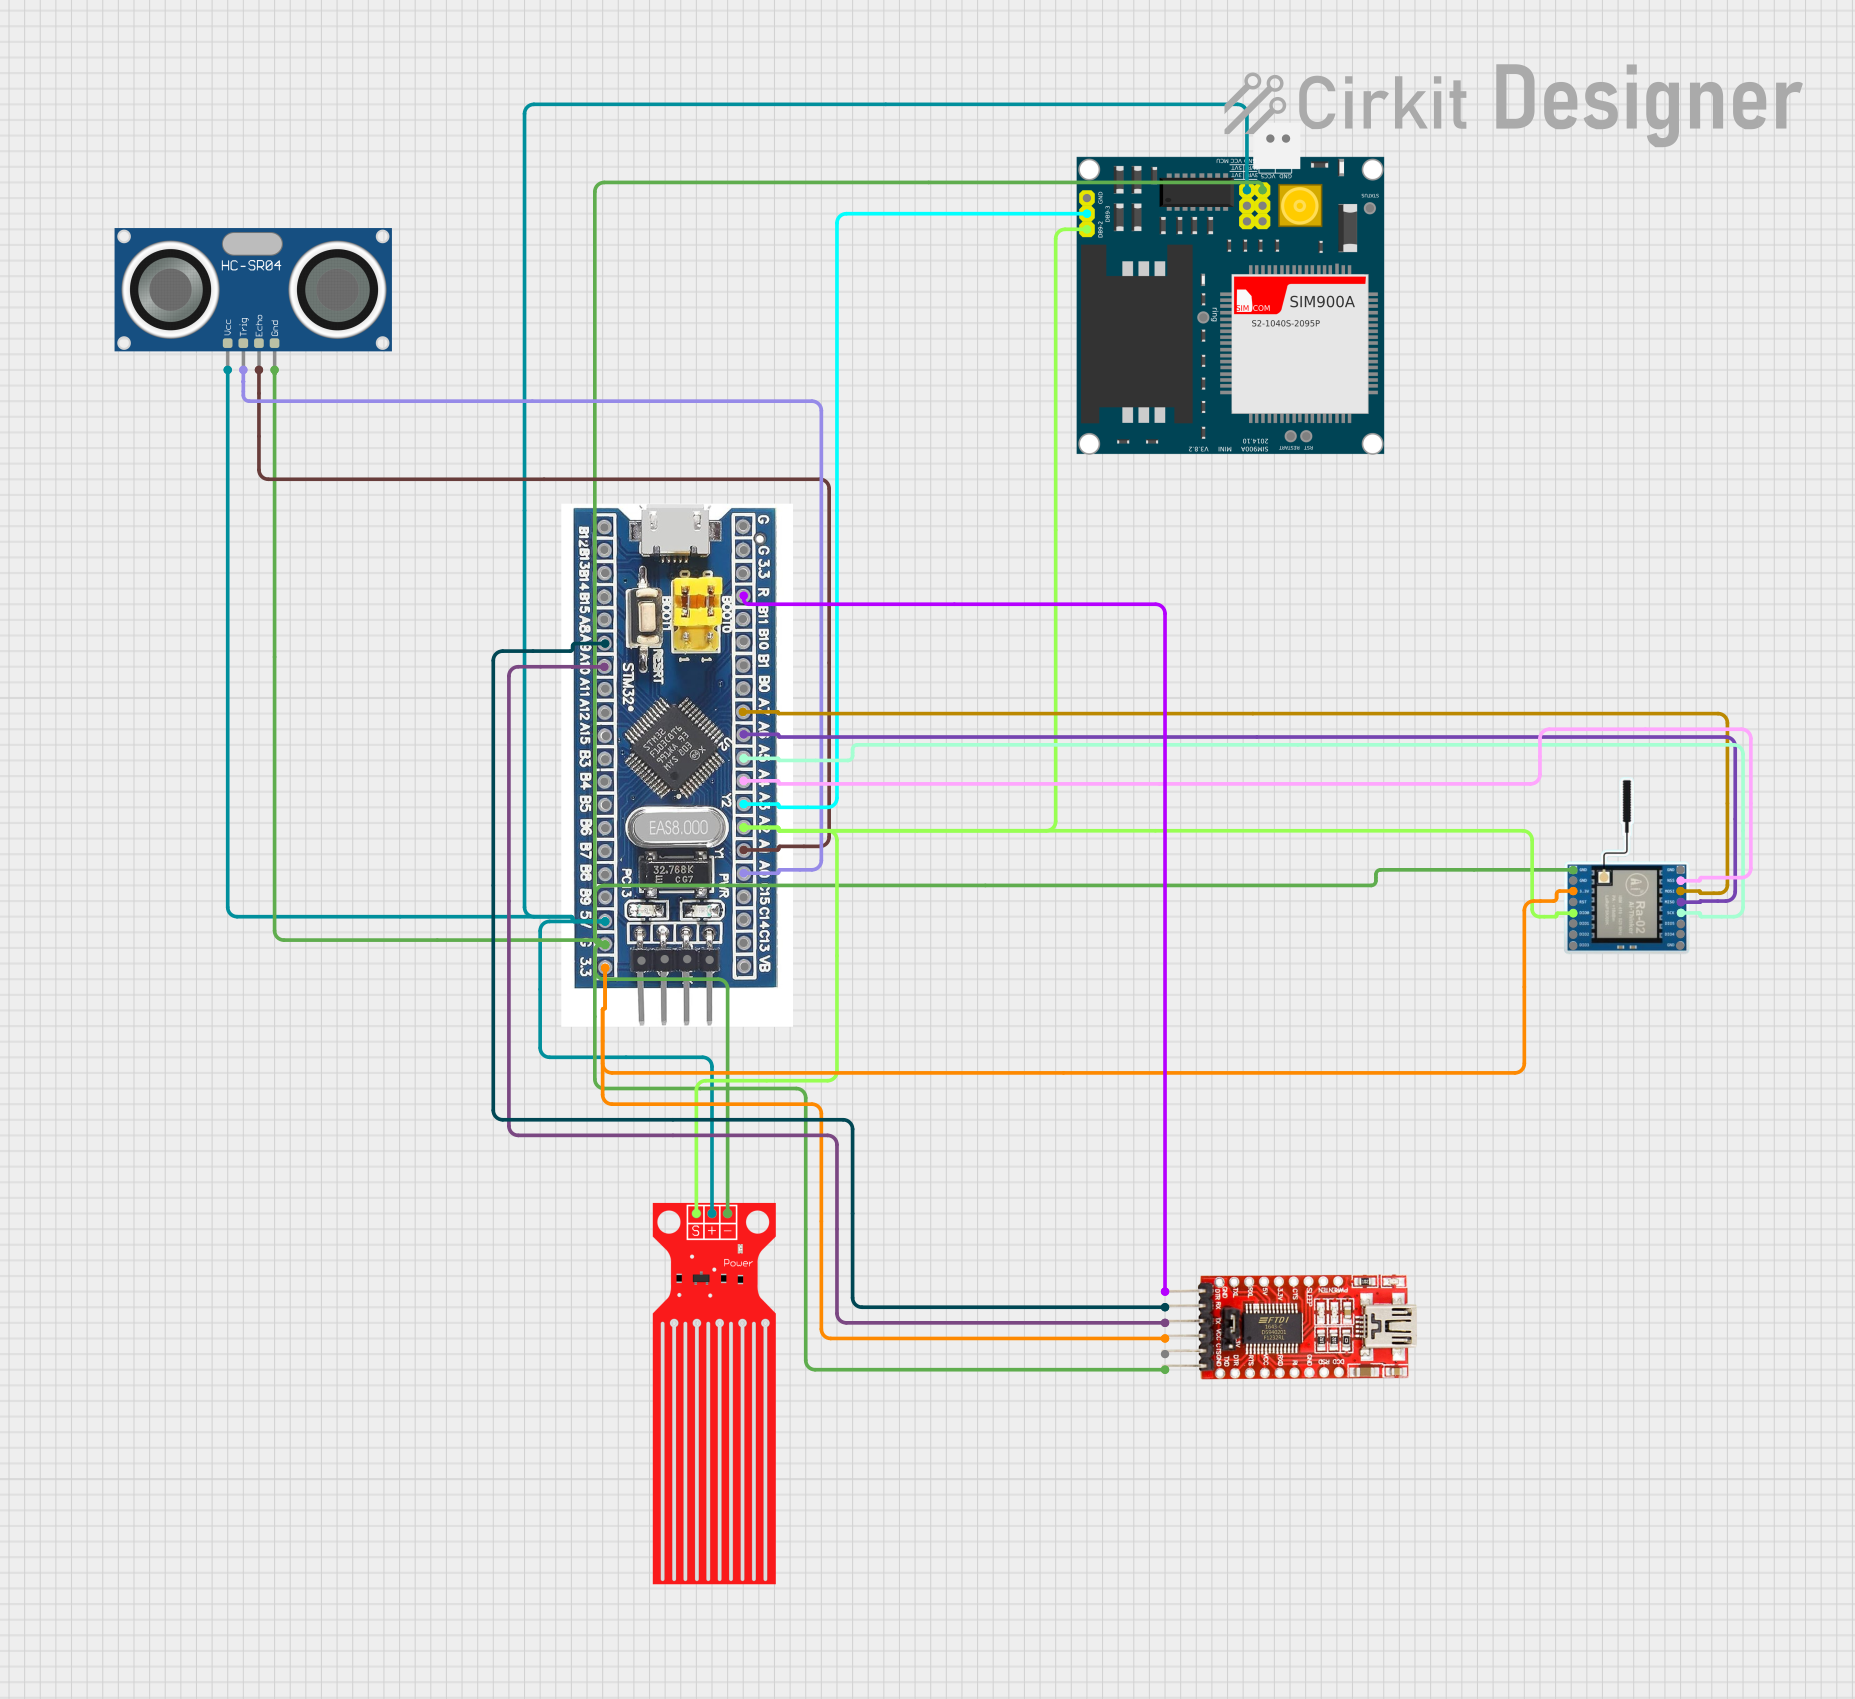
Usage Instructions
How to Use the FT232RL Module in a Circuit
Connect the Module to Your Device:
- Use the 6-pin header to connect the FT232RL Module to your microcontroller or serial device.
- Ensure the
TXDpin of the module is connected to theRXpin of the device, and theRXDpin is connected to theTXpin of the device. - Connect the
GNDpin of the module to the ground of your circuit.
Power the Module:
- The module is powered via the USB connection. It provides a selectable output voltage (3.3V or 5V) to power external devices. Use the onboard jumper to select the desired voltage.
Install Drivers:
- Download and install the FTDI drivers from the official FTDI website (https://ftdichip.com/). These drivers are required for the module to function properly on your computer.
Connect to a Computer:
- Plug the module into a USB port on your computer using a USB cable. The module will appear as a virtual COM port.
Test Communication:
- Use a serial terminal program (e.g., PuTTY, Tera Term, or Arduino IDE Serial Monitor) to send and receive data through the module.
Important Considerations and Best Practices
- Voltage Selection: Ensure the correct voltage (3.3V or 5V) is selected using the jumper before connecting the module to your device.
- Driver Installation: Always install the appropriate FTDI drivers to avoid communication issues.
- Cross-Check Connections: Double-check the
TXDandRXDconnections to avoid communication errors. - Avoid Overloading: Do not draw excessive current from the module's VCC pin, as it is limited by the USB port's power supply.
Example: Connecting to an Arduino UNO
The FT232RL Module can be used to program or communicate with an Arduino UNO. Below is an example of how to connect and use the module:
Wiring Diagram
| FT232RL Pin | Arduino UNO Pin |
|---|---|
| GND | GND |
| TXD | RX (Pin 0) |
| RXD | TX (Pin 1) |
| VCC | 5V |
| DTR | RESET (via a 0.1 µF capacitor) |
Sample Code
The following Arduino sketch demonstrates serial communication with the FT232RL Module:
// Example: Serial Communication with FT232RL Module
// This code sends "Hello, World!" to the FT232RL Module every second.

void setup() {
  Serial.begin(9600); // Initialize serial communication at 9600 baud
}

void loop() {
  Serial.println("Hello, World!"); // Send data to the FT232RL Module
  delay(1000); // Wait for 1 second
}
Upload this code to your Arduino UNO, and open the Serial Monitor in the Arduino IDE to observe the output.
Troubleshooting and FAQs
Common Issues and Solutions
Module Not Recognized by Computer:
- Ensure the USB cable is functional and properly connected.
- Verify that the FTDI drivers are installed correctly.
- Try using a different USB port or cable.
No Data Transmission:
- Check the
TXDandRXDconnections. Ensure they are not swapped. - Confirm that the baud rate in your serial terminal matches the baud rate in your code.
- Check the
Device Not Powering On:
- Verify that the USB port is supplying power.
- Check the jumper setting for the correct voltage (3.3V or 5V).
Arduino Not Resetting Automatically:
- Ensure the
DTRpin is connected to the Arduino'sRESETpin via a 0.1 µF capacitor.
- Ensure the
FAQs
Q: Can the FT232RL Module be used with 3.3V devices?
A: Yes, the module supports both 3.3V and 5V logic levels. Use the jumper to select the appropriate voltage.
Q: What is the maximum baud rate supported by the module?
A: The FT232RL Module supports baud rates up to 3 Mbps.
Q: Do I need to install drivers for Linux?
A: Most modern Linux distributions include built-in support for FTDI devices, so additional drivers are usually not required.
Q: Can I use this module to program an ESP8266 or ESP32?
A: Yes, the FT232RL Module can be used to program ESP8266 and ESP32 devices. Ensure proper wiring and voltage selection.
By following this documentation, you can effectively use the FT232RL Module for a variety of USB-to-serial communication applications.