How to Use TMC5160-BOB: Examples, Pinouts, and Specs

 Design with TMC5160-BOB in Cirkit Designer
Introduction
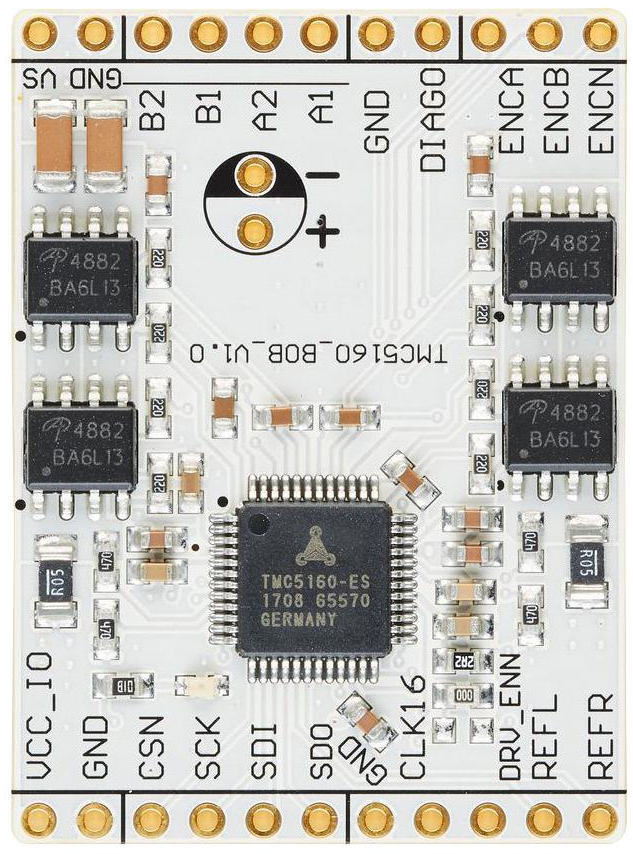
The TMC5160-BOB is a breakout board for the TMC5160 stepper motor driver, manufactured by Trinamic. This high-performance motion control component is designed to drive stepper motors with precision and efficiency. It supports advanced features such as sensorless homing, microstepping up to 256 steps, and configurable current settings, making it a versatile choice for applications requiring smooth and reliable motor control.
Explore Projects Built with TMC5160-BOB

 Open Project in Cirkit Designer
 Open Project in Cirkit Designer
 Open Project in Cirkit Designer
 Open Project in Cirkit Designer
Explore Projects Built with TMC5160-BOB

 Open Project in Cirkit Designer
 Open Project in Cirkit Designer
 Open Project in Cirkit Designer
 Open Project in Cirkit Designer
Common Applications
- 3D Printers: Enables precise control of stepper motors for high-quality printing.
- CNC Machines: Provides smooth motion control for cutting, milling, and engraving.
- Robotics: Ideal for robotic arms and other motion-intensive robotic systems.
- Industrial Automation: Used in conveyor systems and other automated machinery.
Technical Specifications
The TMC5160-BOB is built to handle demanding motion control tasks. Below are its key technical details:
Key Specifications
| Parameter | Value |
|---|---|
| Supply Voltage (VM) | 8V to 60V |
| Logic Voltage (VIO) | 3.3V or 5V (configurable) |
| Maximum Motor Current | Up to 20A peak (with proper cooling) |
| Microstepping Resolution | Up to 256 microsteps per full step |
| Communication Interface | SPI |
| Features | Sensorless homing, StallGuard™, CoolStep™ |
Pin Configuration
The TMC5160-BOB breakout board features a set of pins for easy integration into your circuit. Below is the pinout description:
| Pin Name | Description |
|---|---|
| VM | Motor power supply (8V to 60V). Connect to the motor's power source. |
| GND | Ground connection. |
| VIO | Logic voltage input (3.3V or 5V). Configures the logic level for SPI. |
| SPI_MOSI | SPI Master Out Slave In. Used for data input to the TMC5160. |
| SPI_MISO | SPI Master In Slave Out. Used for data output from the TMC5160. |
| SPI_SCK | SPI Clock. Synchronizes data transfer between the microcontroller and IC. |
| SPI_CS | SPI Chip Select. Activates the TMC5160 for communication. |
| ENN | Enable pin. Active low; disables the driver when pulled high. |
| STEP | Step input. Controls the motor's step signal. |
| DIR | Direction input. Sets the motor's rotation direction. |
| DIAG | Diagnostic output. Indicates motor status or errors. |
| A1, A2, B1, B2 | Motor coil connections. Connect to the stepper motor's windings. |
Usage Instructions
The TMC5160-BOB is designed for easy integration into motion control systems. Follow these steps to use the component effectively:
Connecting the TMC5160-BOB
- Power Supply: Connect the motor power supply (8V to 60V) to the
VMpin and ground to theGNDpin. - Logic Voltage: Set the logic voltage (
VIO) to match your microcontroller's logic level (3.3V or 5V). - Motor Connections: Connect the stepper motor's coils to the
A1,A2,B1, andB2pins. - SPI Interface: Connect the SPI pins (
SPI_MOSI,SPI_MISO,SPI_SCK,SPI_CS) to your microcontroller. - Control Pins: Use the
STEPandDIRpins to control the motor's movement. TheENNpin must be pulled low to enable the driver.
Example Arduino UNO Code
Below is an example of how to control the TMC5160-BOB using an Arduino UNO via SPI:
#include <SPI.h>

// Define SPI pins
const int CS_PIN = 10; // Chip Select pin for TMC5160
const int STEP_PIN = 3; // Step pin
const int DIR_PIN = 4;  // Direction pin

void setup() {
  // Initialize SPI
  SPI.begin();
  pinMode(CS_PIN, OUTPUT);
  digitalWrite(CS_PIN, HIGH); // Set CS pin high (inactive)

  // Initialize control pins
  pinMode(STEP_PIN, OUTPUT);
  pinMode(DIR_PIN, OUTPUT);

  // Set initial motor direction
  digitalWrite(DIR_PIN, LOW); // Set direction to clockwise
}

void loop() {
  // Generate step pulses
  digitalWrite(STEP_PIN, HIGH);
  delayMicroseconds(500); // Adjust delay for desired speed
  digitalWrite(STEP_PIN, LOW);
  delayMicroseconds(500);
}

// Note: Configure the TMC5160 registers via SPI as needed for your application.
// Refer to the TMC5160 datasheet for detailed register settings.
Best Practices
- Cooling: Ensure proper cooling (e.g., heatsinks or fans) when driving motors at high currents.
- Power Supply: Use a stable and adequately rated power supply to avoid voltage drops.
- SPI Configuration: Configure the SPI clock speed and mode to match the TMC5160's requirements.
- Motor Selection: Use stepper motors compatible with the TMC5160's voltage and current ratings.
Troubleshooting and FAQs
Common Issues and Solutions
Motor Not Moving
- Cause: Incorrect wiring or insufficient power supply.
- Solution: Double-check all connections and ensure the power supply meets the voltage and current requirements.
Overheating
- Cause: High current settings or inadequate cooling.
- Solution: Reduce the motor current via SPI configuration and add a heatsink or fan.
No SPI Communication
- Cause: Incorrect SPI wiring or logic voltage mismatch.
- Solution: Verify SPI connections and ensure the
VIOpin matches the microcontroller's logic level.
Stall Detection Not Working
- Cause: Incorrect StallGuard™ configuration.
- Solution: Adjust the StallGuard™ threshold via SPI registers as per the datasheet.
FAQs
Q: Can I use the TMC5160-BOB with a 12V power supply?
A: Yes, the TMC5160-BOB supports motor power supplies from 8V to 60V. Ensure your motor is compatible with 12V operation.
Q: How do I enable sensorless homing?
A: Sensorless homing requires configuring the StallGuard™ feature via SPI. Refer to the TMC5160 datasheet for detailed instructions.
Q: What is the maximum step rate supported?
A: The TMC5160 can handle step rates up to 250kHz, depending on your microcontroller's capabilities.
Q: Can I use the TMC5160-BOB with a 5V microcontroller?
A: Yes, set the VIO pin to 5V to match the logic level of your microcontroller.
By following this documentation, you can effectively integrate the TMC5160-BOB into your motion control projects. For advanced configurations, refer to the Trinamic TMC5160 datasheet.