How to Use Spectral UV Sensor: Examples, Pinouts, and Specs
Introduction
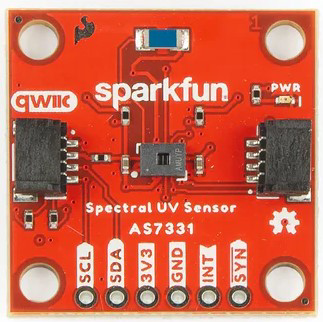
The Spectral UV Sensor (AS7331), manufactured by SparkFun, is a high-precision device designed to detect and measure ultraviolet (UV) light across various wavelengths. This sensor is ideal for applications requiring accurate UV intensity readings, such as environmental monitoring, health and safety systems, and material testing. Its ability to measure UV light in specific spectral bands makes it a versatile tool for scientific and industrial use.
Explore Projects Built with Spectral UV Sensor


Explore Projects Built with Spectral UV Sensor
Common Applications
- Environmental Monitoring: Measuring UV index for weather stations or outdoor safety.
- Health Applications: Monitoring UV exposure for skin protection or sterilization systems.
- Material Testing: Assessing UV resistance of materials or coatings.
- Industrial Processes: UV curing and quality control in manufacturing.
Technical Specifications
The AS7331 Spectral UV Sensor is a highly capable device with the following key specifications:
| Parameter | Value |
|---|---|
| Manufacturer | SparkFun |
| Part Number | AS7331 |
| Spectral Range | 280 nm to 400 nm (UV-A and UV-B) |
| Supply Voltage | 3.3V to 5V |
| Communication Interface | I²C |
| Operating Temperature | -40°C to +85°C |
| Power Consumption | Low power (typical < 1 mA in active mode) |
| Resolution | 16-bit ADC |
| Dimensions | Compact, PCB-mounted module |
Pin Configuration and Descriptions
The AS7331 sensor module has the following pinout:
| Pin Name | Pin Number | Description |
|---|---|---|
| VCC | 1 | Power supply input (3.3V to 5V) |
| GND | 2 | Ground connection |
| SDA | 3 | I²C data line |
| SCL | 4 | I²C clock line |
| INT | 5 | Interrupt output (optional, for event signaling) |
| ADDR | 6 | I²C address selection (connect to GND or VCC) |
Usage Instructions
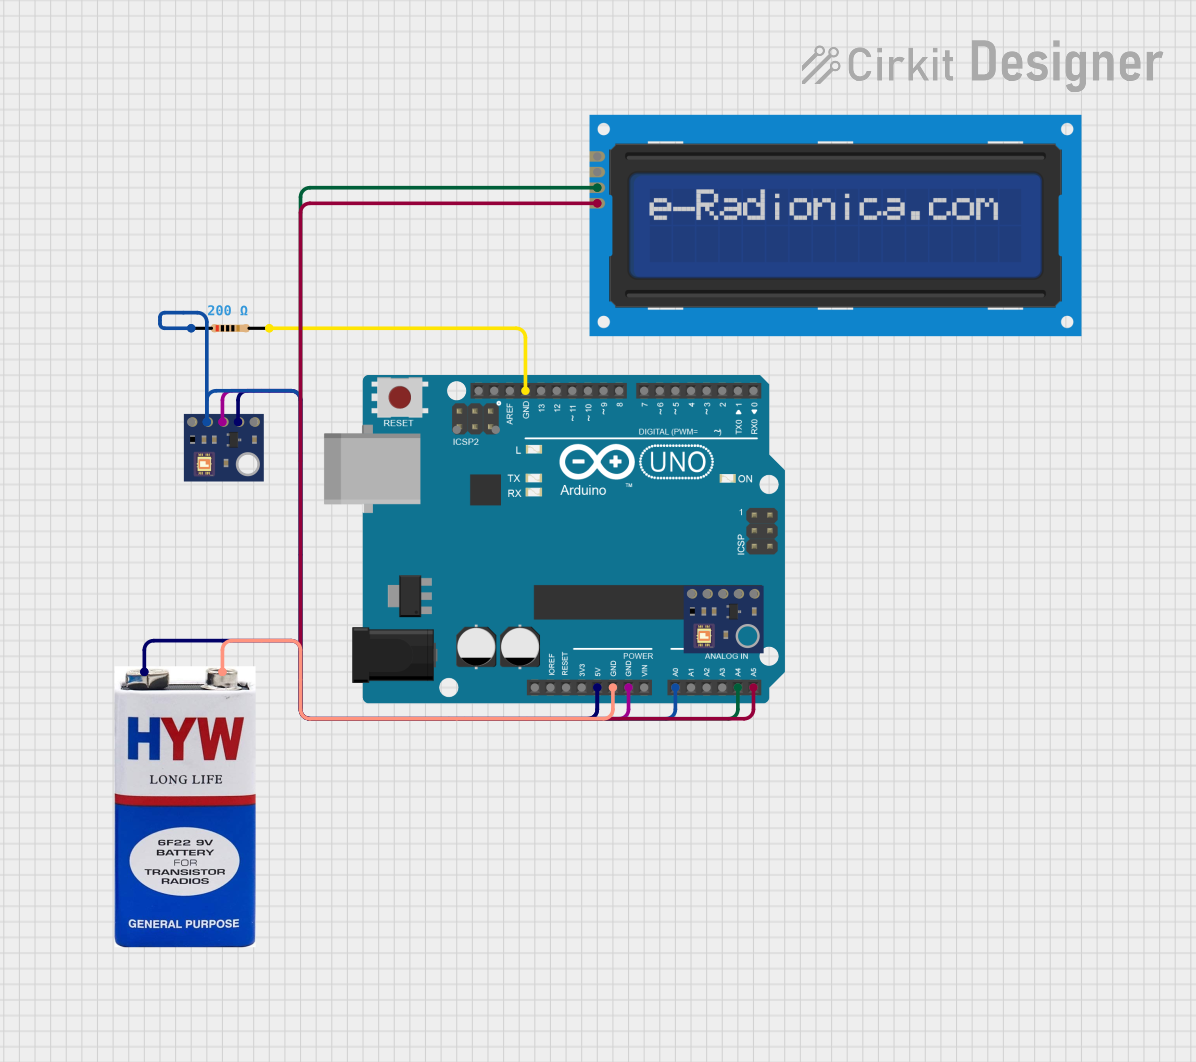
How to Use the AS7331 in a Circuit
- Power the Sensor: Connect the VCC pin to a 3.3V or 5V power source and the GND pin to ground.
- I²C Communication: Connect the SDA and SCL pins to the corresponding I²C pins on your microcontroller (e.g., Arduino UNO).
- Address Selection: Use the ADDR pin to set the I²C address. Connect it to GND for the default address or to VCC for an alternate address.
- Interrupt Pin (Optional): If you need event-based signaling, connect the INT pin to a GPIO pin on your microcontroller.
Important Considerations
- Voltage Levels: Ensure the microcontroller's I²C lines are compatible with the sensor's voltage levels (3.3V or 5V).
- Pull-Up Resistors: Use appropriate pull-up resistors (typically 4.7 kΩ) on the SDA and SCL lines if not already included on the module.
- UV Light Exposure: Avoid prolonged exposure to intense UV light, as it may degrade the sensor's performance over time.
Example Code for Arduino UNO
Below is an example of how to interface the AS7331 with an Arduino UNO using the I²C protocol:
#include <Wire.h>

// Define the I²C address of the AS7331 sensor
#define AS7331_I2C_ADDRESS 0x39

void setup() {
  Wire.begin(); // Initialize I²C communication
  Serial.begin(9600); // Start serial communication for debugging

  // Initialize the AS7331 sensor
  Wire.beginTransmission(AS7331_I2C_ADDRESS);
  // Example: Write to a configuration register (replace 0x00 and 0x01 with actual values)
  Wire.write(0x00); // Register address
  Wire.write(0x01); // Configuration value
  Wire.endTransmission();

  Serial.println("AS7331 initialized.");
}

void loop() {
  // Request UV data from the sensor
  Wire.beginTransmission(AS7331_I2C_ADDRESS);
  Wire.write(0x02); // Register address for UV data (replace with actual address)
  Wire.endTransmission();

  Wire.requestFrom(AS7331_I2C_ADDRESS, 2); // Request 2 bytes of data
  if (Wire.available() == 2) {
    uint16_t uvData = Wire.read() << 8 | Wire.read(); // Combine two bytes
    Serial.print("UV Intensity: ");
    Serial.println(uvData);
  }

  delay(1000); // Wait 1 second before the next reading
}
Notes on the Code
- Replace register addresses (e.g.,
0x00,0x02) and configuration values with those specified in the AS7331 datasheet. - Ensure the I²C address matches the configuration of your sensor (default is
0x39).
Troubleshooting and FAQs
Common Issues
No Data from the Sensor
- Cause: Incorrect I²C address or wiring.
- Solution: Verify the I²C address and ensure proper connections for SDA, SCL, VCC, and GND.
Inconsistent Readings
- Cause: Electrical noise or insufficient pull-up resistors on I²C lines.
- Solution: Add or adjust pull-up resistors (4.7 kΩ is typical).
Sensor Not Detected
- Cause: Incorrect voltage levels or damaged sensor.
- Solution: Ensure the power supply matches the sensor's requirements (3.3V or 5V). Check for physical damage.
FAQs
Q: Can the AS7331 measure visible light?
A: No, the AS7331 is specifically designed for UV light detection in the 280 nm to 400 nm range.
Q: How do I protect the sensor from UV damage?
A: Avoid prolonged exposure to high-intensity UV light and store the sensor in a dark, dry environment when not in use.
Q: Can I use the AS7331 with a 3.3V microcontroller?
A: Yes, the AS7331 is compatible with both 3.3V and 5V systems.
Q: What is the maximum I²C clock speed supported?
A: The AS7331 supports standard (100 kHz) and fast (400 kHz) I²C modes.
By following this documentation, you can effectively integrate the AS7331 Spectral UV Sensor into your projects and applications.