Cirkit Designer Logo
Cirkit Designer
Your all-in-one circuit design IDE
Home / 
Component Documentation

How to Use Circuit Playground Express (CPX): Examples, Pinouts, and Specs

Image of Circuit Playground Express (CPX)
Cirkit Designer LogoDesign with Circuit Playground Express (CPX) in Cirkit Designer

Introduction

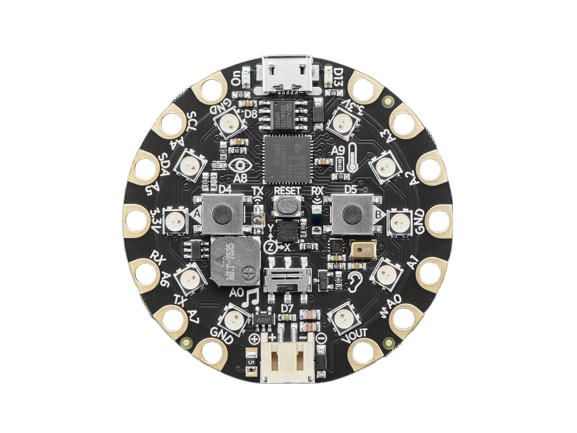
The Circuit Playground Express (CPX), manufactured by Adafruit (Part ID: 3333), is a versatile microcontroller board designed for education, prototyping, and creative projects. It features a rich set of built-in sensors, LEDs, and connectivity options, making it an excellent tool for learning programming, electronics, and interactive design.

Explore Projects Built with Circuit Playground Express (CPX)

Use Cirkit Designer to design, explore, and prototype these projects online. Some projects support real-time simulation. Click "Open Project" to start designing instantly!
Adafruit Circuit Playground Bluefruit and Crickit-Based Smart RGB LED and Temperature Monitoring System
Image of Example: A project utilizing Circuit Playground Express (CPX) in a practical application
This circuit integrates an Adafruit Circuit Playground Bluefruit with an Adafruit Crickit for Circuit Playground Express to control a temperature sensor, a loudspeaker, and a series of WS2812 RGB LED strips. The Crickit board reads temperature data, drives the loudspeaker, and controls the LED strips to create visual effects based on the sensor input.
Cirkit Designer LogoOpen Project in Cirkit Designer
Adafruit Circuit Playground-Based Interactive Control System with Pushbutton and Slide Potentiometers
Image of Lever Up Controller: A project utilizing Circuit Playground Express (CPX) in a practical application
This circuit features an Adafruit Circuit Playground Dev Edition microcontroller interfaced with a pushbutton and two slide potentiometers. The pushbutton is connected to digital pin D6, while the potentiometers provide analog input to pins D9 and D10, allowing for variable control inputs.
Cirkit Designer LogoOpen Project in Cirkit Designer
Battery-Powered Smart Light with Proximity Sensor and OLED Display using Adafruit QT Py RP2040
Image of lab: A project utilizing Circuit Playground Express (CPX) in a practical application
This circuit is a portable, battery-powered system featuring an Adafruit QT Py RP2040 microcontroller that interfaces with an OLED display, a proximity sensor, an accelerometer, and an RGB LED strip. The system is powered by a lithium-ion battery with a step-up boost converter to provide 5V for the LED strip, and it includes a toggle switch for power control. The microcontroller communicates with the sensors and display via I2C.
Cirkit Designer LogoOpen Project in Cirkit Designer
Battery-Powered ESP32-C3 Interactive Control Panel
Image of GTV-Transmitter Advanced: A project utilizing Circuit Playground Express (CPX) in a practical application
This circuit features an ESP32-C3 microcontroller connected to various input devices and an OLED display. The input devices include two KY-023 Dual Axis Joystick Modules for directional input and a Rotary Encoder for incremental input, both interfaced with the ESP32-C3's GPIO pins. The circuit also includes a power management system with a Polymer Lithium Ion Battery, a JST connector, and a toggle switch to control power to an LED indicator.
Cirkit Designer LogoOpen Project in Cirkit Designer

Explore Projects Built with Circuit Playground Express (CPX)

Use Cirkit Designer to design, explore, and prototype these projects online. Some projects support real-time simulation. Click "Open Project" to start designing instantly!
Image of Example: A project utilizing Circuit Playground Express (CPX) in a practical application
Adafruit Circuit Playground Bluefruit and Crickit-Based Smart RGB LED and Temperature Monitoring System
This circuit integrates an Adafruit Circuit Playground Bluefruit with an Adafruit Crickit for Circuit Playground Express to control a temperature sensor, a loudspeaker, and a series of WS2812 RGB LED strips. The Crickit board reads temperature data, drives the loudspeaker, and controls the LED strips to create visual effects based on the sensor input.
Cirkit Designer LogoOpen Project in Cirkit Designer
Image of Lever Up Controller: A project utilizing Circuit Playground Express (CPX) in a practical application
Adafruit Circuit Playground-Based Interactive Control System with Pushbutton and Slide Potentiometers
This circuit features an Adafruit Circuit Playground Dev Edition microcontroller interfaced with a pushbutton and two slide potentiometers. The pushbutton is connected to digital pin D6, while the potentiometers provide analog input to pins D9 and D10, allowing for variable control inputs.
Cirkit Designer LogoOpen Project in Cirkit Designer
Image of lab: A project utilizing Circuit Playground Express (CPX) in a practical application
Battery-Powered Smart Light with Proximity Sensor and OLED Display using Adafruit QT Py RP2040
This circuit is a portable, battery-powered system featuring an Adafruit QT Py RP2040 microcontroller that interfaces with an OLED display, a proximity sensor, an accelerometer, and an RGB LED strip. The system is powered by a lithium-ion battery with a step-up boost converter to provide 5V for the LED strip, and it includes a toggle switch for power control. The microcontroller communicates with the sensors and display via I2C.
Cirkit Designer LogoOpen Project in Cirkit Designer
Image of GTV-Transmitter Advanced: A project utilizing Circuit Playground Express (CPX) in a practical application
Battery-Powered ESP32-C3 Interactive Control Panel
This circuit features an ESP32-C3 microcontroller connected to various input devices and an OLED display. The input devices include two KY-023 Dual Axis Joystick Modules for directional input and a Rotary Encoder for incremental input, both interfaced with the ESP32-C3's GPIO pins. The circuit also includes a power management system with a Polymer Lithium Ion Battery, a JST connector, and a toggle switch to control power to an LED indicator.
Cirkit Designer LogoOpen Project in Cirkit Designer

Common Applications and Use Cases

  • STEM Education: Ideal for teaching programming and electronics to beginners.
  • Wearable Electronics: Compact size and onboard LEDs make it suitable for wearable projects.
  • Prototyping: Built-in sensors and connectors simplify rapid prototyping.
  • Interactive Art: Use the onboard LEDs and sensors to create interactive installations.
  • IoT Projects: With its connectivity options, CPX can be used in Internet of Things applications.

Technical Specifications

The Circuit Playground Express is packed with features to support a wide range of projects. Below are its key technical details:

General Specifications

Feature Description
Microcontroller ATSAMD21 ARM Cortex-M0+ 32-bit processor
Flash Memory 2 MB SPI Flash for file storage
Operating Voltage 3.3V (logic level)
Power Supply USB, JST battery connector, or external power (3.3V–6V)
Dimensions 50mm diameter, 5.6mm thick

Built-in Components

Component Description
LEDs 10 RGB NeoPixels (individually addressable)
Buttons 2 push buttons (A and B)
Switch 1 slide switch
Sensors Light, temperature, sound, motion (accelerometer), and capacitive touch
Speaker Mini speaker for audio output
Microphone MEMS microphone for sound input
IR Communication Infrared transmitter and receiver

Pin Configuration

The CPX does not have traditional pins but instead features pads around its edge. These pads are labeled and can be used for alligator clips or soldering.

Pad Label Function
A1–A7 Analog/Digital I/O pins
TX/RX UART communication pins
3.3V 3.3V power output
GND Ground
SDA/SCL I2C communication pins

Usage Instructions

The Circuit Playground Express is designed to be beginner-friendly and versatile. Below are the steps and best practices for using it in a circuit.

Getting Started

  1. Powering the CPX:

    • Connect via USB to a computer for programming and power.
    • Use a 3.7V LiPo battery with the JST connector for portable projects.
    • Supply external power (3.3V–6V) to the pads labeled 3.3V and GND.
  2. Programming the CPX:

    • The CPX supports multiple programming environments:
      • MakeCode: A block-based coding platform for beginners.
      • CircuitPython: A Python-based environment for more advanced users.
      • Arduino IDE: For those familiar with Arduino programming.
  3. Connecting Components:

    • Use alligator clips or solder wires to the edge pads for connecting external components.
    • Ensure proper polarity when connecting power or external devices.

Example: Using CPX with Arduino IDE

Below is an example of controlling the onboard NeoPixels using the Arduino IDE:

#include <Adafruit_CircuitPlayground.h> // Include the CPX library

void setup() {
  CircuitPlayground.begin(); // Initialize the CPX board
}

void loop() {
  // Turn all NeoPixels red
  CircuitPlayground.setPixelColor(0, 255, 0, 0); // Set pixel 0 to red
  delay(500); // Wait for 500ms
  
  // Turn all NeoPixels green
  CircuitPlayground.setPixelColor(0, 0, 255, 0); // Set pixel 0 to green
  delay(500); // Wait for 500ms
}

Best Practices

  • Avoid shorting the edge pads to prevent damage to the board.
  • Use the onboard sensors and LEDs to prototype before adding external components.
  • When using external power, ensure the voltage does not exceed 6V.

Troubleshooting and FAQs

Common Issues and Solutions

  1. CPX Not Recognized by Computer:

    • Ensure the USB cable is data-capable (not just for charging).
    • Check that the CPX is in bootloader mode (double-tap the reset button).
  2. NeoPixels Not Lighting Up:

    • Verify that the CircuitPlayground.begin() function is called in your code.
    • Ensure the CPX is properly powered.
  3. Code Not Uploading:

    • Confirm that the correct board and port are selected in the Arduino IDE.
    • If using CircuitPython, ensure the CPX is in the correct mode for programming.
  4. Sensors Not Responding:

    • Check the code for proper initialization of the sensor.
    • Ensure no external components are interfering with the onboard sensors.

FAQs

Q: Can I use the CPX with a breadboard?
A: The CPX is not breadboard-compatible due to its circular design, but you can use alligator clips or solder wires to connect it to a breadboard.

Q: What is the maximum current draw of the NeoPixels?
A: Each NeoPixel can draw up to 60mA at full brightness (white). Use external power if driving all LEDs at high brightness.

Q: Can I use the CPX for wireless communication?
A: The CPX does not have built-in Wi-Fi or Bluetooth, but you can add wireless modules via the edge pads.

By following this documentation, you can unlock the full potential of the Circuit Playground Express for your projects!