Cirkit Designer Logo
Cirkit Designer
Your all-in-one circuit design IDE
Home / 
Component Documentation

How to Use Adafruit AT42QT1010 Standalone Momentary Capacitive Touch Sensor: Examples, Pinouts, and Specs

Image of Adafruit AT42QT1010 Standalone Momentary Capacitive Touch Sensor
Cirkit Designer LogoDesign with Adafruit AT42QT1010 Standalone Momentary Capacitive Touch Sensor in Cirkit Designer

Introduction

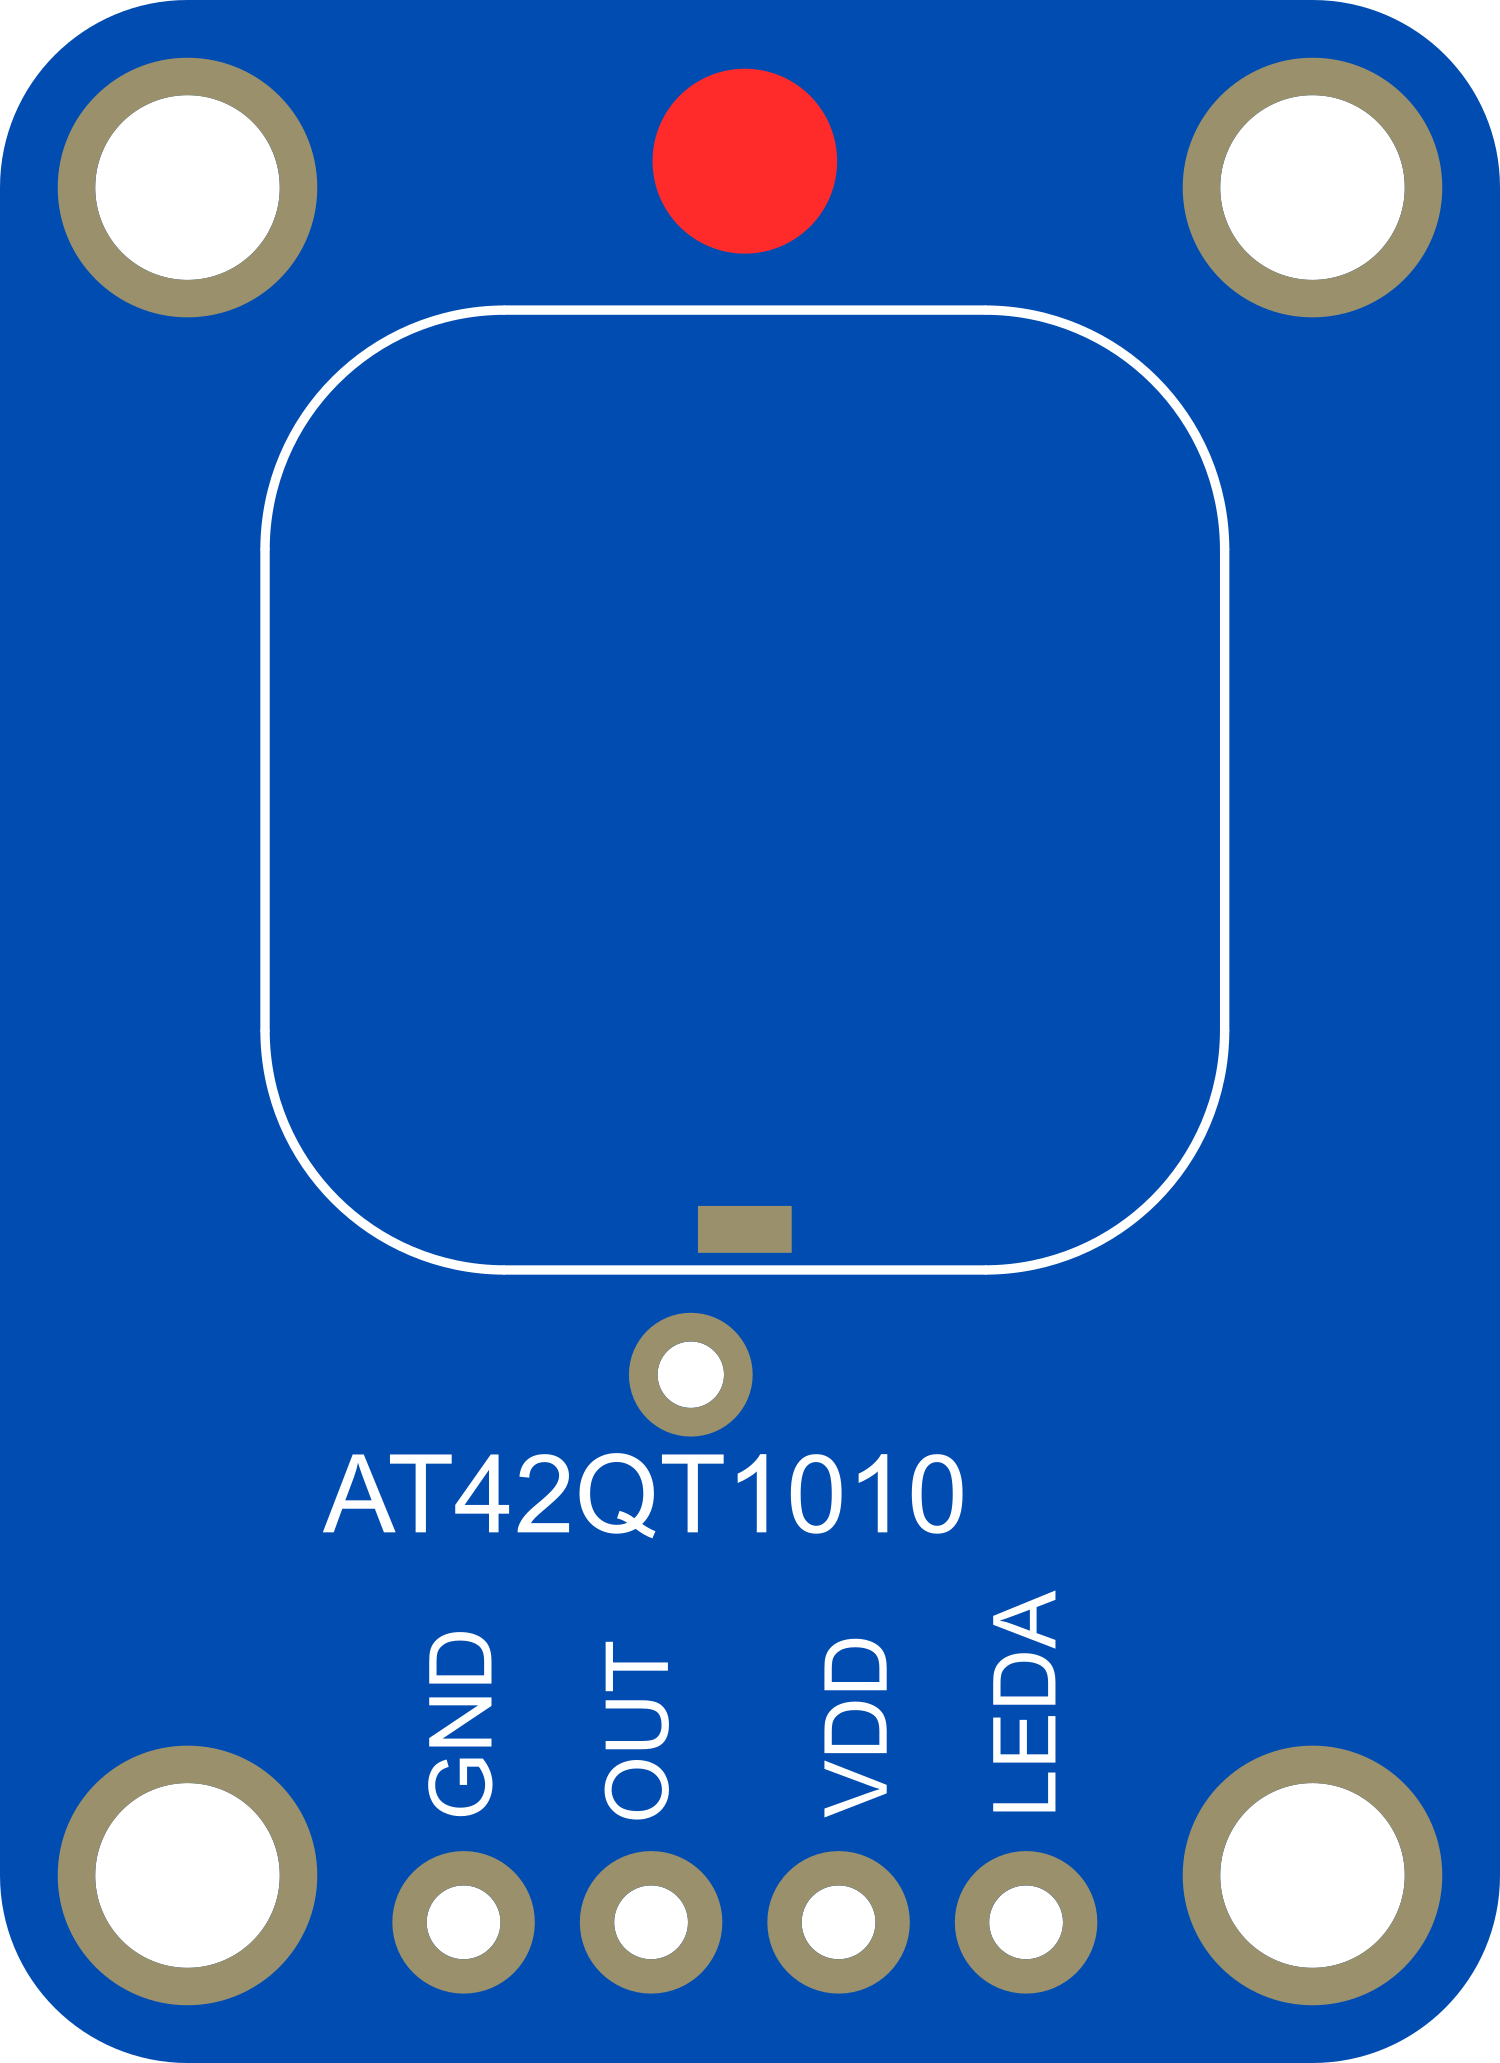
The Adafruit AT42QT1010 is a standalone momentary capacitive touch sensor that offers a simple and effective solution for implementing touch-sensitive features in various electronic projects. This sensor can detect touch and proximity through capacitive sensing and is designed to work without the need for additional external components. It is commonly used for creating touch-sensitive buttons, interactive user interfaces, and proximity detection systems.

Explore Projects Built with Adafruit AT42QT1010 Standalone Momentary Capacitive Touch Sensor

Use Cirkit Designer to design, explore, and prototype these projects online. Some projects support real-time simulation. Click "Open Project" to start designing instantly!
Capacitive Touch and Ultrasonic Sensor Interface with Adafruit Feather nRF52840 Sense
Image of Senior Design Project: A project utilizing Adafruit AT42QT1010 Standalone Momentary Capacitive Touch Sensor in a practical application
This circuit features an Adafruit Feather nRF52840 Sense microcontroller connected to an ultrasonic sensor for distance measurement and an Adafruit AT42QT1010 capacitive touch sensor for touch input. The ultrasonic sensor's Trigger and Echo pins are interfaced with the microcontroller's digital pins D6 and D9, respectively, to send and receive ultrasonic signals. Additionally, a pressure-sensitive conductive sheet (Velostat) is connected in series with a 10k Ohm resistor to the microcontroller's analog pin A0, likely forming a pressure sensor.
Cirkit Designer LogoOpen Project in Cirkit Designer
Touch-Sensitive Interface with Adafruit MPR121 and Feather 32u4 Bluefruit
Image of MPR121: A project utilizing Adafruit AT42QT1010 Standalone Momentary Capacitive Touch Sensor in a practical application
This circuit integrates an Adafruit MPR121 capacitive touch sensor with an Adafruit Feather 32u4 Bluefruit microcontroller. The MPR121 is powered by the Feather and communicates via I2C (SCL and SDA) to detect touch inputs, which can be processed or transmitted wirelessly by the Feather.
Cirkit Designer LogoOpen Project in Cirkit Designer
Arduino UNO Capacitive Touch Sensor Interface
Image of P7Ej2: A project utilizing Adafruit AT42QT1010 Standalone Momentary Capacitive Touch Sensor in a practical application
This circuit consists of an Arduino UNO microcontroller connected to a capacitive touch sensor. The sensor's VCC and GND pins are powered by the Arduino's 5V and GND pins, respectively, and the sensor's output is connected to the Arduino's digital pin D10. The Arduino can read touch inputs from the sensor to perform various actions based on the provided code.
Cirkit Designer LogoOpen Project in Cirkit Designer
Battery-Powered Smart Sensor Hub with Adafruit QT Py RP2040
Image of wearable final: A project utilizing Adafruit AT42QT1010 Standalone Momentary Capacitive Touch Sensor in a practical application
This circuit features an Adafruit QT Py RP2040 microcontroller interfaced with an APDS9960 proximity sensor, an MPU6050 accelerometer and gyroscope, and an OLED display via I2C communication. It also includes a buzzer controlled by the microcontroller and is powered by a 3.7V LiPo battery with a toggle switch for power control.
Cirkit Designer LogoOpen Project in Cirkit Designer

Explore Projects Built with Adafruit AT42QT1010 Standalone Momentary Capacitive Touch Sensor

Use Cirkit Designer to design, explore, and prototype these projects online. Some projects support real-time simulation. Click "Open Project" to start designing instantly!
Image of Senior Design Project: A project utilizing Adafruit AT42QT1010 Standalone Momentary Capacitive Touch Sensor in a practical application
Capacitive Touch and Ultrasonic Sensor Interface with Adafruit Feather nRF52840 Sense
This circuit features an Adafruit Feather nRF52840 Sense microcontroller connected to an ultrasonic sensor for distance measurement and an Adafruit AT42QT1010 capacitive touch sensor for touch input. The ultrasonic sensor's Trigger and Echo pins are interfaced with the microcontroller's digital pins D6 and D9, respectively, to send and receive ultrasonic signals. Additionally, a pressure-sensitive conductive sheet (Velostat) is connected in series with a 10k Ohm resistor to the microcontroller's analog pin A0, likely forming a pressure sensor.
Cirkit Designer LogoOpen Project in Cirkit Designer
Image of MPR121: A project utilizing Adafruit AT42QT1010 Standalone Momentary Capacitive Touch Sensor in a practical application
Touch-Sensitive Interface with Adafruit MPR121 and Feather 32u4 Bluefruit
This circuit integrates an Adafruit MPR121 capacitive touch sensor with an Adafruit Feather 32u4 Bluefruit microcontroller. The MPR121 is powered by the Feather and communicates via I2C (SCL and SDA) to detect touch inputs, which can be processed or transmitted wirelessly by the Feather.
Cirkit Designer LogoOpen Project in Cirkit Designer
Image of P7Ej2: A project utilizing Adafruit AT42QT1010 Standalone Momentary Capacitive Touch Sensor in a practical application
Arduino UNO Capacitive Touch Sensor Interface
This circuit consists of an Arduino UNO microcontroller connected to a capacitive touch sensor. The sensor's VCC and GND pins are powered by the Arduino's 5V and GND pins, respectively, and the sensor's output is connected to the Arduino's digital pin D10. The Arduino can read touch inputs from the sensor to perform various actions based on the provided code.
Cirkit Designer LogoOpen Project in Cirkit Designer
Image of wearable final: A project utilizing Adafruit AT42QT1010 Standalone Momentary Capacitive Touch Sensor in a practical application
Battery-Powered Smart Sensor Hub with Adafruit QT Py RP2040
This circuit features an Adafruit QT Py RP2040 microcontroller interfaced with an APDS9960 proximity sensor, an MPU6050 accelerometer and gyroscope, and an OLED display via I2C communication. It also includes a buzzer controlled by the microcontroller and is powered by a 3.7V LiPo battery with a toggle switch for power control.
Cirkit Designer LogoOpen Project in Cirkit Designer

Common Applications and Use Cases

  • Touch-activated lighting controls
  • Interactive art installations
  • User interface controls for appliances
  • Proximity-based triggers for security systems
  • DIY projects and educational purposes
  • Touch-based input for microcontroller projects

Technical Specifications

Key Technical Details

  • Operating Voltage: 1.8V - 5.5V
  • Current Consumption: <1 mA (typical)
  • Interface: Digital output (active low)
  • Response Time: <60 ms
  • Sensitivity: Adjustable with external capacitor (0 - 50pF)

Pin Configuration and Descriptions

Pin Number Name Description
1 VDD Power supply (1.8V - 5.5V)
2 OUT Digital output (active low)
3 GND Ground connection

Usage Instructions

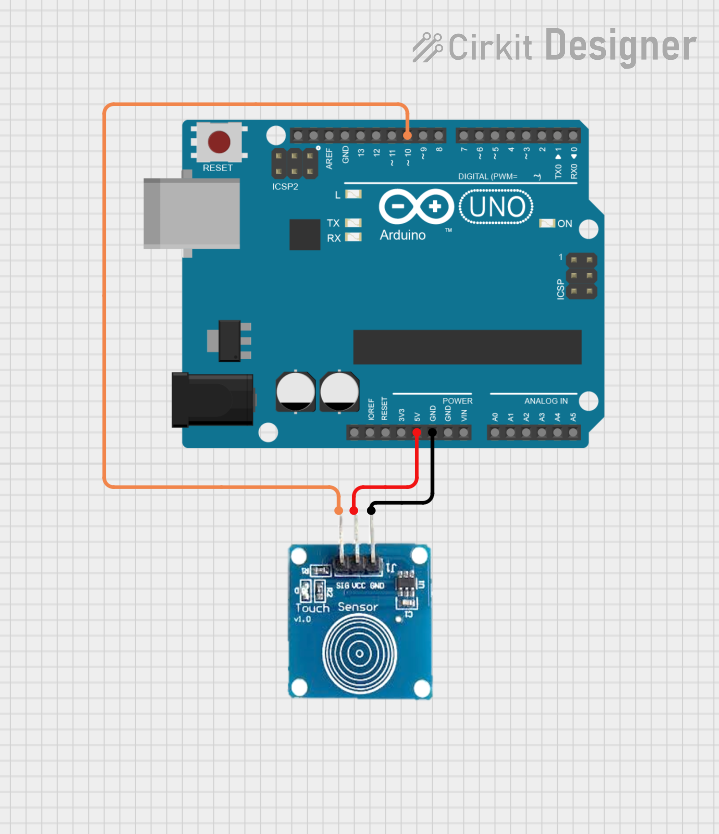
How to Use the Component in a Circuit

  1. Connect the VDD pin to a power supply within the range of 1.8V to 5.5V.
  2. Connect the GND pin to the ground of the power supply.
  3. The OUT pin provides a digital output signal. Connect this pin to a digital input pin on your microcontroller.
  4. Optionally, connect a capacitor between the OUT pin and GND to adjust the sensitivity of the sensor.

Important Considerations and Best Practices

  • Ensure that the power supply voltage does not exceed the maximum rating of 5.5V.
  • Avoid placing the sensor close to conductive materials that may interfere with the capacitive sensing.
  • Use a pull-up resistor on the OUT pin if your microcontroller does not have an internal pull-up feature.
  • Keep the sensor and associated wiring away from high-noise sources to prevent false triggering.

Example Code for Arduino UNO

// Define the touch sensor output pin
const int touchSensorPin = 2;

void setup() {
  // Configure the touch sensor pin as an input
  pinMode(touchSensorPin, INPUT_PULLUP);
  // Initialize serial communication
  Serial.begin(9600);
}

void loop() {
  // Read the state of the touch sensor
  int sensorState = digitalRead(touchSensorPin);

  // Check if the sensor is touched (active low)
  if (sensorState == LOW) {
    // Output a message to the serial monitor
    Serial.println("Sensor touched!");
  }

  // Small delay to debounce and prevent flooding the serial output
  delay(100);
}

Troubleshooting and FAQs

Common Issues Users Might Face

  • Sensor not responding to touch: Ensure that the sensor is properly powered and that the sensitivity is correctly adjusted with an external capacitor if necessary.
  • False triggering: This can be caused by noise or interference. Check the wiring and keep the sensor away from high-noise sources.
  • No output signal: Verify that the OUT pin is connected to the correct microcontroller pin and that the pull-up resistor is in place if needed.

Solutions and Tips for Troubleshooting

  • Double-check all connections and ensure that the power supply is within the specified voltage range.
  • If using a sensitivity capacitor, try adjusting its value to fine-tune the sensor's responsiveness.
  • Implement software debouncing in your code to filter out spurious signals.

FAQs

Q: Can I use the AT42QT1010 with a 3.3V system? A: Yes, the AT42QT1010 can operate at voltages as low as 1.8V, making it compatible with 3.3V systems.

Q: How can I adjust the sensitivity of the sensor? A: Sensitivity can be adjusted by connecting a capacitor between the OUT pin and GND. The capacitance value can range from 0 to 50pF.

Q: Is it possible to use multiple AT42QT1010 sensors in one project? A: Yes, you can use multiple sensors in a project. Each sensor will require a separate digital input pin on your microcontroller to read its state.

Q: How do I prevent the sensor from false triggering? A: Ensure proper grounding, avoid placing the sensor near conductive materials, and keep it away from noise sources. Additionally, software debouncing can help mitigate false triggers.

This documentation provides a comprehensive guide to using the Adafruit AT42QT1010 Standalone Momentary Capacitive Touch Sensor in your projects. For further assistance or more advanced applications, consult the manufacturer's datasheet and additional resources.