How to Use Esp32C3 0.42 Oled: Examples, Pinouts, and Specs
Introduction
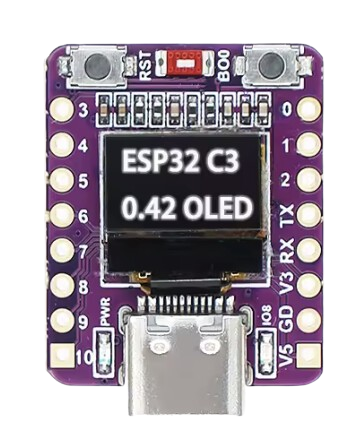
The ESP32-C3 0.42 OLED by ABRobot is a compact and versatile microcontroller module that integrates the ESP32-C3 chip with a 0.42-inch OLED display. This module combines the power of the ESP32-C3's Wi-Fi and Bluetooth Low Energy (BLE) capabilities with a built-in OLED screen, making it ideal for IoT applications, wearable devices, and compact display-based projects.
Explore Projects Built with Esp32C3 0.42 Oled

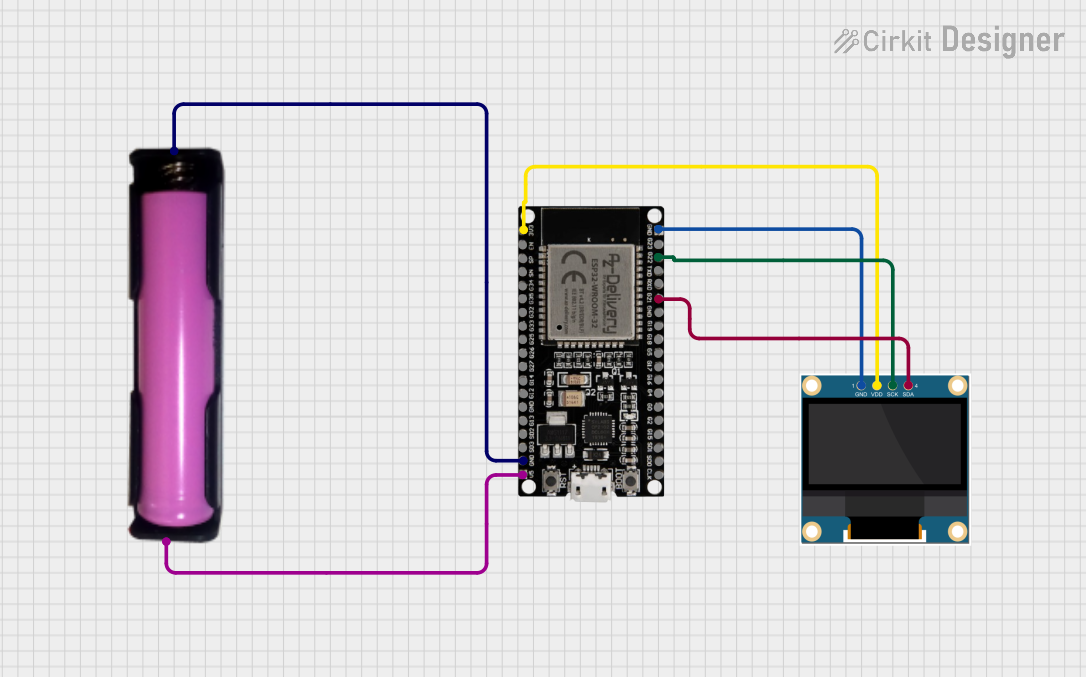


Explore Projects Built with Esp32C3 0.42 Oled
Common Applications and Use Cases
- IoT devices with real-time data display
- Wearable electronics
- Smart home automation systems
- Portable monitoring devices
- Educational and prototyping projects
Technical Specifications
Key Technical Details
| Parameter | Specification |
|---|---|
| Microcontroller | ESP32-C3 (RISC-V architecture) |
| Wireless Connectivity | Wi-Fi 802.11 b/g/n, Bluetooth 5 (LE) |
| Flash Memory | 4 MB |
| Operating Voltage | 3.3V |
| OLED Display | 0.42-inch, 72x40 resolution, monochrome |
| Power Consumption | Ultra-low power in deep sleep mode |
| Interface | I2C for OLED communication |
| Dimensions | 25mm x 15mm x 5mm |
Pin Configuration and Descriptions
| Pin Name | Pin Number | Description |
|---|---|---|
| VCC | 1 | Power input (3.3V) |
| GND | 2 | Ground |
| SDA | 3 | I2C data line for OLED communication |
| SCL | 4 | I2C clock line for OLED communication |
| GPIO0 | 5 | General-purpose I/O pin |
| GPIO1 | 6 | General-purpose I/O pin |
| RST | 7 | Reset pin for the ESP32-C3 |
| EN | 8 | Enable pin to power up the module |
Usage Instructions
How to Use the Component in a Circuit
- Powering the Module: Connect the VCC pin to a 3.3V power source and the GND pin to ground.
- I2C Communication: Use the SDA and SCL pins to interface with the OLED display. Ensure the I2C address of the OLED is correctly configured in your code (default:
0x3C). - Programming the ESP32-C3: Use a USB-to-serial adapter to upload code to the ESP32-C3. Ensure the correct board and port are selected in your IDE (e.g., Arduino IDE or ESP-IDF).
Important Considerations and Best Practices
- Power Supply: Ensure a stable 3.3V power source to avoid damaging the module.
- Pull-up Resistors: Use pull-up resistors (typically 4.7kΩ) on the SDA and SCL lines if not already integrated.
- OLED Brightness: Prolong the OLED's lifespan by reducing brightness or using sleep modes when not in use.
- Firmware Updates: Keep the ESP32-C3 firmware updated for optimal performance and security.
Example Code for Arduino UNO
Below is an example of how to use the ESP32-C3 0.42 OLED with the Arduino IDE to display text on the OLED screen.
#include <Wire.h>
#include <Adafruit_GFX.h>
#include <Adafruit_SSD1306.h>

// Define OLED display dimensions
#define SCREEN_WIDTH 72
#define SCREEN_HEIGHT 40

// I2C address for the OLED display
#define OLED_ADDRESS 0x3C

// Create an instance of the SSD1306 display
Adafruit_SSD1306 display(SCREEN_WIDTH, SCREEN_HEIGHT, &Wire, -1);

void setup() {
  // Initialize serial communication for debugging
  Serial.begin(115200);

  // Initialize the OLED display
  if (!display.begin(SSD1306_I2C_ADDRESS, OLED_ADDRESS)) {
    Serial.println(F("OLED initialization failed!"));
    while (true); // Halt execution if OLED fails to initialize
  }

  // Clear the display buffer
  display.clearDisplay();

  // Set text size and color
  display.setTextSize(1); // Small text size
  display.setTextColor(SSD1306_WHITE);

  // Display a message
  display.setCursor(0, 0); // Start at top-left corner
  display.println(F("Hello, ESP32-C3!"));
  display.display(); // Render the text on the OLED
}

void loop() {
  // Add your main code here
}
Troubleshooting and FAQs
Common Issues and Solutions
OLED Display Not Turning On:
- Ensure the VCC and GND connections are secure.
- Verify the I2C address (
0x3C) in your code matches the OLED's address. - Check for proper pull-up resistors on the SDA and SCL lines.
ESP32-C3 Not Detected by IDE:
- Confirm the correct board and port are selected in the Arduino IDE.
- Ensure the USB-to-serial adapter drivers are installed on your computer.
Flickering or Dim OLED Display:
- Check the power supply voltage and current capacity.
- Reduce the brightness in your code to prevent overloading the OLED.
I2C Communication Errors:
- Verify the SDA and SCL connections.
- Use a logic analyzer to debug I2C signals if necessary.
FAQs
Q: Can I power the ESP32-C3 0.42 OLED with 5V?
A: No, the module operates at 3.3V. Using 5V may damage the module.
Q: What is the default I2C address of the OLED?
A: The default I2C address is 0x3C.
Q: Can I use the ESP32-C3 0.42 OLED with MicroPython?
A: Yes, the ESP32-C3 is compatible with MicroPython. You can use libraries like ssd1306.py to control the OLED.
Q: How do I reset the module?
A: Use the RST pin to reset the module by momentarily pulling it low.
This documentation provides a comprehensive guide to using the ESP32-C3 0.42 OLED module effectively. For further assistance, refer to the manufacturer's datasheet or support resources.