Cirkit Designer Logo
Cirkit Designer
Your all-in-one circuit design IDE
Home / 
Component Documentation

How to Use ESP32-S Chip: Examples, Pinouts, and Specs

Image of ESP32-S Chip
Cirkit Designer LogoDesign with ESP32-S Chip in Cirkit Designer

Introduction

The ESP32-S is a low-cost, low-power system on a chip (SoC) developed by Espressif Systems. It integrates both Wi-Fi and Bluetooth capabilities, making it an ideal choice for a wide range of IoT (Internet of Things) applications. The ESP32-S is designed to provide robust wireless communication, high processing power, and energy efficiency, all in a compact package.

Explore Projects Built with ESP32-S Chip

Use Cirkit Designer to design, explore, and prototype these projects online. Some projects support real-time simulation. Click "Open Project" to start designing instantly!
ESP32-Based Sensor Monitoring System with OLED Display and E-Stop
Image of MVP_design: A project utilizing ESP32-S Chip in a practical application
This circuit features an ESP32 microcontroller that interfaces with a variety of sensors and output devices. It is powered by a Lipo battery through a buck converter, ensuring a stable voltage supply. The ESP32 collects data from a DHT11 temperature and humidity sensor and a vibration sensor, controls a buzzer, and displays information on an OLED screen. An emergency stop (E Stop) is connected for safety purposes, allowing the system to be quickly deactivated.
Cirkit Designer LogoOpen Project in Cirkit Designer
ESP32-Based Environmental Monitoring System with Ultrasonic, Gas, and IR Sensors
Image of Automatic Object Sensing Smart Dustbin: A project utilizing ESP32-S Chip in a practical application
This circuit features an ESP32 microcontroller as the central processing unit, interfacing with a variety of sensors and output devices. It includes an HC-SR04 ultrasonic sensor for distance measurement, an IR sensor for object detection, an MQ-2 gas sensor for detecting combustible gases, and an OLED display for data visualization. Additionally, a Servomotor SG90 is connected for actuation purposes. The ESP32 reads sensor data and controls the servo based on programmed logic, which is not provided in the code input.
Cirkit Designer LogoOpen Project in Cirkit Designer
ESP32-Based LoRa Communication Device with OLED Display
Image of LoRa_Satellite_GS: A project utilizing ESP32-S Chip in a practical application
This circuit features an ESP32 microcontroller connected to a 0.96" OLED display and a LoRa Ra-02 SX1278 module for wireless communication. The ESP32 facilitates communication with the OLED display via I2C (SDA and SCK lines) and with the LoRa module via SPI (MISO, MOSI, SCK, NSS lines) and GPIO for control signals (DI00, DI01, RST). The circuit is designed for applications requiring wireless data transmission and visual data display.
Cirkit Designer LogoOpen Project in Cirkit Designer
ESP32-C3 and Micro SD Card Module for Data Logging
Image of Esp 32 super mini with MicroSd module: A project utilizing ESP32-S Chip in a practical application
This circuit features an ESP32-C3 microcontroller interfaced with a Micro SD Card Module. The ESP32-C3 handles SPI communication with the SD card for data storage and retrieval, with specific GPIO pins assigned for MOSI, MISO, SCK, and CS signals.
Cirkit Designer LogoOpen Project in Cirkit Designer

Explore Projects Built with ESP32-S Chip

Use Cirkit Designer to design, explore, and prototype these projects online. Some projects support real-time simulation. Click "Open Project" to start designing instantly!
Image of MVP_design: A project utilizing ESP32-S Chip in a practical application
ESP32-Based Sensor Monitoring System with OLED Display and E-Stop
This circuit features an ESP32 microcontroller that interfaces with a variety of sensors and output devices. It is powered by a Lipo battery through a buck converter, ensuring a stable voltage supply. The ESP32 collects data from a DHT11 temperature and humidity sensor and a vibration sensor, controls a buzzer, and displays information on an OLED screen. An emergency stop (E Stop) is connected for safety purposes, allowing the system to be quickly deactivated.
Cirkit Designer LogoOpen Project in Cirkit Designer
Image of Automatic Object Sensing Smart Dustbin: A project utilizing ESP32-S Chip in a practical application
ESP32-Based Environmental Monitoring System with Ultrasonic, Gas, and IR Sensors
This circuit features an ESP32 microcontroller as the central processing unit, interfacing with a variety of sensors and output devices. It includes an HC-SR04 ultrasonic sensor for distance measurement, an IR sensor for object detection, an MQ-2 gas sensor for detecting combustible gases, and an OLED display for data visualization. Additionally, a Servomotor SG90 is connected for actuation purposes. The ESP32 reads sensor data and controls the servo based on programmed logic, which is not provided in the code input.
Cirkit Designer LogoOpen Project in Cirkit Designer
Image of LoRa_Satellite_GS: A project utilizing ESP32-S Chip in a practical application
ESP32-Based LoRa Communication Device with OLED Display
This circuit features an ESP32 microcontroller connected to a 0.96" OLED display and a LoRa Ra-02 SX1278 module for wireless communication. The ESP32 facilitates communication with the OLED display via I2C (SDA and SCK lines) and with the LoRa module via SPI (MISO, MOSI, SCK, NSS lines) and GPIO for control signals (DI00, DI01, RST). The circuit is designed for applications requiring wireless data transmission and visual data display.
Cirkit Designer LogoOpen Project in Cirkit Designer
Image of Esp 32 super mini with MicroSd module: A project utilizing ESP32-S Chip in a practical application
ESP32-C3 and Micro SD Card Module for Data Logging
This circuit features an ESP32-C3 microcontroller interfaced with a Micro SD Card Module. The ESP32-C3 handles SPI communication with the SD card for data storage and retrieval, with specific GPIO pins assigned for MOSI, MISO, SCK, and CS signals.
Cirkit Designer LogoOpen Project in Cirkit Designer

Common Applications and Use Cases

  • Smart home devices (e.g., smart plugs, thermostats, and lighting systems)
  • Wearable electronics
  • Industrial IoT systems
  • Wireless sensor networks
  • Remote monitoring and control systems
  • Robotics and automation
  • Prototyping and development of IoT projects

Technical Specifications

The ESP32-S chip is packed with features that make it versatile and powerful. Below are its key technical specifications:

General Specifications

Parameter Value
Manufacturer Espressif Systems
Part ID ESP32-S
Core Architecture Dual-core Xtensa® 32-bit LX6
Clock Speed Up to 240 MHz
Wireless Connectivity Wi-Fi 802.11 b/g/n, Bluetooth v4.2 BR/EDR
Operating Voltage 3.0V to 3.6V
Flash Memory Up to 4 MB
SRAM 520 KB
GPIO Pins Up to 34
Operating Temperature -40°C to +85°C

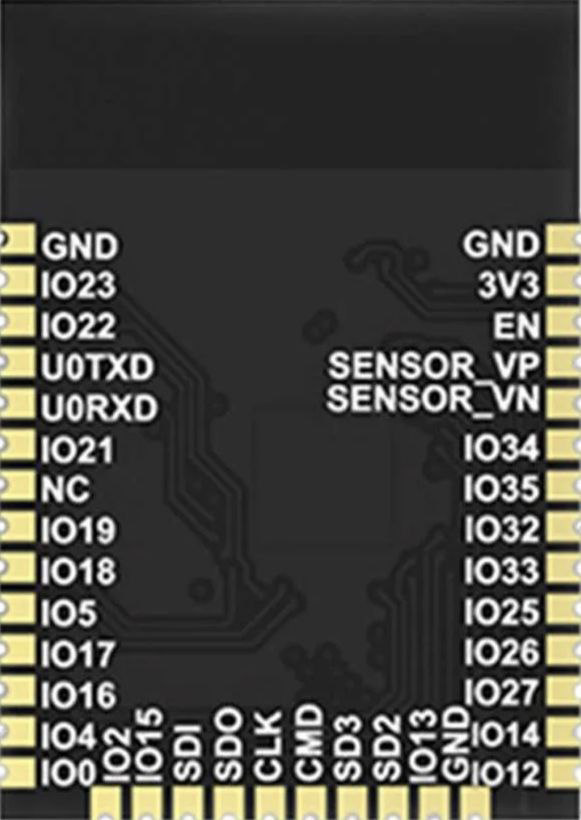
Pin Configuration and Descriptions

The ESP32-S chip has multiple pins for various functionalities. Below is a table summarizing the key pins and their descriptions:

Pin Name Pin Number Functionality
GPIO0 1 General-purpose I/O, boot mode selection
GPIO2 2 General-purpose I/O, ADC2 channel
GPIO12 12 General-purpose I/O, ADC2 channel, touch pad
GPIO13 13 General-purpose I/O, ADC2 channel, touch pad
GPIO15 15 General-purpose I/O, ADC2 channel, touch pad
EN 21 Chip enable (active high)
3V3 25 3.3V power supply input
GND 26 Ground

Note: The ESP32-S has many more pins with specific functionalities. Refer to the full datasheet for a complete pinout.

Usage Instructions

The ESP32-S chip is highly versatile and can be used in a variety of circuits. Below are the steps and best practices for using the ESP32-S in your projects:

Basic Circuit Setup

  1. Power Supply: Provide a stable 3.3V power supply to the 3V3 pin. Ensure the current rating of the power source meets the chip's requirements.
  2. Boot Mode: Connect GPIO0 to ground during boot to enable flashing mode.
  3. Programming: Use a USB-to-serial adapter to program the ESP32-S. Connect the adapter's TX and RX pins to the RX and TX pins of the ESP32-S, respectively.
  4. External Components: Add decoupling capacitors (e.g., 0.1 µF) near the power pins to reduce noise.

Example: Connecting to an Arduino UNO

The ESP32-S can communicate with an Arduino UNO via serial communication. Below is an example of how to connect and program the ESP32-S to send data to the Arduino:

Wiring Diagram

ESP32-S Pin Arduino UNO Pin
RX TX (Pin 1)
TX RX (Pin 0)
GND GND
3V3 3.3V

Example Code for ESP32-S

#include <WiFi.h>

// Replace with your network credentials
const char* ssid = "Your_SSID";
const char* password = "Your_PASSWORD";

void setup() {
  Serial.begin(115200); // Initialize serial communication at 115200 baud
  WiFi.begin(ssid, password); // Connect to Wi-Fi network

  // Wait for connection
  while (WiFi.status() != WL_CONNECTED) {
    delay(1000);
    Serial.println("Connecting to WiFi...");
  }

  Serial.println("Connected to WiFi!");
}

void loop() {
  // Send a message to the Arduino UNO
  Serial.println("Hello from ESP32-S!");
  delay(1000); // Wait for 1 second before sending the next message
}

Best Practices

  • Use level shifters if interfacing the ESP32-S with 5V logic devices.
  • Avoid powering the ESP32-S directly from USB without proper regulation.
  • Use an external antenna for better Wi-Fi range if the onboard antenna is insufficient.

Troubleshooting and FAQs

Common Issues and Solutions

  1. ESP32-S Not Connecting to Wi-Fi

    • Solution: Double-check the SSID and password. Ensure the router is within range and supports 2.4 GHz Wi-Fi (ESP32-S does not support 5 GHz).
  2. Serial Communication Not Working

    • Solution: Verify the TX and RX connections. Ensure the baud rate in the code matches the serial monitor settings.
  3. Chip Not Entering Flash Mode

    • Solution: Ensure GPIO0 is connected to ground during boot. Check the USB-to-serial adapter connections.
  4. Overheating

    • Solution: Ensure proper ventilation and avoid overloading the GPIO pins. Use a heatsink if necessary.

FAQs

Q: Can the ESP32-S operate on battery power?
A: Yes, the ESP32-S can be powered by a battery. Use a 3.3V regulator if the battery voltage exceeds the operating range.

Q: Does the ESP32-S support OTA (Over-the-Air) updates?
A: Yes, the ESP32-S supports OTA updates, allowing you to update firmware wirelessly.

Q: Can I use the ESP32-S for Bluetooth audio applications?
A: Yes, the ESP32-S supports Bluetooth Classic and BLE, making it suitable for audio streaming and other Bluetooth applications.

Q: How do I reset the ESP32-S?
A: Pull the EN pin low momentarily to reset the chip.

By following this documentation, you can effectively integrate the ESP32-S into your projects and troubleshoot common issues. For more advanced features, refer to the official Espressif Systems datasheet.