How to Use TDA7297 Amplifier: Examples, Pinouts, and Specs
Introduction
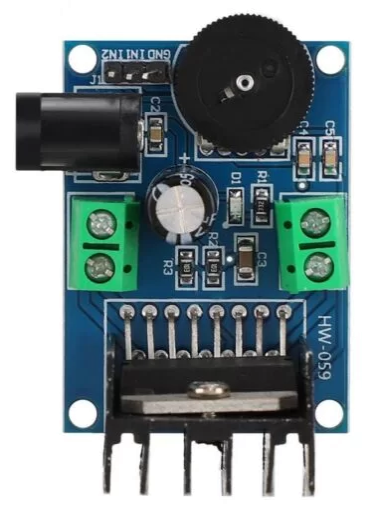
The TDA7297 Amplifier is a dual-channel power amplifier integrated circuit (IC) designed for high-quality audio applications. Manufactured by DAYPOWER NF, this IC is capable of delivering up to 15W per channel with low distortion, making it ideal for stereo audio systems. It features built-in thermal protection and short-circuit protection, ensuring reliable operation in demanding environments.
Explore Projects Built with TDA7297 Amplifier


Explore Projects Built with TDA7297 Amplifier
Common Applications
- Home audio systems
- Portable speaker systems
- Television audio amplifiers
- DIY audio amplifier projects
- Automotive audio systems
Technical Specifications
The TDA7297 Amplifier is designed to operate efficiently in a variety of audio applications. Below are its key technical specifications:
| Parameter | Value |
|---|---|
| Supply Voltage (Vcc) | 6V to 18V |
| Output Power | 15W per channel (at 8Ω, 10% THD) |
| Total Harmonic Distortion (THD) | ≤ 0.1% (at 1W, 1kHz) |
| Input Impedance | 30 kΩ |
| Gain | 32 dB |
| Operating Temperature | -20°C to +85°C |
| Protection Features | Thermal shutdown, short-circuit |
Pin Configuration and Descriptions
The TDA7297 comes in a 15-pin Multiwatt package. Below is the pinout and description:
| Pin Number | Pin Name | Description |
|---|---|---|
| 1 | IN1 | Input for Channel 1 |
| 2 | GND | Ground |
| 3 | SVR | Supply Voltage Rejection |
| 4 | OUT1+ | Positive Output for Channel 1 |
| 5 | OUT1- | Negative Output for Channel 1 |
| 6 | Vcc | Positive Supply Voltage |
| 7 | OUT2- | Negative Output for Channel 2 |
| 8 | OUT2+ | Positive Output for Channel 2 |
| 9 | GND | Ground |
| 10 | IN2 | Input for Channel 2 |
| 11-15 | NC | Not Connected (reserved for internal use) |
Usage Instructions
How to Use the TDA7297 in a Circuit
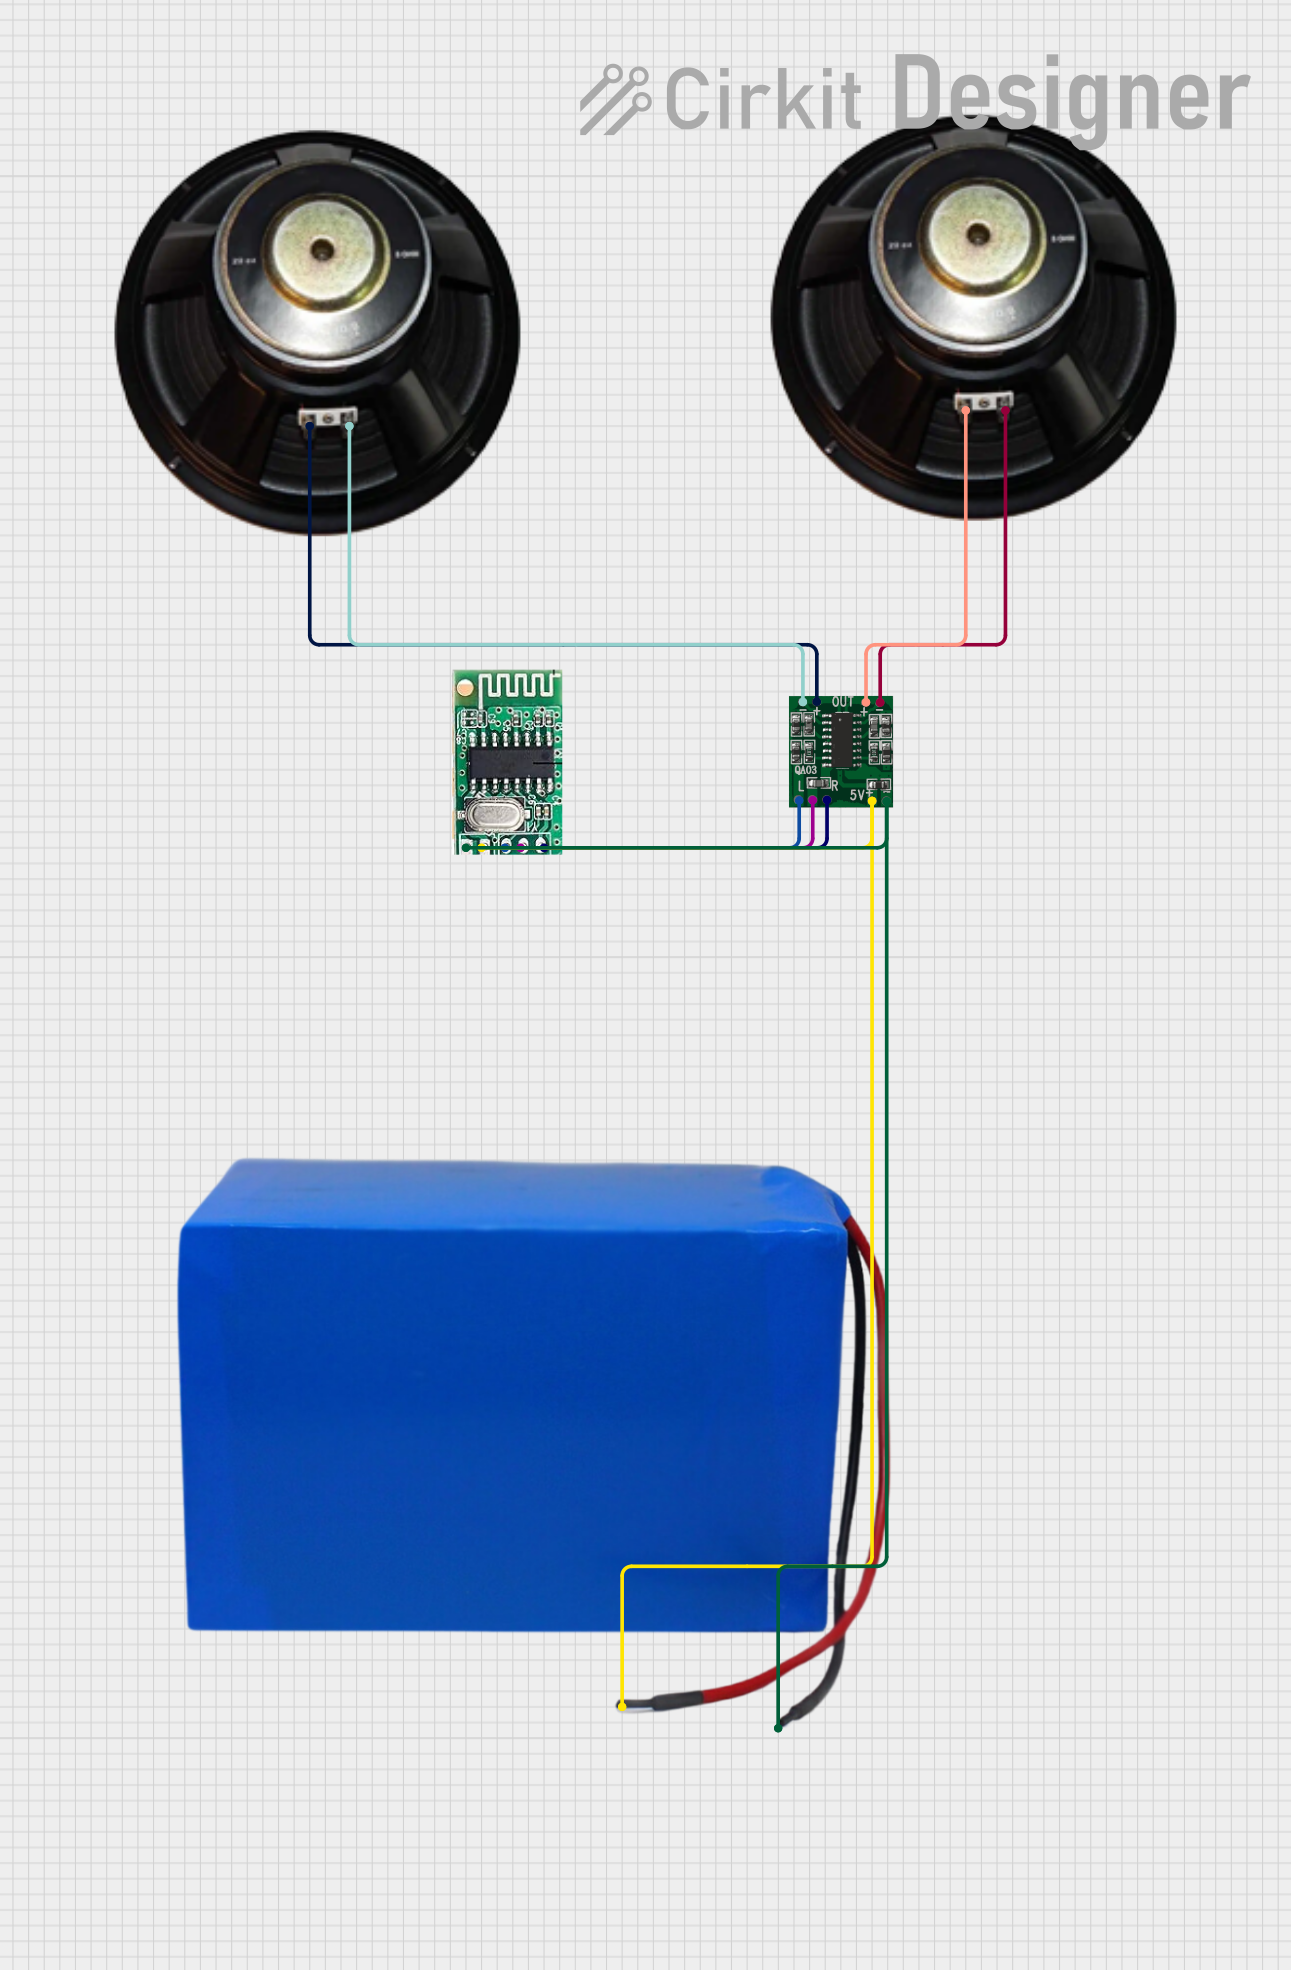
- Power Supply: Connect a DC power supply with a voltage between 6V and 18V to the Vcc pin. Ensure the power supply can provide sufficient current for the desired output power.
- Audio Input: Connect the audio signal source (e.g., a smartphone or audio player) to the IN1 and IN2 pins for stereo input. Use capacitors (e.g., 1µF) in series with the input to block DC offset.
- Speaker Connection: Connect the speakers to the OUT1+/- and OUT2+/- pins. Ensure the speakers have an impedance of 4Ω to 8Ω for optimal performance.
- Grounding: Connect all ground pins (GND) to a common ground point in the circuit.
- Heat Dissipation: Attach a heatsink to the IC to prevent overheating during operation.
Important Considerations
- Use decoupling capacitors (e.g., 100µF and 0.1µF) near the Vcc pin to stabilize the power supply and reduce noise.
- Avoid exceeding the maximum supply voltage (18V) to prevent damage to the IC.
- Ensure proper ventilation or use a heatsink to manage heat dissipation.
- Use shielded cables for audio input to minimize noise and interference.
Example: Connecting to an Arduino UNO
The TDA7297 can be used with an Arduino UNO to amplify audio signals. Below is an example of how to control the amplifier using the Arduino:
Circuit Connections
- Connect the audio input source to the IN1 and IN2 pins of the TDA7297.
- Connect the speakers to the OUT1+/- and OUT2+/- pins.
- Use the Arduino to control the power to the amplifier via a relay or transistor.
Example Code
// Example code to control the TDA7297 amplifier using an Arduino UNO
// This code turns the amplifier on and off using a digital pin.

const int amplifierControlPin = 7; // Pin connected to the amplifier control circuit

void setup() {
  pinMode(amplifierControlPin, OUTPUT); // Set the control pin as an output
  digitalWrite(amplifierControlPin, LOW); // Start with the amplifier off
}

void loop() {
  digitalWrite(amplifierControlPin, HIGH); // Turn the amplifier on
  delay(5000); // Keep it on for 5 seconds
  digitalWrite(amplifierControlPin, LOW); // Turn the amplifier off
  delay(5000); // Keep it off for 5 seconds
}
Note: Use a relay or transistor to control the power to the amplifier, as the Arduino cannot directly supply the required current.
Troubleshooting and FAQs
Common Issues and Solutions
No Sound Output
- Cause: Incorrect wiring or no input signal.
- Solution: Verify all connections and ensure the audio source is functioning.
Distorted Sound
- Cause: Insufficient power supply or speaker impedance mismatch.
- Solution: Use a power supply with adequate current capacity and ensure the speakers have an impedance of 4Ω to 8Ω.
Overheating
- Cause: Prolonged high-power operation without proper heat dissipation.
- Solution: Attach a heatsink to the IC and ensure proper ventilation.
Humming or Noise
- Cause: Ground loop or interference.
- Solution: Use shielded cables for audio input and ensure a single ground point.
FAQs
Q1: Can I use the TDA7297 with a 4Ω speaker?
A1: Yes, the TDA7297 supports speakers with an impedance of 4Ω to 8Ω. However, ensure proper heat dissipation when using 4Ω speakers, as they draw more current.
Q2: What is the maximum output power of the TDA7297?
A2: The TDA7297 can deliver up to 15W per channel at 8Ω with 10% THD.
Q3: Can I use the TDA7297 with a battery-powered system?
A3: Yes, as long as the battery voltage is within the range of 6V to 18V and can supply sufficient current.
Q4: Do I need a heatsink for the TDA7297?
A4: Yes, a heatsink is recommended to prevent overheating during high-power operation.
By following this documentation, you can effectively integrate the TDA7297 Amplifier into your audio projects and achieve high-quality sound output.