How to Use Slave OpenTherm Shield: Examples, Pinouts, and Specs
Introduction
The Slave OpenTherm Shield (manufacturer part ID: slave_ot_shield) by DIYLESS is a communication interface designed to connect devices to OpenTherm systems. OpenTherm is a widely used protocol for communication between heating appliances (e.g., boilers) and control systems (e.g., thermostats). This shield enables efficient data exchange, making it ideal for smart home applications, energy management systems, and advanced heating control solutions.
Explore Projects Built with Slave OpenTherm Shield


Explore Projects Built with Slave OpenTherm Shield
Common Applications and Use Cases
- Smart thermostats for residential and commercial heating systems
- Energy-efficient heating control and monitoring
- Integration of IoT devices with OpenTherm-compatible appliances
- Prototyping and development of OpenTherm-based systems
- Retrofitting older heating systems with modern control capabilities
Technical Specifications
Key Technical Details
| Parameter | Value |
|---|---|
| Operating Voltage | 5V (powered via Arduino or external source) |
| Communication Protocol | OpenTherm (Master-Slave) |
| Current Consumption | ~20mA |
| Operating Temperature | -20°C to 70°C |
| Dimensions | 68mm x 53mm (fits standard Arduino shields) |
| Compatibility | Arduino UNO, Mega, and similar boards |
| Safety Features | Galvanic isolation for safe operation |
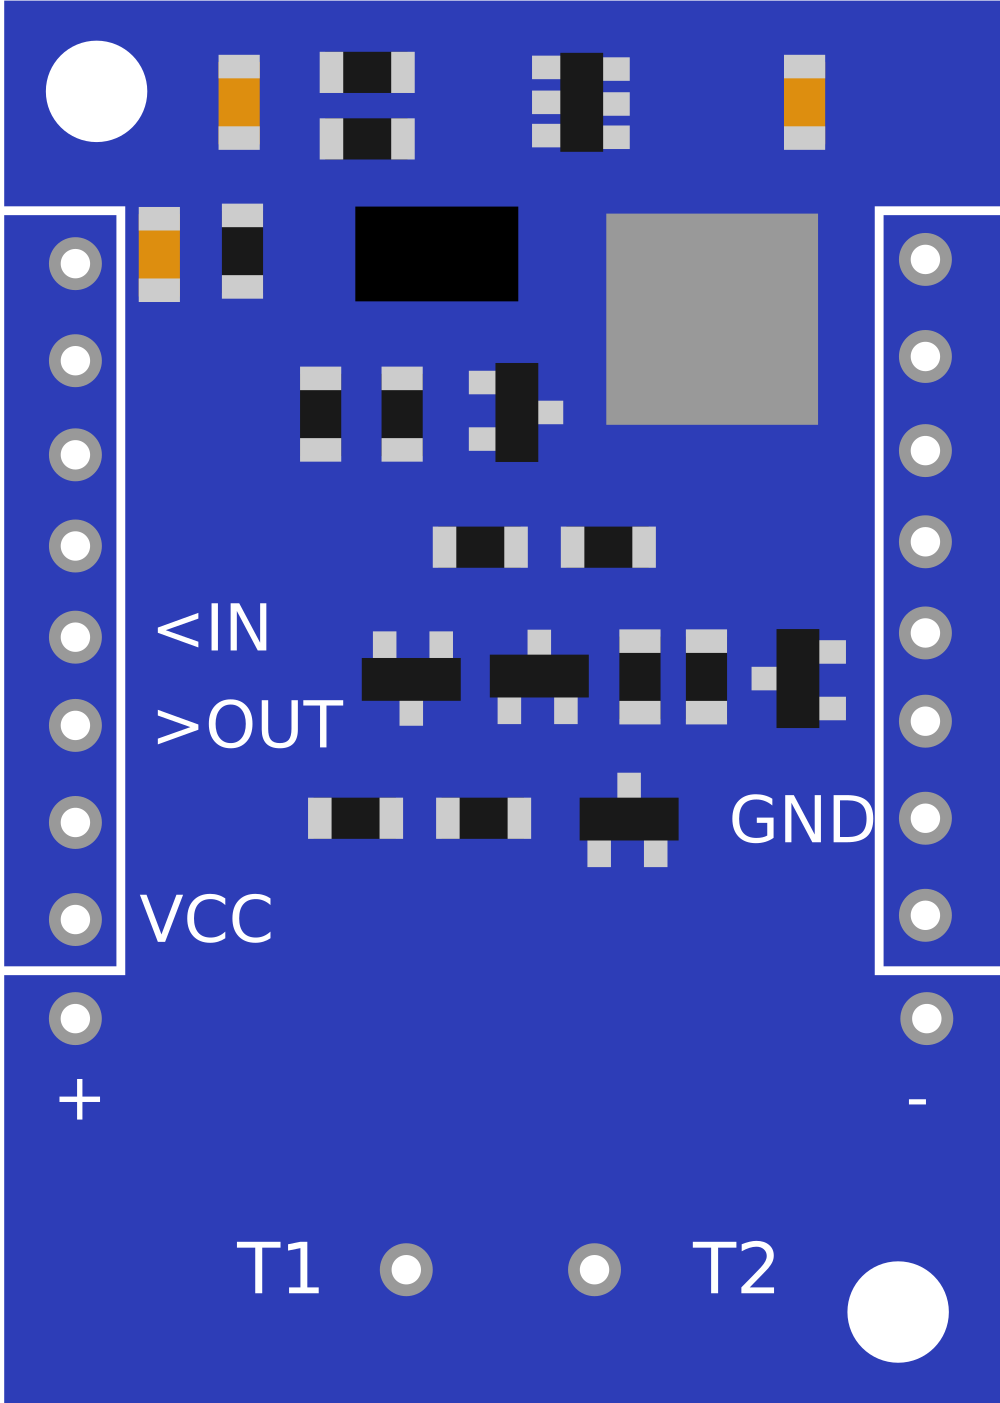
Pin Configuration and Descriptions
The Slave OpenTherm Shield is designed to interface with an Arduino board. Below is the pin configuration:
| Pin Name | Arduino Pin Mapping | Description |
|---|---|---|
| OT_IN | D2 | OpenTherm input signal (from boiler or master) |
| OT_OUT | D3 | OpenTherm output signal (to boiler or master) |
| GND | GND | Ground connection |
| VCC | 5V | Power supply (5V) |
| LED1 | - | Status LED for communication activity |
| LED2 | - | Error indication LED |
Usage Instructions
How to Use the Component in a Circuit
Hardware Setup:
- Mount the Slave OpenTherm Shield onto an Arduino UNO or compatible board.
- Connect the OpenTherm interface terminals (OT_IN and OT_OUT) to the corresponding terminals on the heating appliance or control system.
- Ensure the shield is powered via the Arduino or an external 5V power source.
Software Setup:
- Install the required OpenTherm library for Arduino. You can use the OpenTherm Arduino Library for this purpose.
- Write or upload a sketch to communicate with the heating appliance using the OpenTherm protocol.
Example Code: Below is an example Arduino sketch to read data from a boiler and send commands using the Slave OpenTherm Shield:
#include <OpenTherm.h> // Include the OpenTherm library const int OT_IN_PIN = 2; // OpenTherm input pin const int OT_OUT_PIN = 3; // OpenTherm output pin OpenTherm ot(OT_IN_PIN, OT_OUT_PIN); // Initialize OpenTherm object void setup() { Serial.begin(9600); // Start serial communication ot.begin(); // Initialize OpenTherm communication Serial.println("Slave OpenTherm Shield Initialized"); } void loop() { // Check if data is available from the master (e.g., thermostat) if (ot.isReady()) { unsigned long request = ot.getRequest(); // Get the request from the master unsigned long response = ot.buildResponse(request); // Build a response ot.sendResponse(response); // Send the response back to the master // Print the request and response for debugging Serial.print("Request: "); Serial.println(request, HEX); Serial.print("Response: "); Serial.println(response, HEX); } }Note: Ensure the OpenTherm library is installed in your Arduino IDE before uploading the code.
Important Considerations and Best Practices
- Galvanic Isolation: The shield includes galvanic isolation to protect the Arduino and connected devices. Ensure proper wiring to maintain isolation.
- Power Supply: Use a stable 5V power source to avoid communication errors.
- Protocol Compliance: The shield is designed for OpenTherm systems. Do not use it with non-OpenTherm devices.
- Debugging: Use the onboard LEDs to monitor communication status and errors.
Troubleshooting and FAQs
Common Issues and Solutions
| Issue | Possible Cause | Solution |
|---|---|---|
| No communication with the boiler | Incorrect wiring or loose connections | Verify all connections and pin mappings. |
| Error LED is ON | Protocol mismatch or hardware fault | Check if the connected device supports OpenTherm. Ensure the shield is functioning properly. |
| Arduino not responding | Insufficient power supply | Ensure the Arduino and shield are powered correctly. |
| Data corruption or noise | Electrical interference | Use shielded cables for OT_IN and OT_OUT. |
FAQs
Can I use this shield with a Raspberry Pi?
- The shield is designed for Arduino boards. However, with proper level shifting and GPIO handling, it may be adapted for use with a Raspberry Pi.
What is the maximum cable length for OT_IN and OT_OUT?
- OpenTherm supports cable lengths up to 50 meters, but shorter lengths are recommended for optimal performance.
Is the shield compatible with all OpenTherm devices?
- The shield is compatible with devices that adhere to the OpenTherm protocol. Always check the device specifications before use.
How do I update the firmware on the shield?
- The shield does not require firmware updates. All logic is handled by the Arduino and the OpenTherm library.
By following this documentation, you can effectively integrate the Slave OpenTherm Shield into your projects and take full advantage of its capabilities.