Cirkit Designer Logo
Cirkit Designer
Your all-in-one circuit design IDE
Home / 
Component Documentation

How to Use Adafruit Perma-Proto Bonnet: Examples, Pinouts, and Specs

Image of Adafruit Perma-Proto Bonnet
Cirkit Designer LogoDesign with Adafruit Perma-Proto Bonnet in Cirkit Designer

Introduction

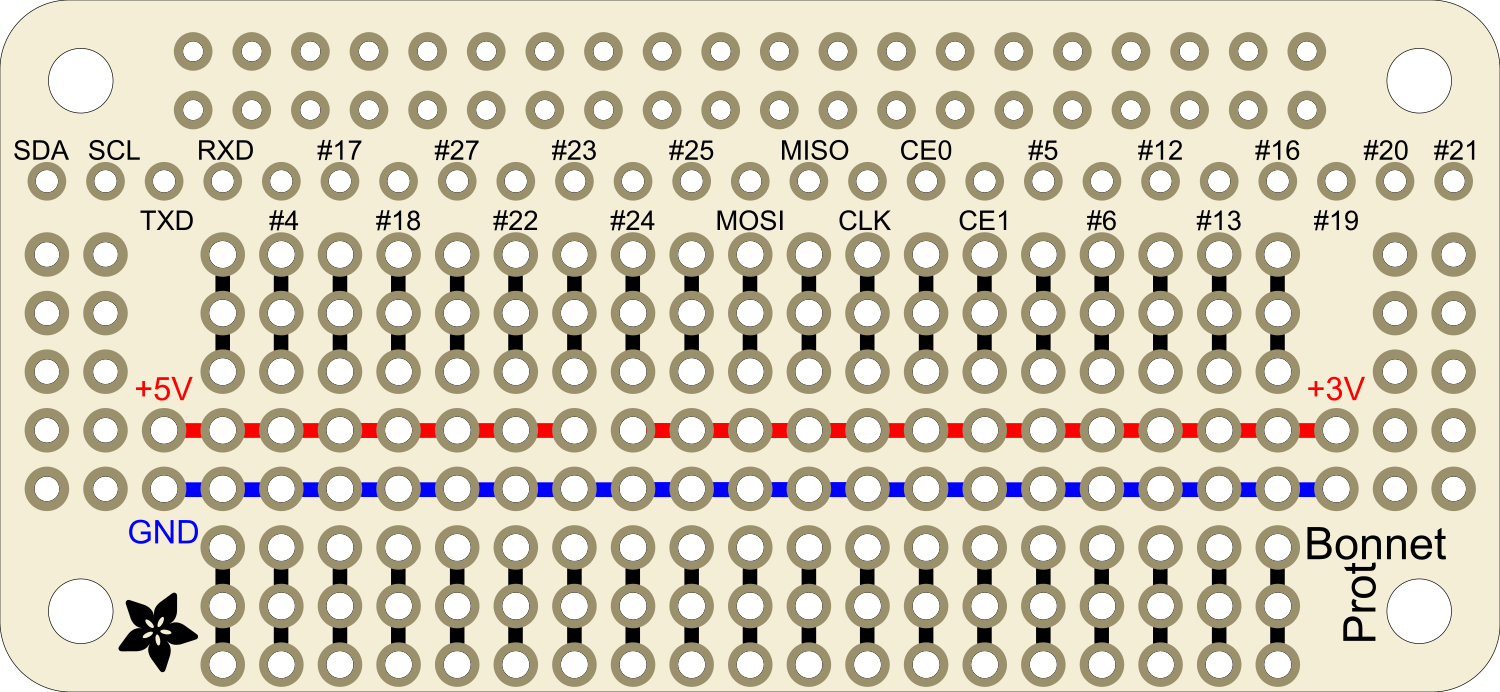
The Adafruit Perma-Proto Bonnet is a versatile prototyping board designed for use with the Raspberry Pi. This board mimics the layout of a breadboard but allows for permanent soldering of components, creating a durable and reusable platform for developing custom circuits. It is ideal for hobbyists, educators, and professionals who require a stable prototype that can be used repeatedly or integrated into a final project.

Explore Projects Built with Adafruit Perma-Proto Bonnet

Use Cirkit Designer to design, explore, and prototype these projects online. Some projects support real-time simulation. Click "Open Project" to start designing instantly!
Raspberry Pi 4B-Based Multi-Sensor Interface Hub with GPS and GSM
Image of Rocket: A project utilizing Adafruit Perma-Proto Bonnet in a practical application
This circuit features a Raspberry Pi 4B interfaced with an IMX296 color global shutter camera, a Neo 6M GPS module, an Adafruit BMP388 barometric pressure sensor, an MPU-6050 accelerometer/gyroscope, and a Sim800l GSM module for cellular connectivity. Power management is handled by an MT3608 boost converter, which steps up the voltage from a Lipo battery, with a resettable fuse PTC and a 1N4007 diode for protection. The Adafruit Perma-Proto HAT is used for organizing connections and interfacing the sensors and modules with the Raspberry Pi via I2C and GPIO pins.
Cirkit Designer LogoOpen Project in Cirkit Designer
Battery-Powered Smart Sensor Hub with Adafruit QT Py RP2040
Image of wearable final: A project utilizing Adafruit Perma-Proto Bonnet in a practical application
This circuit features an Adafruit QT Py RP2040 microcontroller interfaced with an APDS9960 proximity sensor, an MPU6050 accelerometer and gyroscope, and an OLED display via I2C communication. It also includes a buzzer controlled by the microcontroller and is powered by a 3.7V LiPo battery with a toggle switch for power control.
Cirkit Designer LogoOpen Project in Cirkit Designer
Arduino-Based Temperature Monitoring System with RGB LED Feedback and I2C LCD Display
Image of wemos custom shield: A project utilizing Adafruit Perma-Proto Bonnet in a practical application
This circuit features an Adafruit Proto Shield R3 configured with a DS18B20 temperature sensor, a WS2812 RGB LED matrix, and an LCD I2C display. The microcontroller on the Proto Shield reads the temperature from the DS18B20 sensor and displays it on the LCD. It also controls the LED matrix to show random colors and indicates temperature status with onboard LEDs.
Cirkit Designer LogoOpen Project in Cirkit Designer
Battery-Powered Smart Light with Proximity Sensor and OLED Display using Adafruit QT Py RP2040
Image of lab: A project utilizing Adafruit Perma-Proto Bonnet in a practical application
This circuit is a portable, battery-powered system featuring an Adafruit QT Py RP2040 microcontroller that interfaces with an OLED display, a proximity sensor, an accelerometer, and an RGB LED strip. The system is powered by a lithium-ion battery with a step-up boost converter to provide 5V for the LED strip, and it includes a toggle switch for power control. The microcontroller communicates with the sensors and display via I2C.
Cirkit Designer LogoOpen Project in Cirkit Designer

Explore Projects Built with Adafruit Perma-Proto Bonnet

Use Cirkit Designer to design, explore, and prototype these projects online. Some projects support real-time simulation. Click "Open Project" to start designing instantly!
Image of Rocket: A project utilizing Adafruit Perma-Proto Bonnet in a practical application
Raspberry Pi 4B-Based Multi-Sensor Interface Hub with GPS and GSM
This circuit features a Raspberry Pi 4B interfaced with an IMX296 color global shutter camera, a Neo 6M GPS module, an Adafruit BMP388 barometric pressure sensor, an MPU-6050 accelerometer/gyroscope, and a Sim800l GSM module for cellular connectivity. Power management is handled by an MT3608 boost converter, which steps up the voltage from a Lipo battery, with a resettable fuse PTC and a 1N4007 diode for protection. The Adafruit Perma-Proto HAT is used for organizing connections and interfacing the sensors and modules with the Raspberry Pi via I2C and GPIO pins.
Cirkit Designer LogoOpen Project in Cirkit Designer
Image of wearable final: A project utilizing Adafruit Perma-Proto Bonnet in a practical application
Battery-Powered Smart Sensor Hub with Adafruit QT Py RP2040
This circuit features an Adafruit QT Py RP2040 microcontroller interfaced with an APDS9960 proximity sensor, an MPU6050 accelerometer and gyroscope, and an OLED display via I2C communication. It also includes a buzzer controlled by the microcontroller and is powered by a 3.7V LiPo battery with a toggle switch for power control.
Cirkit Designer LogoOpen Project in Cirkit Designer
Image of wemos custom shield: A project utilizing Adafruit Perma-Proto Bonnet in a practical application
Arduino-Based Temperature Monitoring System with RGB LED Feedback and I2C LCD Display
This circuit features an Adafruit Proto Shield R3 configured with a DS18B20 temperature sensor, a WS2812 RGB LED matrix, and an LCD I2C display. The microcontroller on the Proto Shield reads the temperature from the DS18B20 sensor and displays it on the LCD. It also controls the LED matrix to show random colors and indicates temperature status with onboard LEDs.
Cirkit Designer LogoOpen Project in Cirkit Designer
Image of lab: A project utilizing Adafruit Perma-Proto Bonnet in a practical application
Battery-Powered Smart Light with Proximity Sensor and OLED Display using Adafruit QT Py RP2040
This circuit is a portable, battery-powered system featuring an Adafruit QT Py RP2040 microcontroller that interfaces with an OLED display, a proximity sensor, an accelerometer, and an RGB LED strip. The system is powered by a lithium-ion battery with a step-up boost converter to provide 5V for the LED strip, and it includes a toggle switch for power control. The microcontroller communicates with the sensors and display via I2C.
Cirkit Designer LogoOpen Project in Cirkit Designer

Common Applications and Use Cases

  • Rapid prototyping of electronic circuits
  • Educational projects for learning electronics and programming
  • Development of custom Raspberry Pi HATs (Hardware Attached on Top)
  • Building embedded systems and IoT devices
  • Creating permanent fixtures for hobby projects

Technical Specifications

Key Technical Details

  • Dimensions: 65mm x 30.5mm x 2mm / 2.6" x 1.2" x 0.08"
  • Weight: 12g / 0.4oz
  • Material: High-quality FR4
  • Hole Grid: 0.1" (2.54mm) spacing
  • Hole Diameter: 0.9mm / 0.04"
  • Power Rails: Two sets of power rails along the sides

Pin Configuration and Descriptions

Pin Number Description
1-40 Corresponds to Raspberry Pi GPIO
A-J Horizontal rows for components
1-10 Vertical columns for components

Usage Instructions

Integrating with Raspberry Pi

  1. Planning Your Circuit:

    • Before soldering, plan your circuit using a breadboard to ensure functionality.
    • Use the silkscreen labels on the Bonnet to align with the GPIO pins of the Raspberry Pi.
  2. Soldering Components:

    • Insert components through the top side of the Bonnet.
    • Solder components on the bottom side, ensuring good solder joints and avoiding bridges between adjacent pads.
  3. Connecting to Raspberry Pi:

    • Carefully align the GPIO pins of the Raspberry Pi with the Bonnet's pin headers.
    • Press down evenly to avoid bending pins.

Important Considerations and Best Practices

  • Power Handling: Ensure that the power supplied to the Bonnet does not exceed the Raspberry Pi's GPIO pin ratings.
  • Short Circuits: Double-check for potential short circuits before powering up the Raspberry Pi.
  • Static Discharge: Use proper grounding to prevent static discharge that could damage the components.
  • Component Orientation: Pay attention to the polarity of components like diodes, LEDs, and capacitors.

Troubleshooting and FAQs

Common Issues

  • Non-Responsive Circuit:

    • Check for cold solder joints or missed connections.
    • Verify that all components are correctly oriented and seated.
  • Short Circuits:

    • Inspect the bottom of the Bonnet for solder bridges.
    • Use a multimeter to check for continuity where there should be none.

Solutions and Tips

  • Cold Solder Joints:

    • Reheat the solder joint until the solder flows smoothly around the pin and pad.
  • Solder Bridges:

    • Use solder wick or a desoldering pump to remove excess solder.
    • A fine-tipped soldering iron can also be used to drag solder away from the bridge.

FAQs

Q: Can I reuse the Perma-Proto Bonnet after desoldering components? A: Yes, with care during desoldering, the Bonnet can be reused for other projects.

Q: Is the Bonnet compatible with all models of Raspberry Pi? A: The Bonnet is designed to fit any Raspberry Pi with a 40-pin GPIO connector.

Q: How do I connect wires to the power rails? A: Solder the wires directly to the power rail pads, ensuring a secure connection.

Example Code

The following is an example of how to blink an LED connected to the Bonnet using Python on a Raspberry Pi:

import RPi.GPIO as GPIO
import time

Setup

LED_PIN = 18 # GPIO pin connected to the LED GPIO.setmode(GPIO.BCM) GPIO.setup(LED_PIN, GPIO.OUT)

Blink loop

try: while True: GPIO.output(LED_PIN, GPIO.HIGH) # Turn on LED time.sleep(1) # Wait 1 second GPIO.output(LED_PIN, GPIO.LOW) # Turn off LED time.sleep(1) # Wait 1 second except KeyboardInterrupt: GPIO.cleanup() # Clean up GPIO on CTRL+C exit

GPIO.cleanup() # Clean up GPIO on normal exit


Remember to run the code with `sudo` privileges to allow GPIO access. This simple script will blink an LED on and off every second until the program is interrupted.

**Note:** The code comments are wrapped to ensure they do not exceed 80 characters per line, adhering to the specified line length limit.