Cirkit Designer
Your all-in-one circuit design IDE
Home /
Component Documentation
How to Use ESP32-C6 SuperMini: Examples, Pinouts, and Specs
Introduction
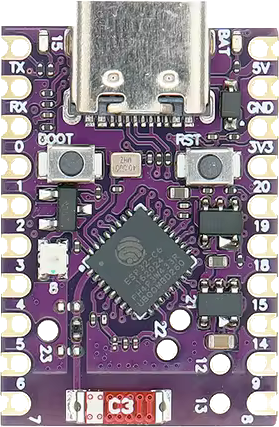
The ESP32-C6 SuperMini is a compact microcontroller module manufactured by Tenstar Robot. It integrates Wi-Fi and Bluetooth capabilities, making it an ideal choice for Internet of Things (IoT) applications. This module is designed to offer low power consumption and high performance, making it suitable for a wide range of applications, from home automation to industrial control systems.
Explore Projects Built with ESP32-C6 SuperMini
ESP32C3 Supermini-Based Smart Environment Monitor and Lighting Control System

This is a smart control system featuring an ESP32C3 Supermini microcontroller for interfacing with various sensors and actuators. It includes temperature and humidity sensing, RGB LED strip control, user input via a pushbutton and rotary encoder, and AC power control through a two-channel relay. The system is powered by an AC source converted to DC by the HLK-PM12 module.
ESP32C3 and LoRa-Enabled Environmental Sensing Node

This circuit features an ESP32C3 Supermini microcontroller connected to a LORA_RA02 module and a DHT11 temperature and humidity sensor. The ESP32C3 handles communication with the LORA module via SPI (using GPIO05, GPIO06, GPIO10, and GPIO04 for MISO, MOSI, NSS, and SCK respectively) and GPIO01 and GPIO02 for additional control signals. The DHT11 sensor is interfaced through GPIO03 for data reading, and all components share a common power supply through the 3.3V and GND pins.
ESP32-C6 and ST7735S Display: Wi-Fi Controlled TFT Display Module

This circuit features an ESP32-C6 microcontroller interfaced with a China ST7735S 160x128 TFT display. The ESP32-C6 controls the display via SPI communication, providing power, ground, and control signals to render graphics and text on the screen.
ESP32-C3 and Micro SD Card Module for Data Logging

This circuit features an ESP32-C3 microcontroller interfaced with a Micro SD Card Module. The ESP32-C3 handles SPI communication with the SD card for data storage and retrieval, with specific GPIO pins assigned for MOSI, MISO, SCK, and CS signals.
Explore Projects Built with ESP32-C6 SuperMini
ESP32C3 Supermini-Based Smart Environment Monitor and Lighting Control System
This is a smart control system featuring an ESP32C3 Supermini microcontroller for interfacing with various sensors and actuators. It includes temperature and humidity sensing, RGB LED strip control, user input via a pushbutton and rotary encoder, and AC power control through a two-channel relay. The system is powered by an AC source converted to DC by the HLK-PM12 module.
ESP32C3 and LoRa-Enabled Environmental Sensing Node
This circuit features an ESP32C3 Supermini microcontroller connected to a LORA_RA02 module and a DHT11 temperature and humidity sensor. The ESP32C3 handles communication with the LORA module via SPI (using GPIO05, GPIO06, GPIO10, and GPIO04 for MISO, MOSI, NSS, and SCK respectively) and GPIO01 and GPIO02 for additional control signals. The DHT11 sensor is interfaced through GPIO03 for data reading, and all components share a common power supply through the 3.3V and GND pins.
ESP32-C6 and ST7735S Display: Wi-Fi Controlled TFT Display Module
This circuit features an ESP32-C6 microcontroller interfaced with a China ST7735S 160x128 TFT display. The ESP32-C6 controls the display via SPI communication, providing power, ground, and control signals to render graphics and text on the screen.
ESP32-C3 and Micro SD Card Module for Data Logging
This circuit features an ESP32-C3 microcontroller interfaced with a Micro SD Card Module. The ESP32-C3 handles SPI communication with the SD card for data storage and retrieval, with specific GPIO pins assigned for MOSI, MISO, SCK, and CS signals.
Common Applications and Use Cases
- Home Automation: Control smart home devices such as lights, thermostats, and security systems.
- Wearable Devices: Integrate into smartwatches, fitness trackers, and health monitoring devices.
- Industrial Automation: Monitor and control industrial processes and machinery.
- Environmental Monitoring: Collect and transmit data from sensors measuring temperature, humidity, air quality, etc.
- Robotics: Enable wireless communication and control for robotic systems.
Technical Specifications
Key Technical Details
| Parameter | Value |
|---|---|
| Manufacturer | Tenstar Robot |
| Part ID | ESP32-C6 SuperMini |
| Operating Voltage | 3.3V |
| Input Voltage | 5V (via USB) |
| Digital I/O Pins | 22 |
| Analog Input Pins | 6 |
| Flash Memory | 4MB |
| SRAM | 320KB |
| Wi-Fi Standards | 802.11 b/g/n |
| Bluetooth Version | Bluetooth 5.0 |
| Power Consumption | Ultra-low power consumption in deep sleep |
| Dimensions | 18mm x 25mm |
Pin Configuration and Descriptions
| Pin Number | Pin Name | Description |
|---|---|---|
| 1 | GND | Ground |
| 2 | 3V3 | 3.3V Power Supply |
| 3 | EN | Enable Pin (Active High) |
| 4 | IO0 | GPIO0, used for boot mode selection |
| 5 | IO1 | GPIO1, general-purpose I/O |
| 6 | IO2 | GPIO2, general-purpose I/O |
| 7 | IO3 | GPIO3, general-purpose I/O |
| 8 | IO4 | GPIO4, general-purpose I/O |
| 9 | IO5 | GPIO5, general-purpose I/O |
| 10 | IO6 | GPIO6, general-purpose I/O |
| 11 | IO7 | GPIO7, general-purpose I/O |
| 12 | IO8 | GPIO8, general-purpose I/O |
| 13 | IO9 | GPIO9, general-purpose I/O |
| 14 | IO10 | GPIO10, general-purpose I/O |
| 15 | IO11 | GPIO11, general-purpose I/O |
| 16 | IO12 | GPIO12, general-purpose I/O |
| 17 | IO13 | GPIO13, general-purpose I/O |
| 18 | IO14 | GPIO14, general-purpose I/O |
| 19 | IO15 | GPIO15, general-purpose I/O |
| 20 | IO16 | GPIO16, general-purpose I/O |
| 21 | IO17 | GPIO17, general-purpose I/O |
| 22 | IO18 | GPIO18, general-purpose I/O |
Usage Instructions
How to Use the Component in a Circuit
Power Supply:
- Connect the 3V3 pin to a 3.3V power source.
- Connect the GND pin to the ground of your circuit.
Programming:
- Use a USB-to-Serial adapter to connect the ESP32-C6 SuperMini to your computer.
- Connect the TX and RX pins of the adapter to the RX and TX pins of the ESP32-C6 SuperMini, respectively.
- Connect the EN pin to the 3.3V power supply to enable the module.
GPIO Usage:
- Connect your sensors, actuators, or other peripherals to the GPIO pins as needed.
- Configure the GPIO pins in your code to set them as input or output.
Important Considerations and Best Practices
- Voltage Levels: Ensure that all connected devices operate at 3.3V logic levels to avoid damaging the ESP32-C6 SuperMini.
- Power Consumption: Utilize the deep sleep mode to minimize power consumption in battery-powered applications.
- Antenna Placement: Ensure that the onboard antenna has a clear path for optimal Wi-Fi and Bluetooth performance.
Example Code for Arduino UNO
#include <WiFi.h>

// Replace with your network credentials
const char* ssid = "your_SSID";
const char* password = "your_PASSWORD";

void setup() {
  // Initialize serial communication
  Serial.begin(115200);

  // Connect to Wi-Fi
  WiFi.begin(ssid, password);

  // Wait for connection
  while (WiFi.status() != WL_CONNECTED) {
    delay(1000);
    Serial.println("Connecting to WiFi...");
  }

  // Print the IP address
  Serial.println("Connected to WiFi");
  Serial.print("IP Address: ");
  Serial.println(WiFi.localIP());
}

void loop() {
  // Your main code here
}
Troubleshooting and FAQs
Common Issues Users Might Face
Wi-Fi Connection Issues:
- Ensure that the SSID and password are correct.
- Check if the Wi-Fi network is within range.
- Verify that the antenna is not obstructed.
Power Supply Problems:
- Ensure that the power supply provides a stable 3.3V.
- Check for loose connections or damaged wires.
Programming Errors:
- Verify that the correct board and port are selected in the Arduino IDE.
- Ensure that the USB-to-Serial adapter is properly connected.
Solutions and Tips for Troubleshooting
- Reset the Module: If the module is unresponsive, try resetting it by briefly disconnecting and reconnecting the EN pin.
- Check Serial Monitor: Use the Serial Monitor in the Arduino IDE to view debug messages and identify issues.
- Update Firmware: Ensure that the ESP32-C6 SuperMini has the latest firmware version installed.
By following this documentation, users can effectively integrate the ESP32-C6 SuperMini into their projects, leveraging its powerful features for a wide range of applications.