How to Use 3 Contact Female Socket: Examples, Pinouts, and Specs
Introduction
A 3 Contact Female Socket is an electrical connector designed to receive and secure three male pins or plugs, facilitating the connection of electrical circuits. This component is widely used in electronics for creating reliable and detachable connections between devices or circuit modules. Its compact design and versatility make it suitable for a variety of applications, including prototyping, power distribution, and signal transmission.
Explore Projects Built with 3 Contact Female Socket


Explore Projects Built with 3 Contact Female Socket
Common Applications and Use Cases
- Prototyping and Development: Used in breadboards and custom PCBs for connecting modules.
- Power Connections: Facilitates the transfer of power between components.
- Signal Transmission: Commonly used in audio, data, and control signal connections.
- Consumer Electronics: Found in devices like chargers, adapters, and small appliances.
Technical Specifications
The 3 Contact Female Socket is designed to meet the needs of low to medium power and signal applications. Below are its key specifications:
| Parameter | Value |
|---|---|
| Number of Contacts | 3 |
| Contact Material | Copper alloy (often gold-plated) |
| Insulation Material | Thermoplastic or similar polymer |
| Voltage Rating | Up to 250V AC/DC |
| Current Rating | Typically 2A to 5A |
| Operating Temperature | -40°C to +85°C |
| Mounting Type | Through-hole or panel mount |
| Durability | 500 to 1000 mating cycles |
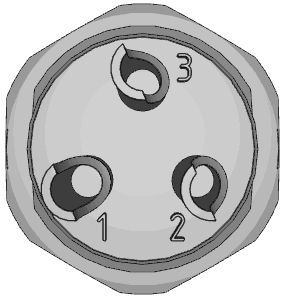
Pin Configuration and Descriptions
The 3 Contact Female Socket has three pins, typically arranged in a straight or triangular configuration. Below is a general description of the pin layout:
| Pin Number | Description |
|---|---|
| Pin 1 | Signal or Power Line 1 |
| Pin 2 | Signal or Power Line 2 |
| Pin 3 | Ground or Common Line |
Note: The exact pin configuration may vary depending on the manufacturer. Always refer to the datasheet for specific details.
Usage Instructions
How to Use the Component in a Circuit
- Mounting the Socket:
- For through-hole sockets, insert the pins into the PCB holes and solder them securely.
- For panel-mount sockets, secure the socket to the panel using screws or a locking mechanism.
- Connecting Wires or Plugs:
- Ensure the male plug or pins match the socket's pin configuration.
- Insert the male connector into the female socket until it clicks or fits snugly.
- Wiring:
- Connect the socket's pins to the appropriate circuit points (e.g., power, ground, or signal lines).
- Use heat shrink tubing or insulation to protect exposed solder joints.
Important Considerations and Best Practices
- Voltage and Current Ratings: Ensure the socket's ratings match or exceed the circuit's requirements.
- Polarity: Double-check the pin assignments to avoid incorrect connections.
- Durability: Avoid excessive force when inserting or removing plugs to maintain the socket's lifespan.
- Environmental Conditions: Protect the socket from moisture, dust, and extreme temperatures to ensure reliable operation.
Example: Connecting to an Arduino UNO
The 3 Contact Female Socket can be used to connect external modules or sensors to an Arduino UNO. Below is an example of wiring and code for reading a signal from a sensor connected via the socket.
Circuit Setup
- Connect Pin 1 of the socket to the sensor's signal output.
- Connect Pin 2 to the Arduino's 5V pin.
- Connect Pin 3 to the Arduino's GND pin.
Arduino Code
// Example code for reading a signal from a sensor connected via a 3 Contact Female Socket

const int sensorPin = A0; // Pin A0 is connected to the sensor's signal output
int sensorValue = 0;      // Variable to store the sensor reading

void setup() {
  Serial.begin(9600); // Initialize serial communication at 9600 baud
  pinMode(sensorPin, INPUT); // Set the sensor pin as an input
}

void loop() {
  sensorValue = analogRead(sensorPin); // Read the sensor value
  Serial.print("Sensor Value: ");      // Print the sensor value to the Serial Monitor
  Serial.println(sensorValue);
  delay(500); // Wait for 500ms before the next reading
}
Note: Ensure the sensor's output voltage is within the Arduino's input range (0-5V for most models).
Troubleshooting and FAQs
Common Issues Users Might Face
Loose Connections:
- Problem: The male plug does not fit securely into the socket.
- Solution: Check for bent or damaged pins. Replace the socket if necessary.
Intermittent Signal or Power Loss:
- Problem: The connection is unstable, causing signal or power interruptions.
- Solution: Ensure the socket is properly soldered or mounted. Clean the contacts to remove dirt or oxidation.
Overheating:
- Problem: The socket becomes hot during operation.
- Solution: Verify that the current does not exceed the socket's rating. Use a higher-rated socket if needed.
Incorrect Pin Connections:
- Problem: The circuit does not function as expected.
- Solution: Double-check the pin assignments and wiring.
FAQs
Q: Can this socket handle high-frequency signals?
- A: Yes, but performance depends on the contact material and design. For high-frequency applications, use sockets with gold-plated contacts to minimize signal loss.
Q: Is this socket waterproof?
- A: Standard 3 Contact Female Sockets are not waterproof. Use a sealed or IP-rated version for outdoor or moisture-prone environments.
Q: Can I use this socket for AC power connections?
- A: Yes, as long as the voltage and current ratings are within the specified limits.
Q: How do I clean the socket contacts?
- A: Use a soft brush or contact cleaner to remove dirt or oxidation. Avoid abrasive materials that could damage the contacts.
By following this documentation, users can effectively integrate the 3 Contact Female Socket into their projects and troubleshoot common issues with ease.